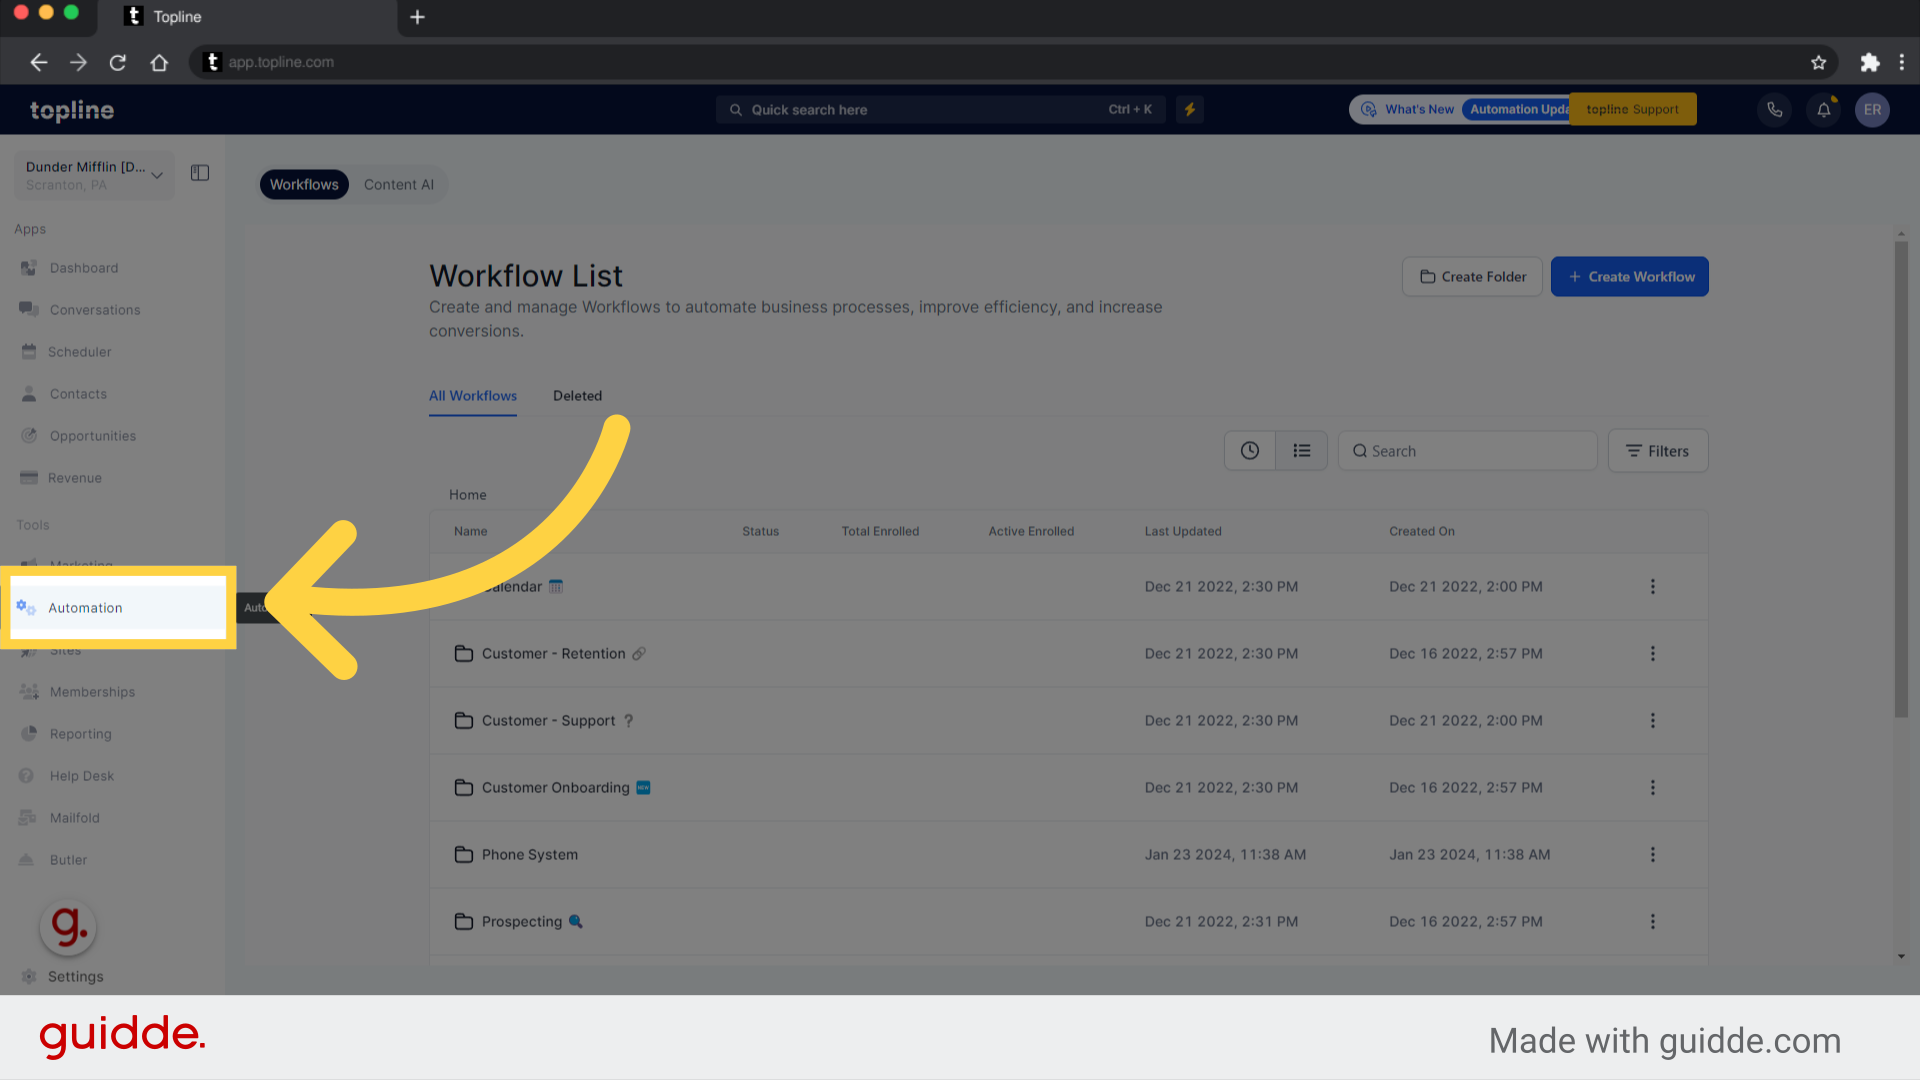
Access to the automation feature on the left side menu.
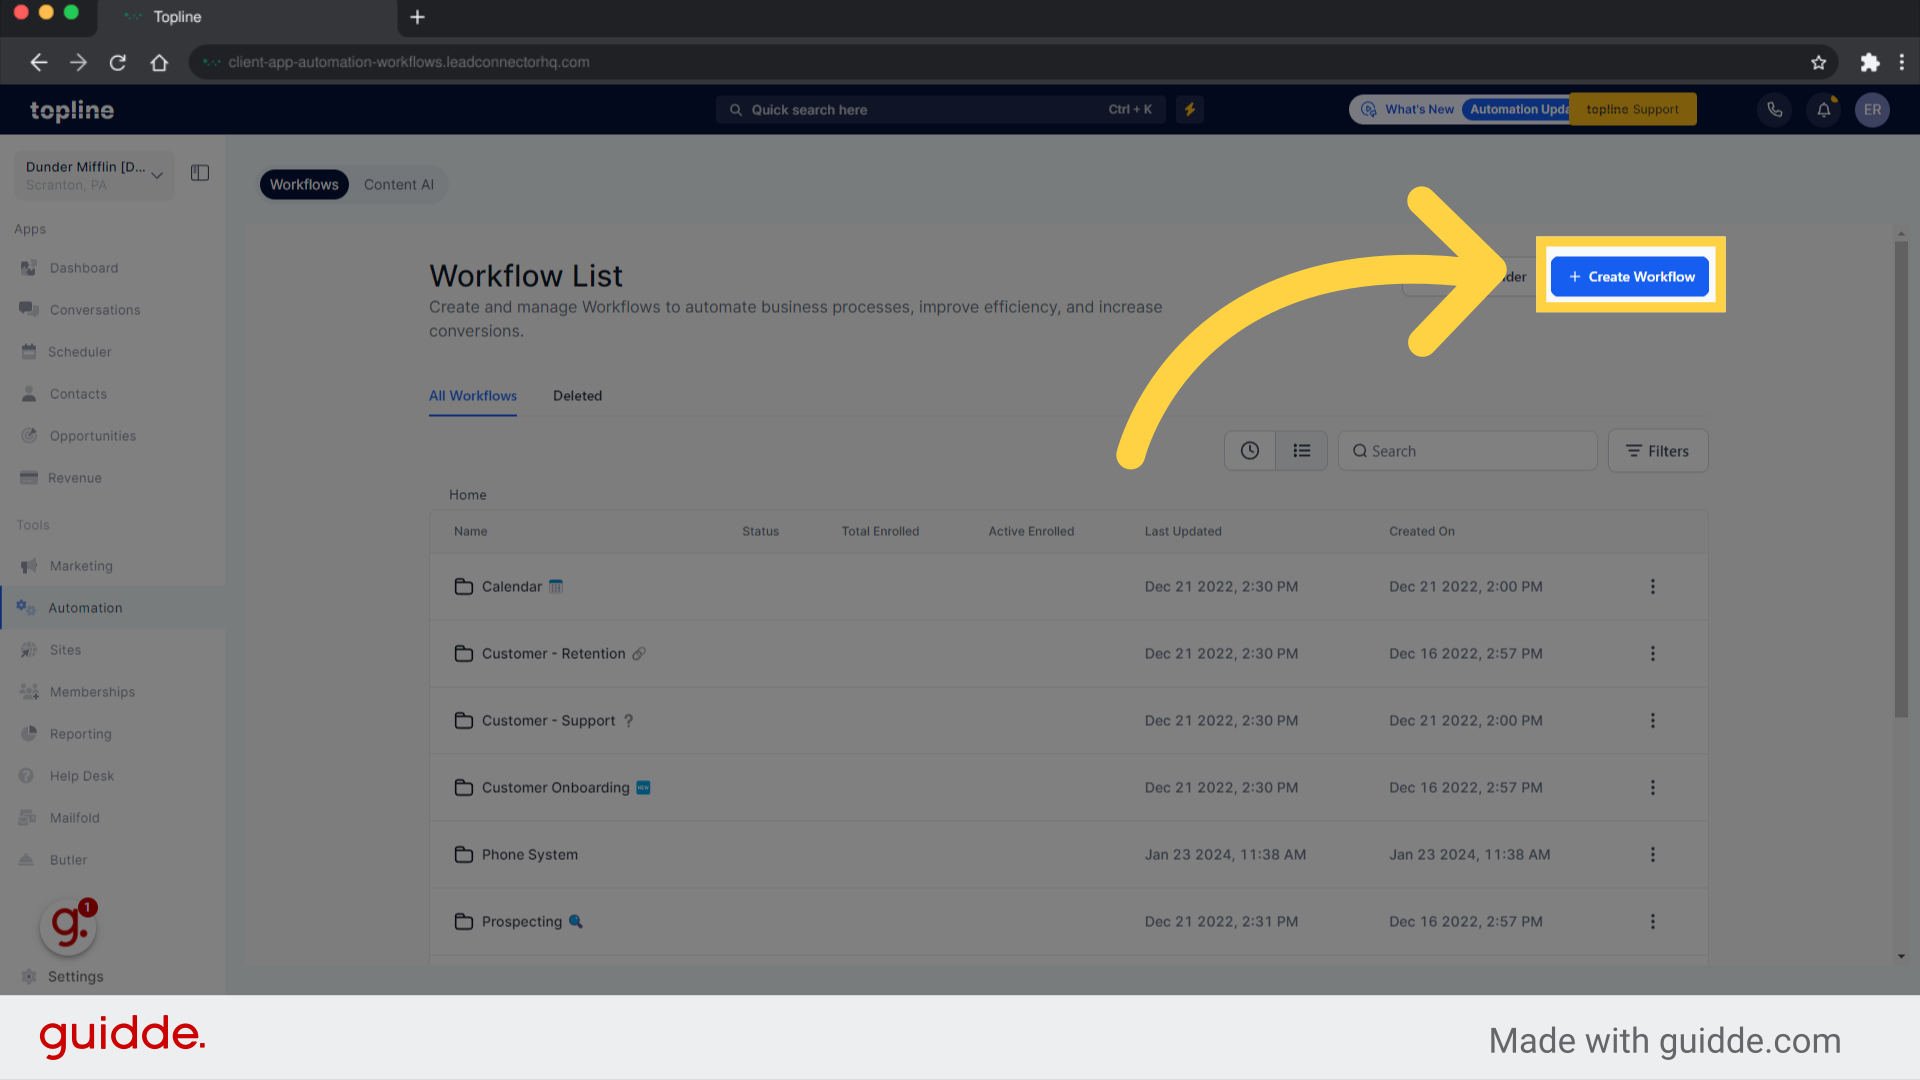
To create a workflow, click the + Create Workflow button in the upper left side of the screen. A Workflow allows users to manually trigger a specific step or task within the workflow. This can be beneficial in situations where human intervention or decision-making is required, ensuring that the workflow progresses smoothly and accurately.
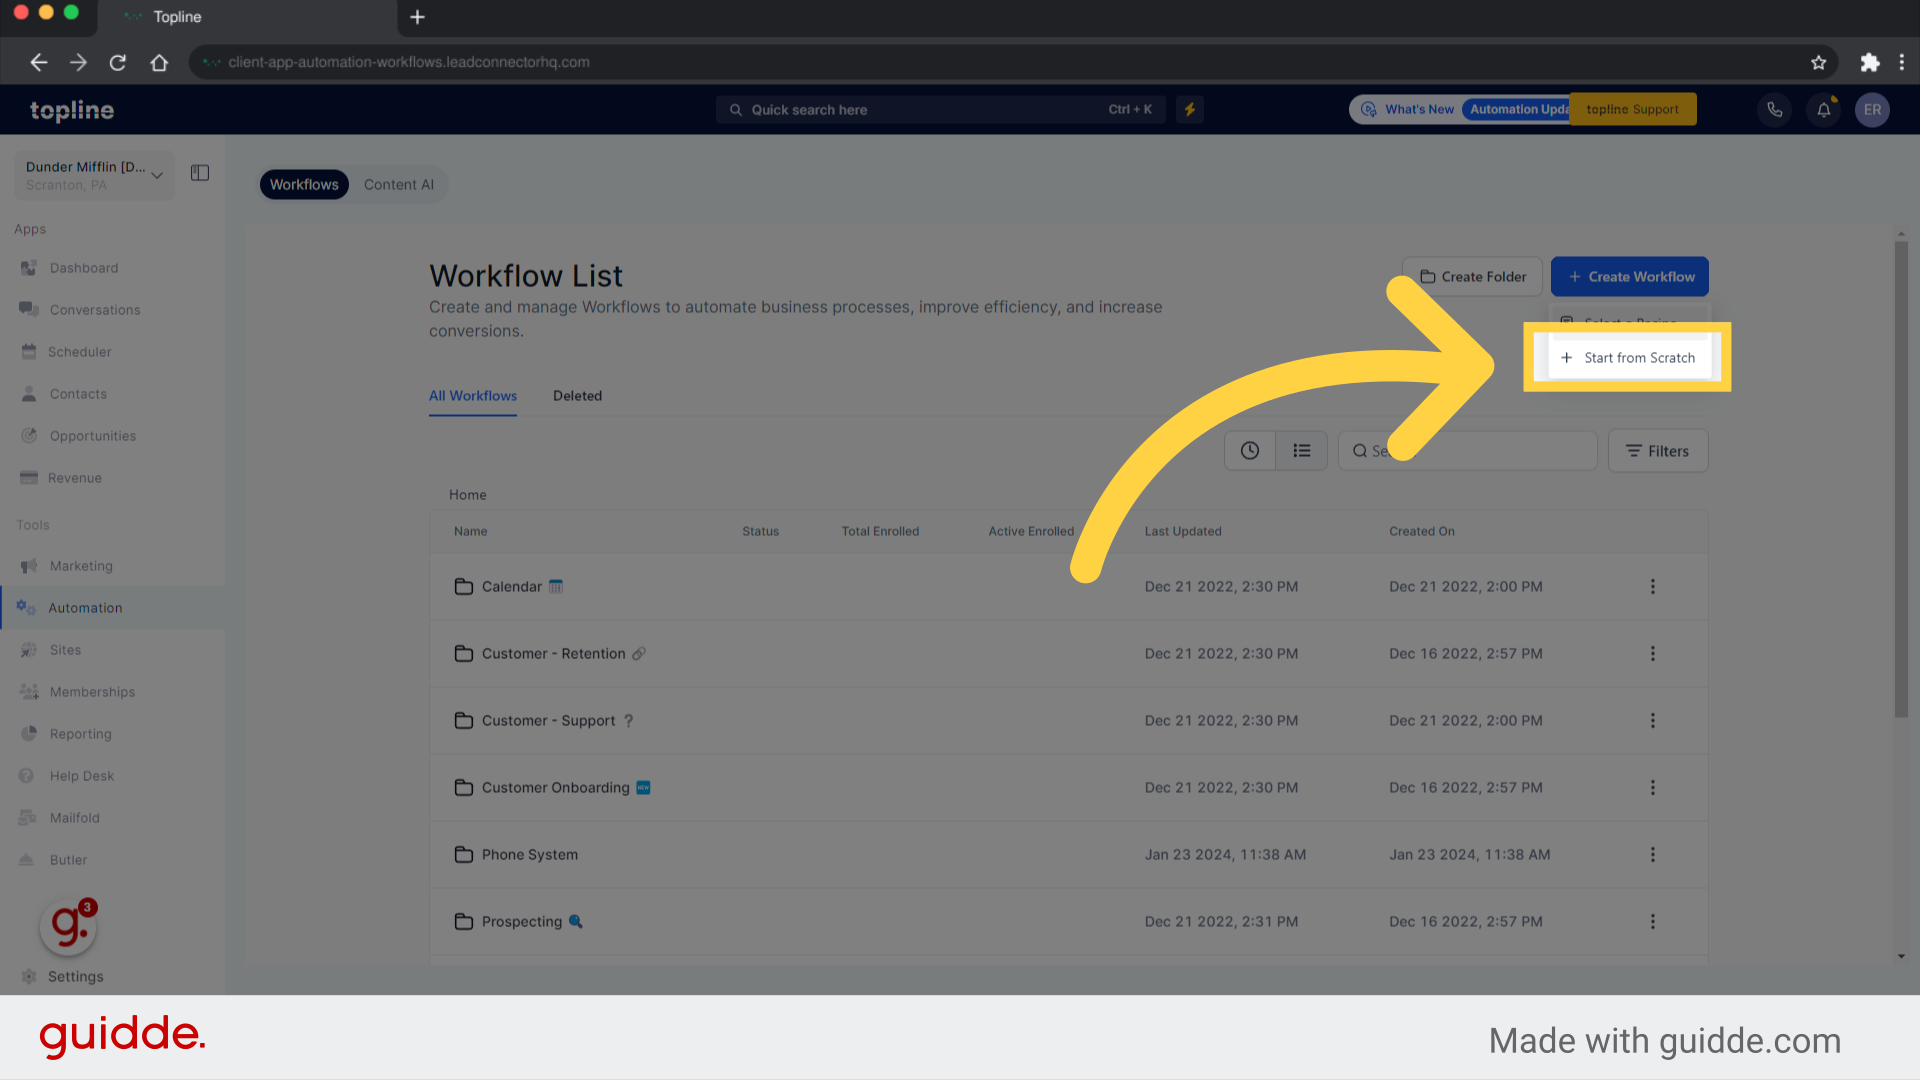
Click on the drop-down menu to select start from scratch.
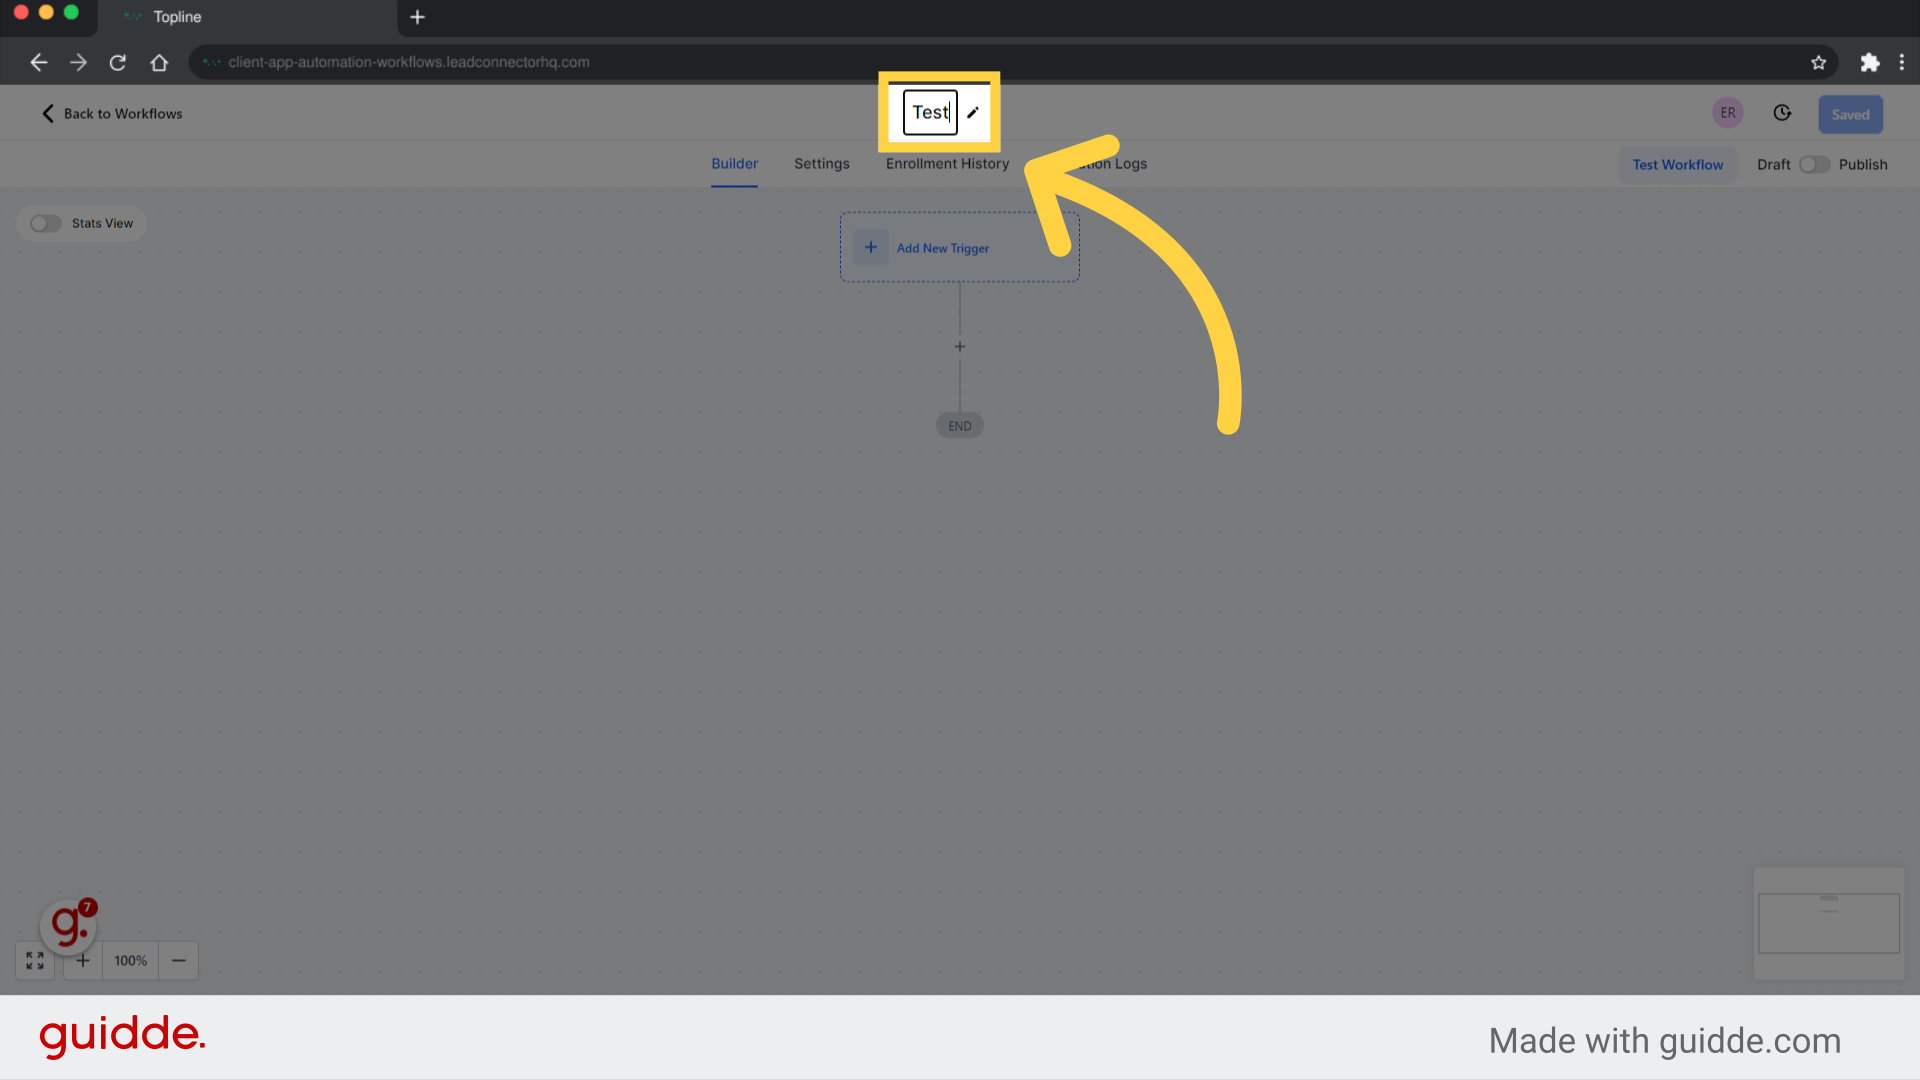
To make it easier to remember, you should replace the workflow name with the name of the action you specified.
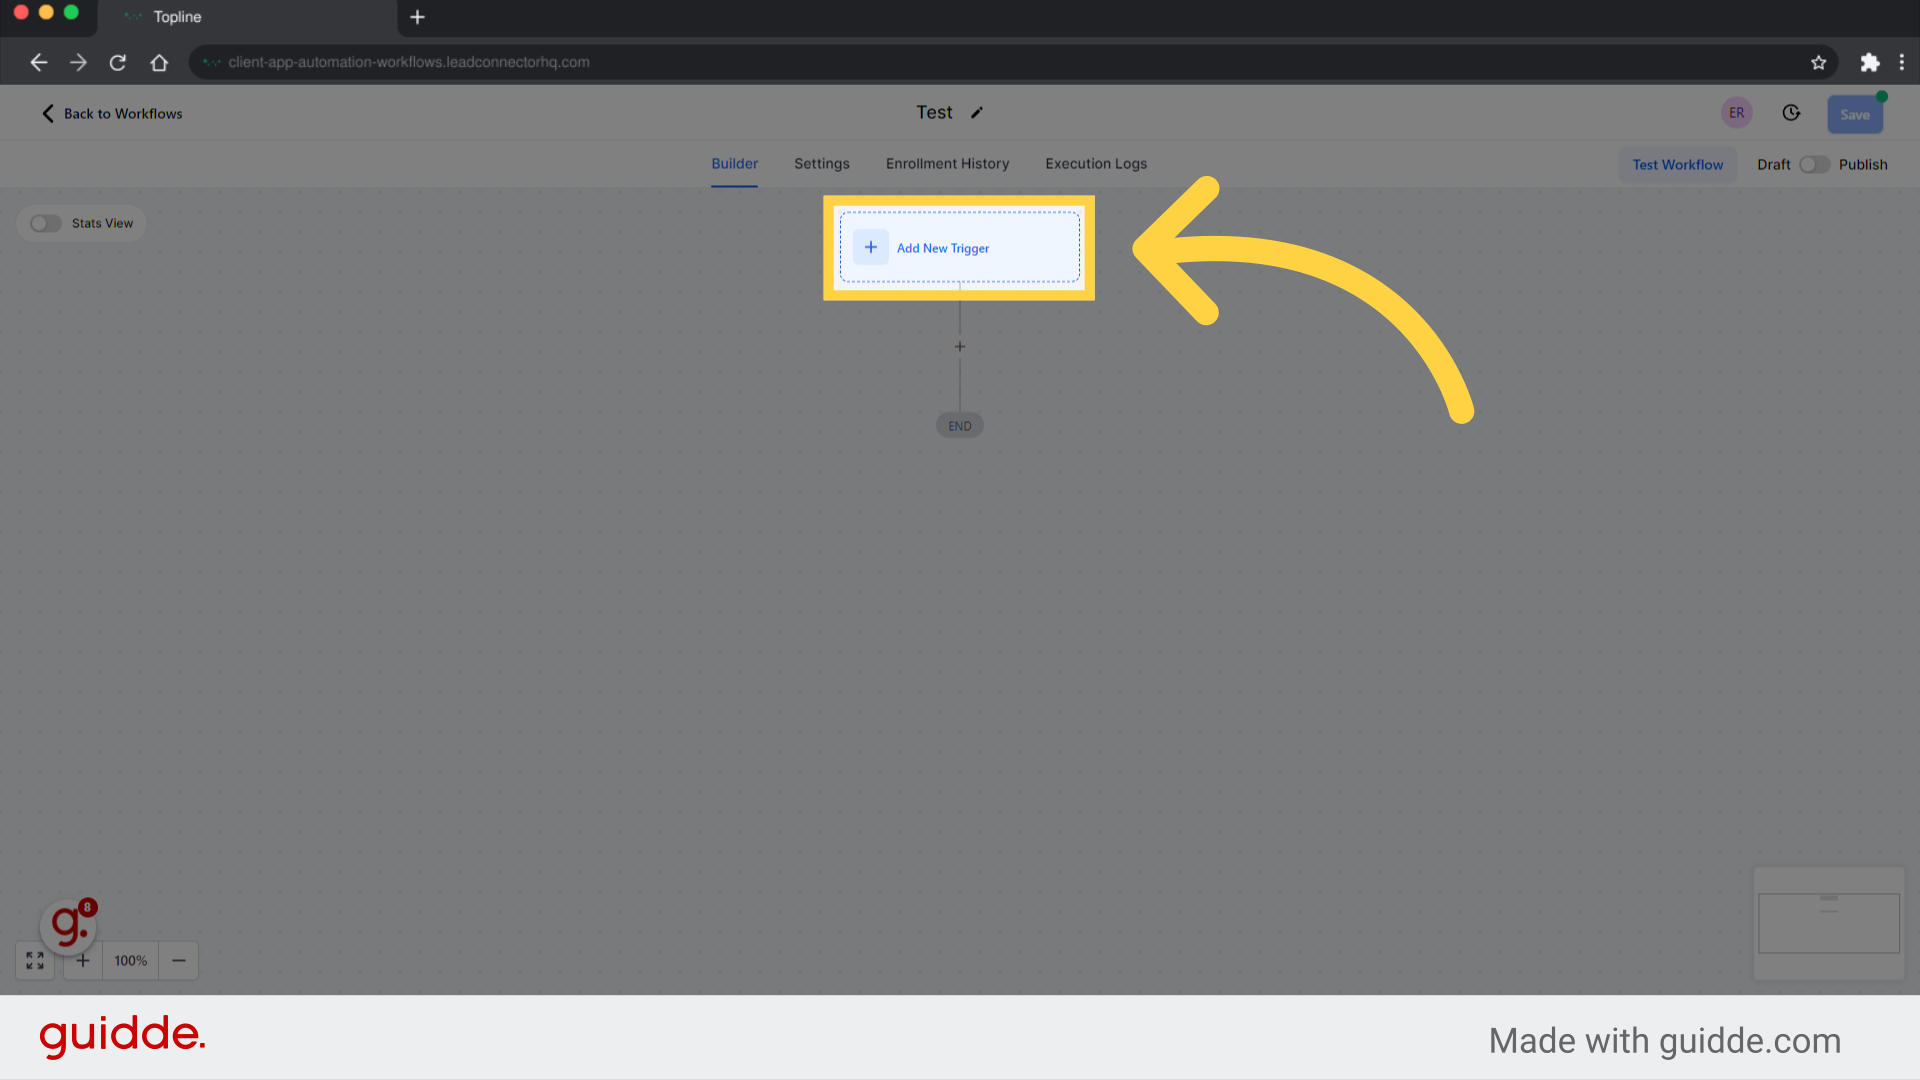
By choosing this option, a new trigger will be added to the workflow.
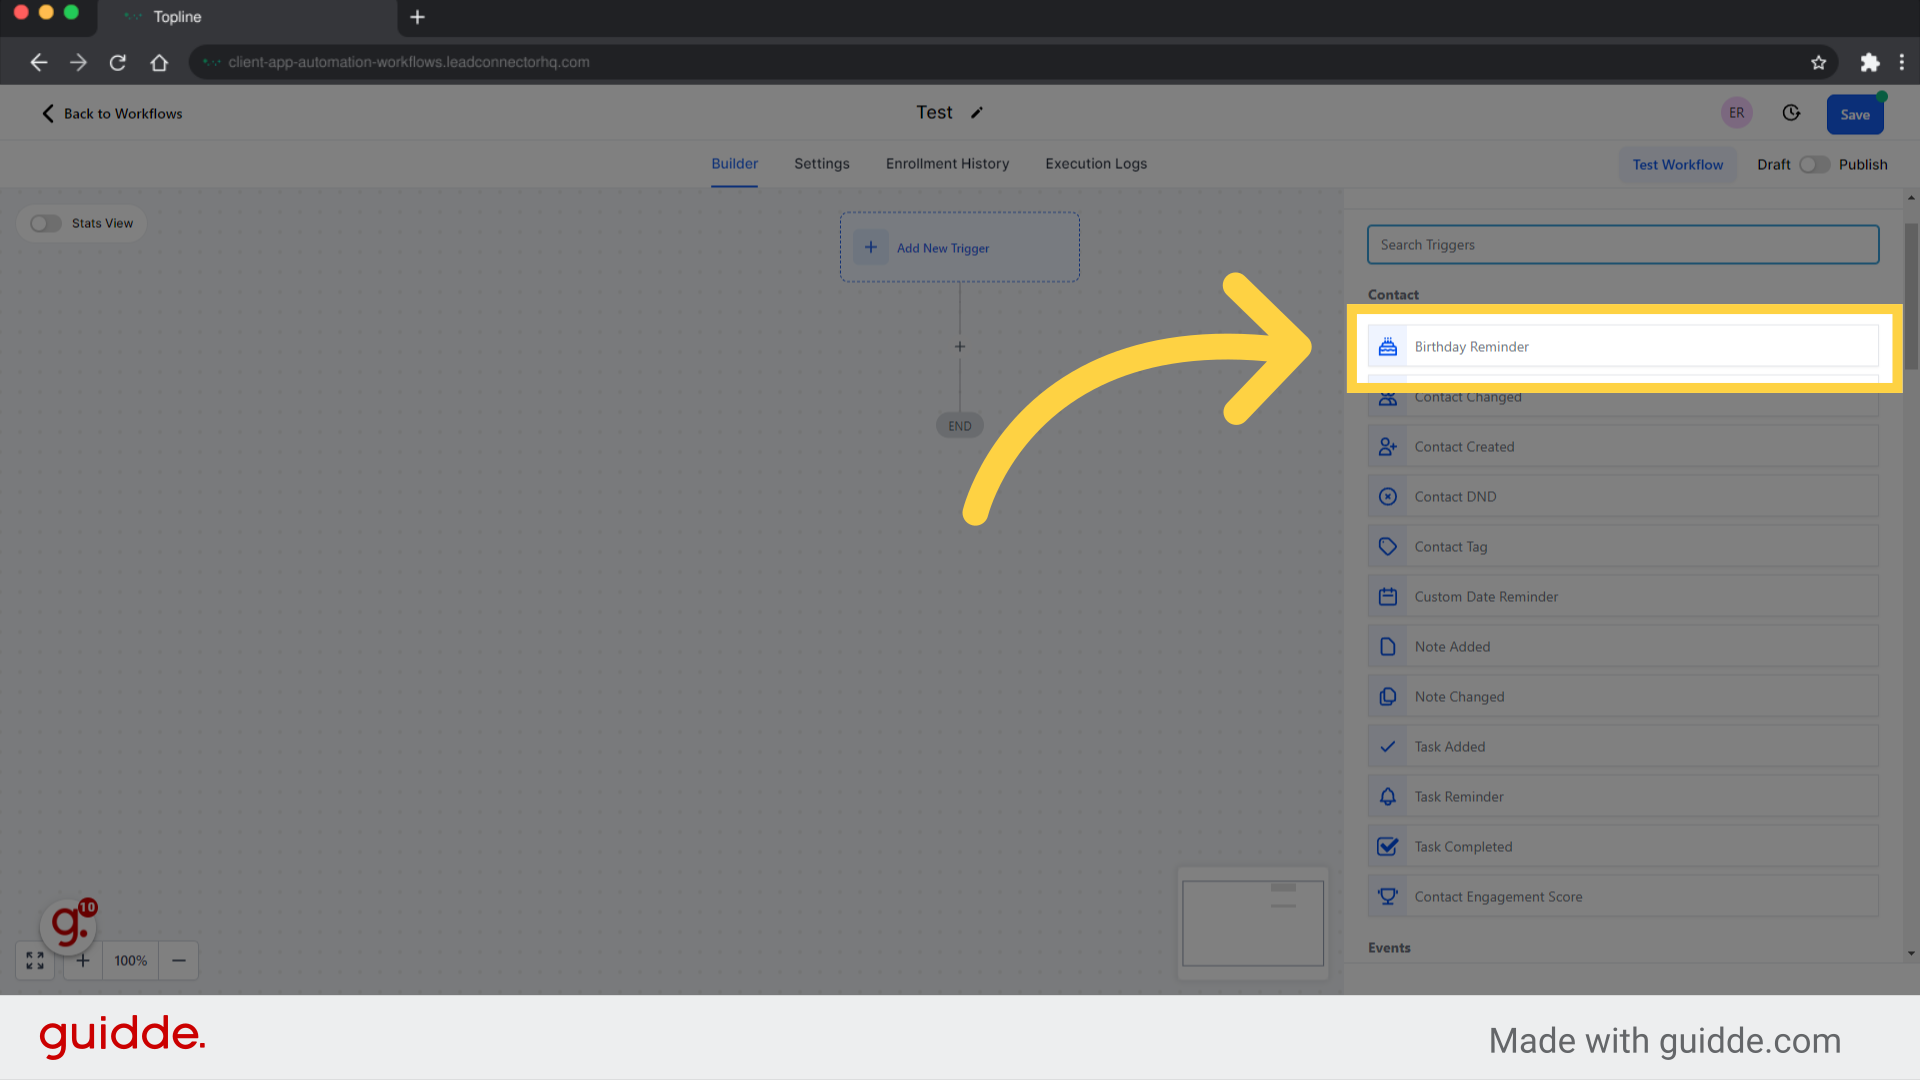
You can find the trigger or the events that will add a new contact to your workflow by searching on the search bar.
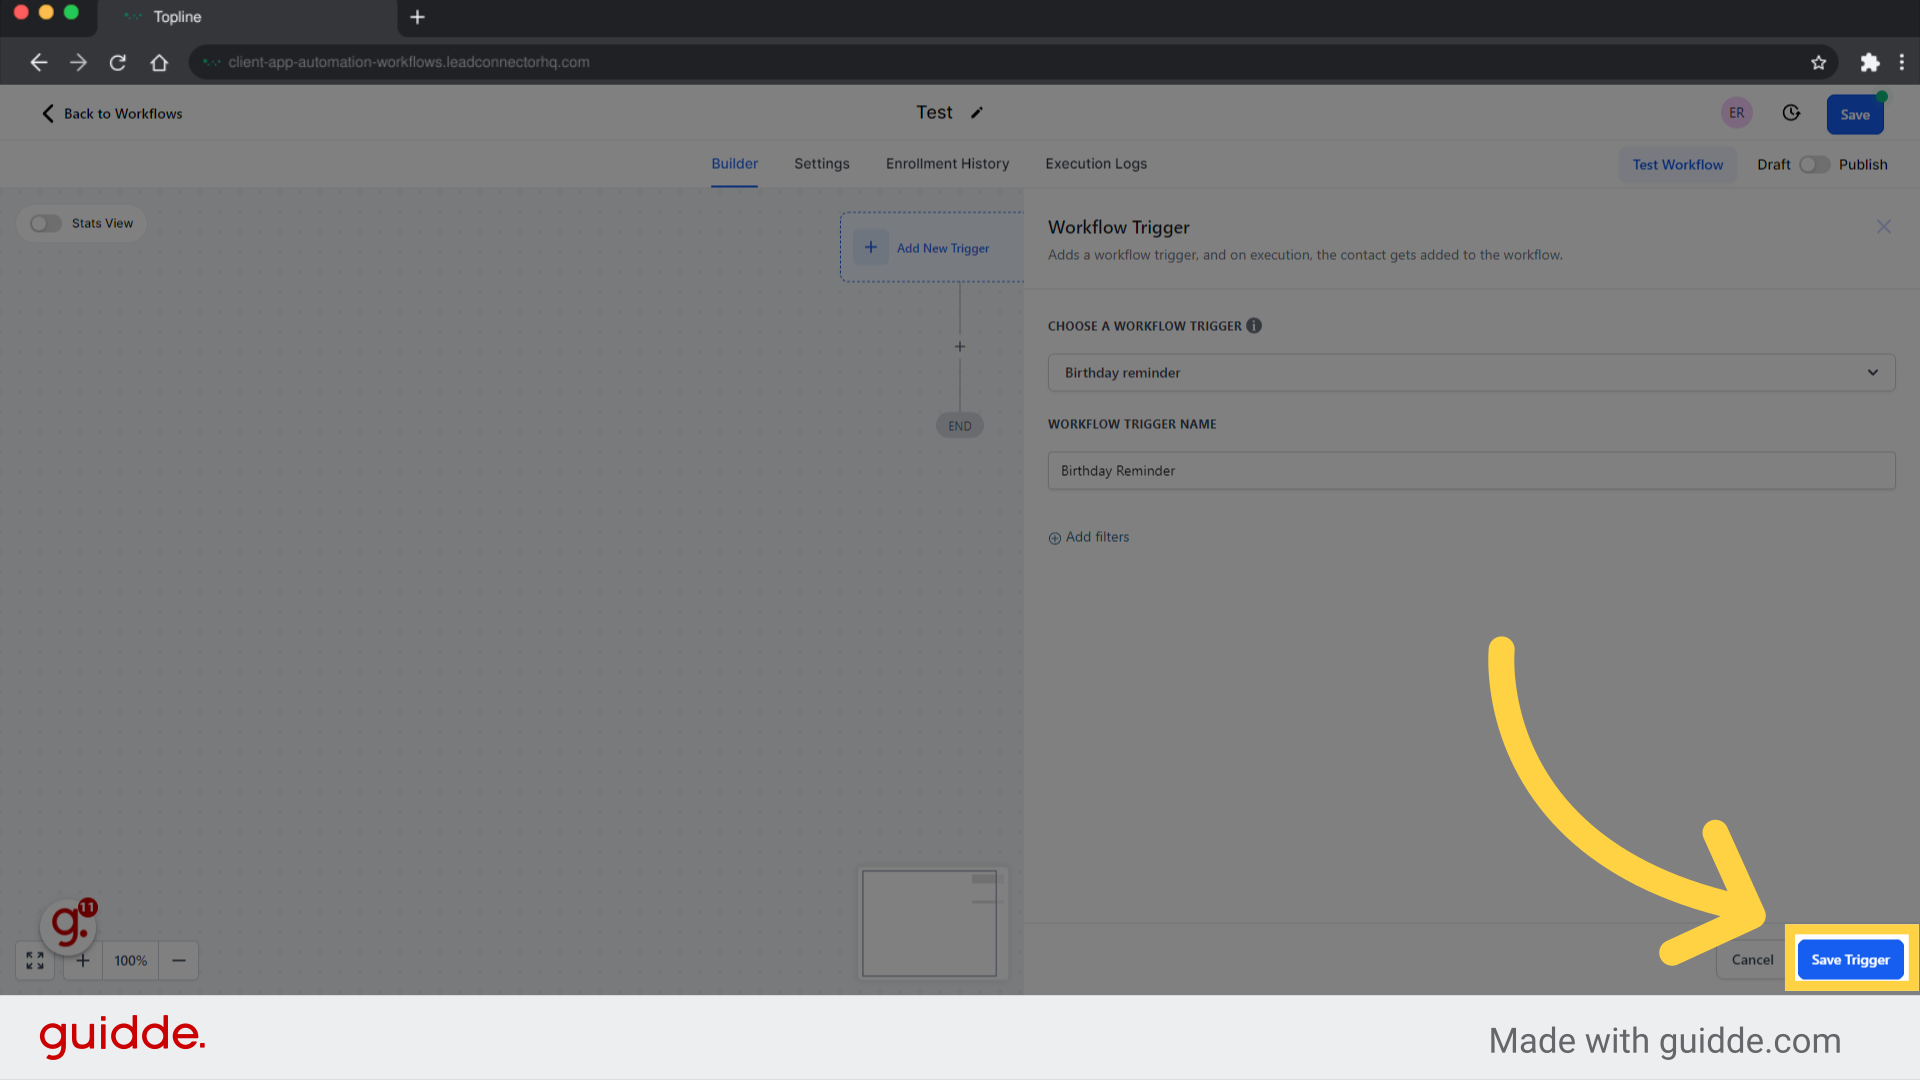
You can proceed to the next step by clicking the save trigger button.
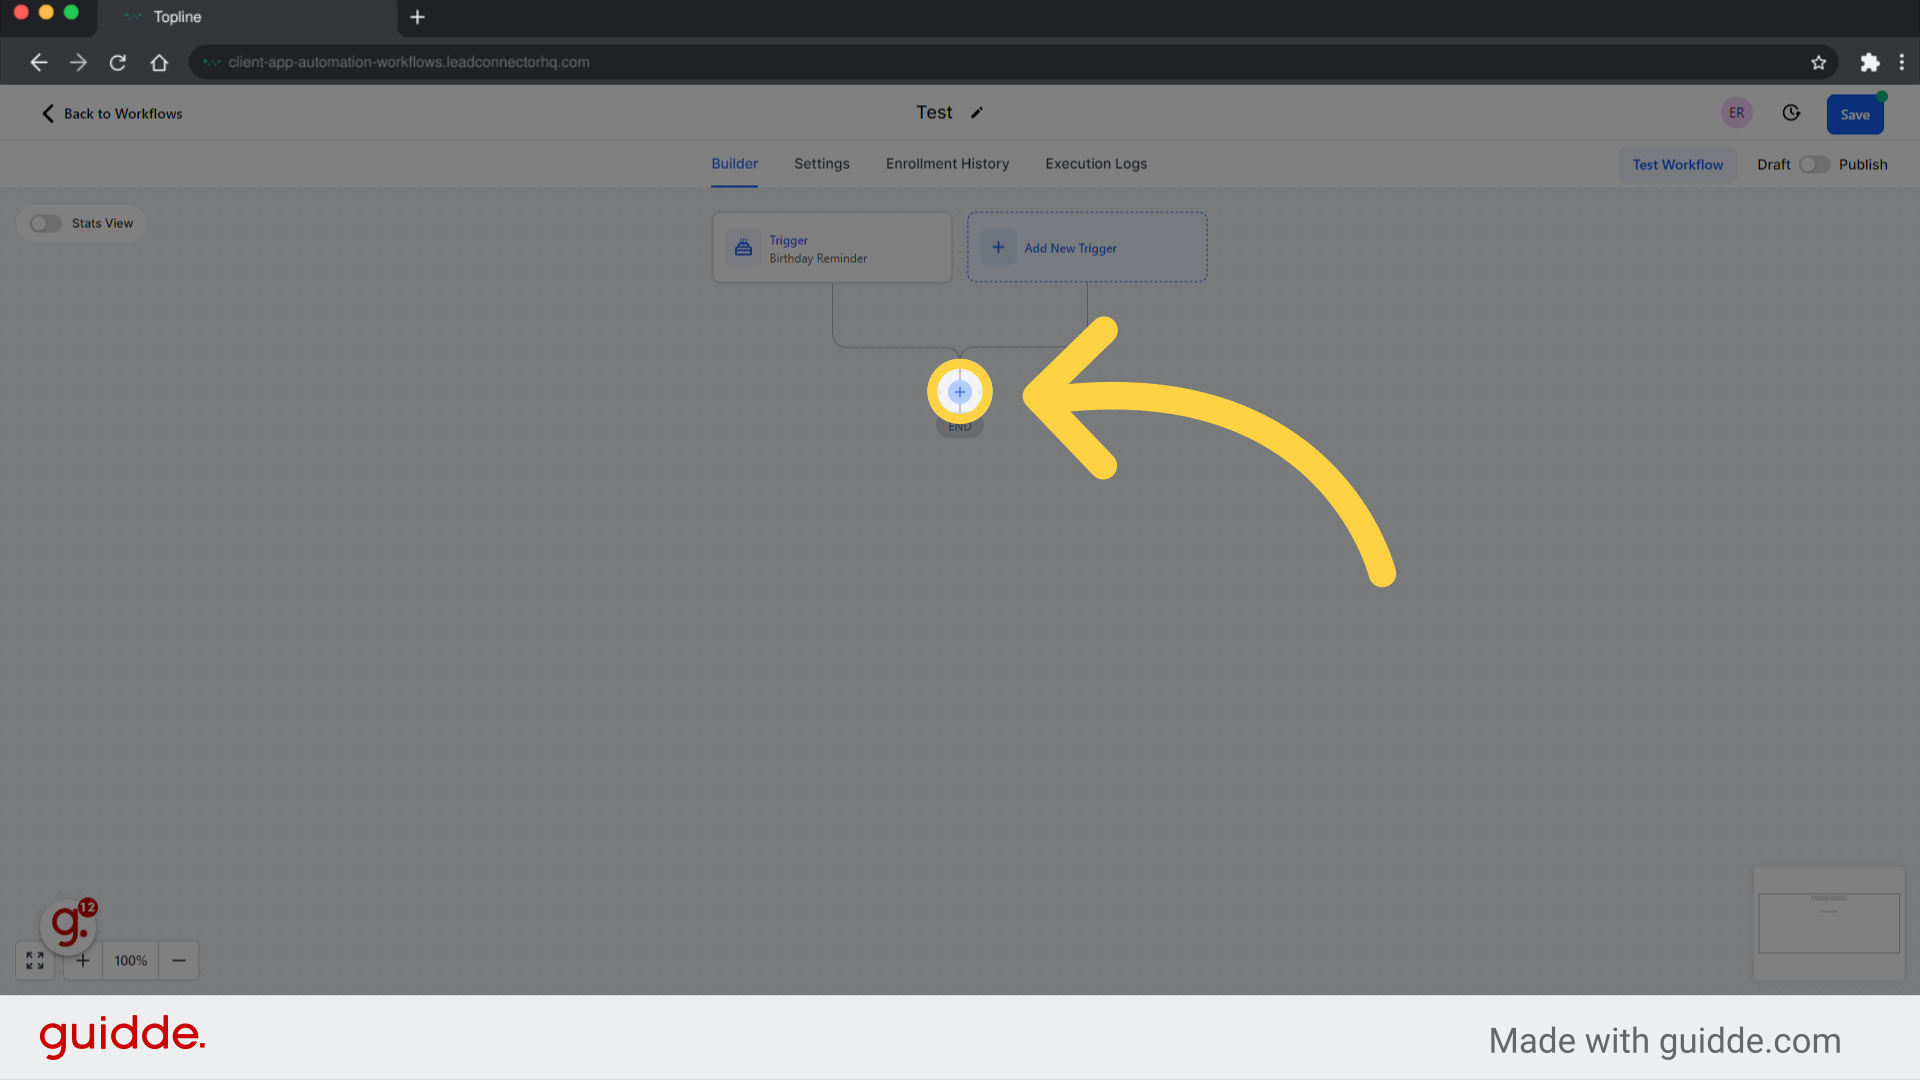
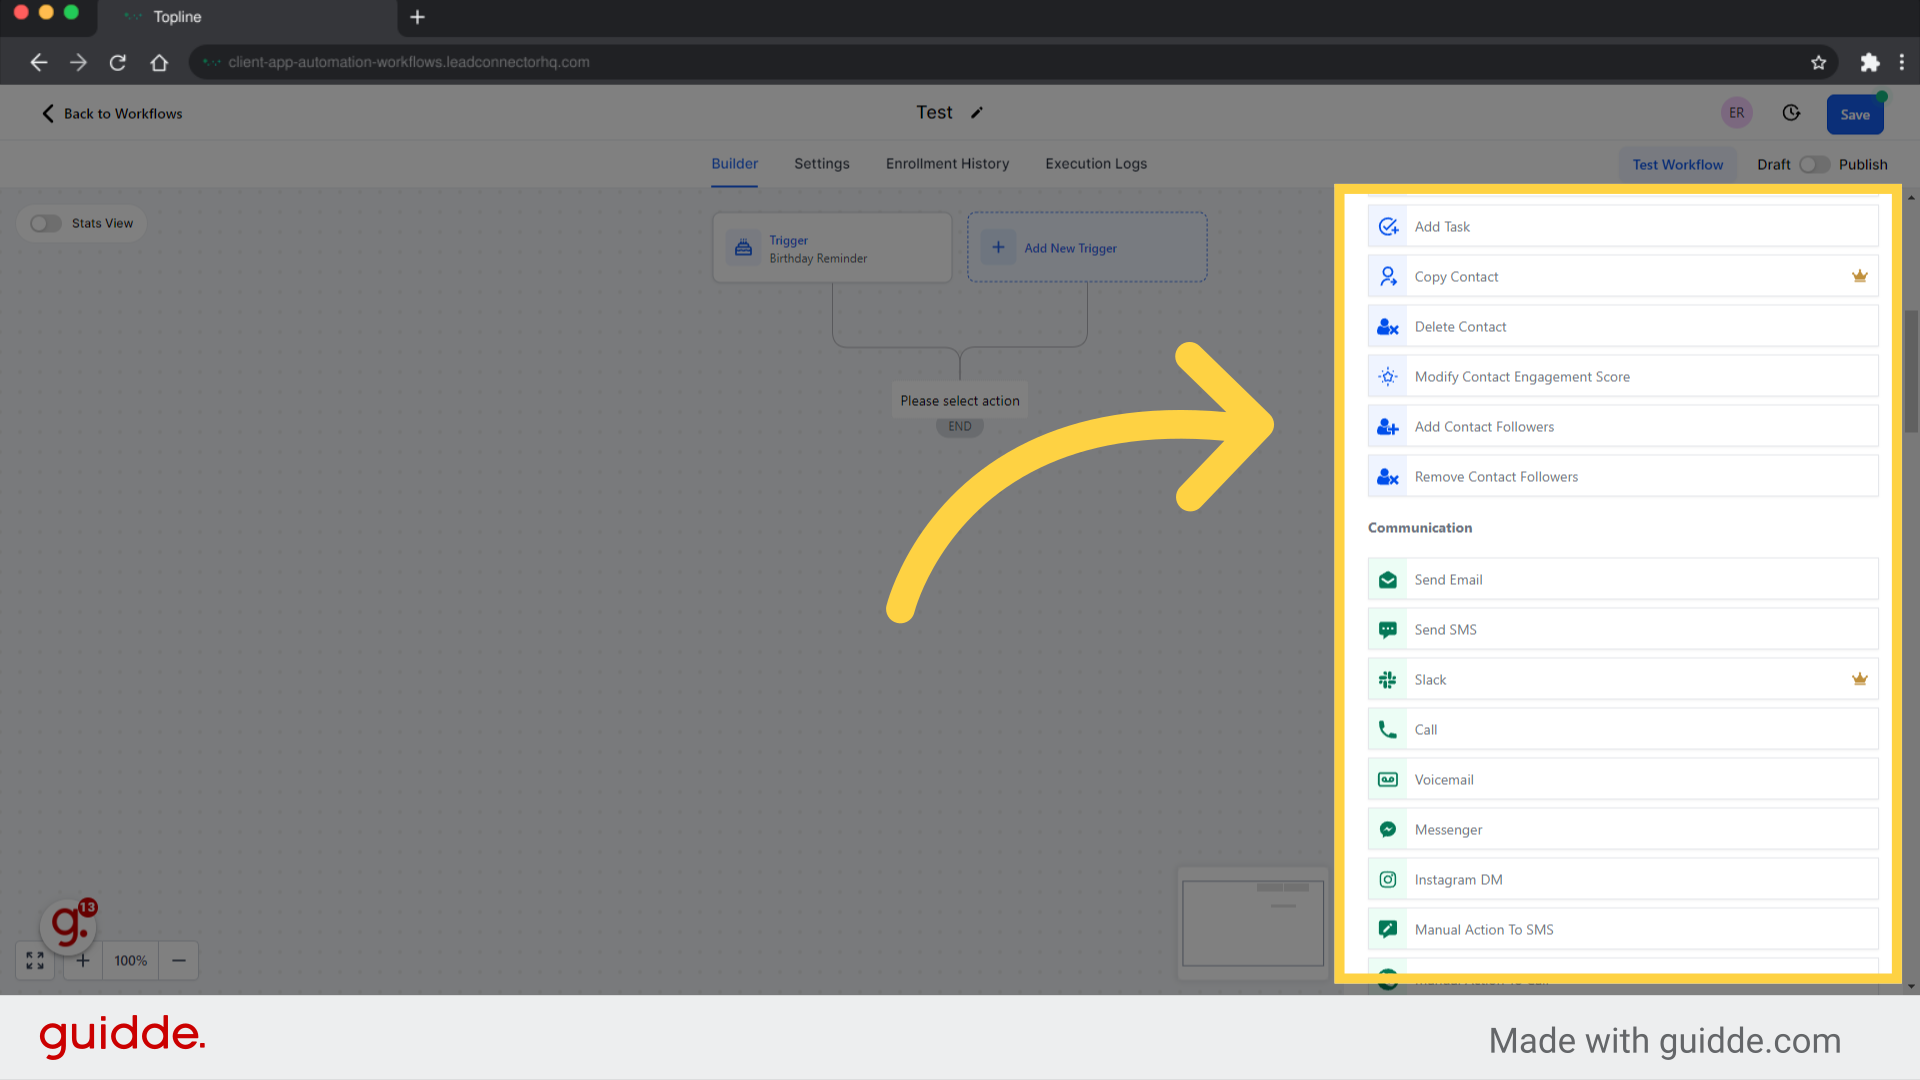
A new action can be added by clicking on the + icon.
Check out the available actions and choose the ones you want to perform.
In this action, we selected email as our workflow action, and this page will allow you to edit and send an email to the specified contact.
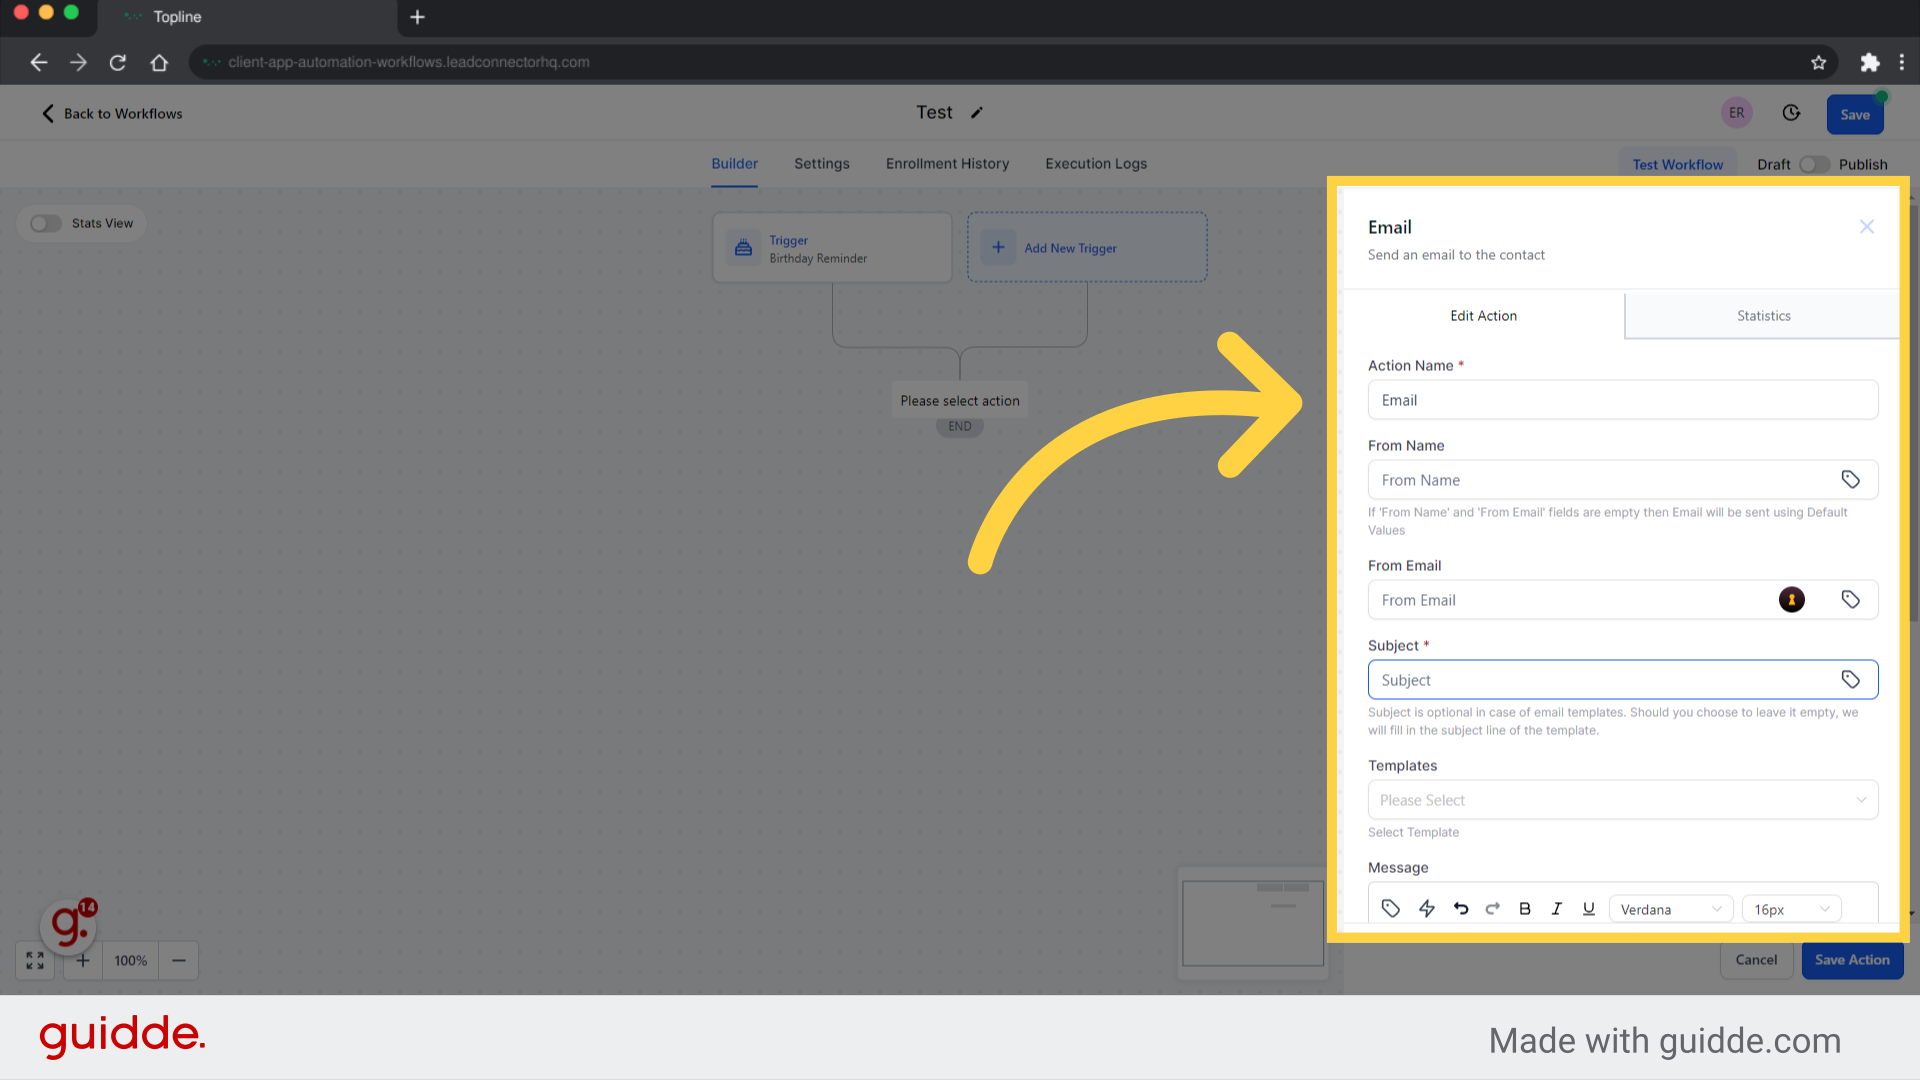
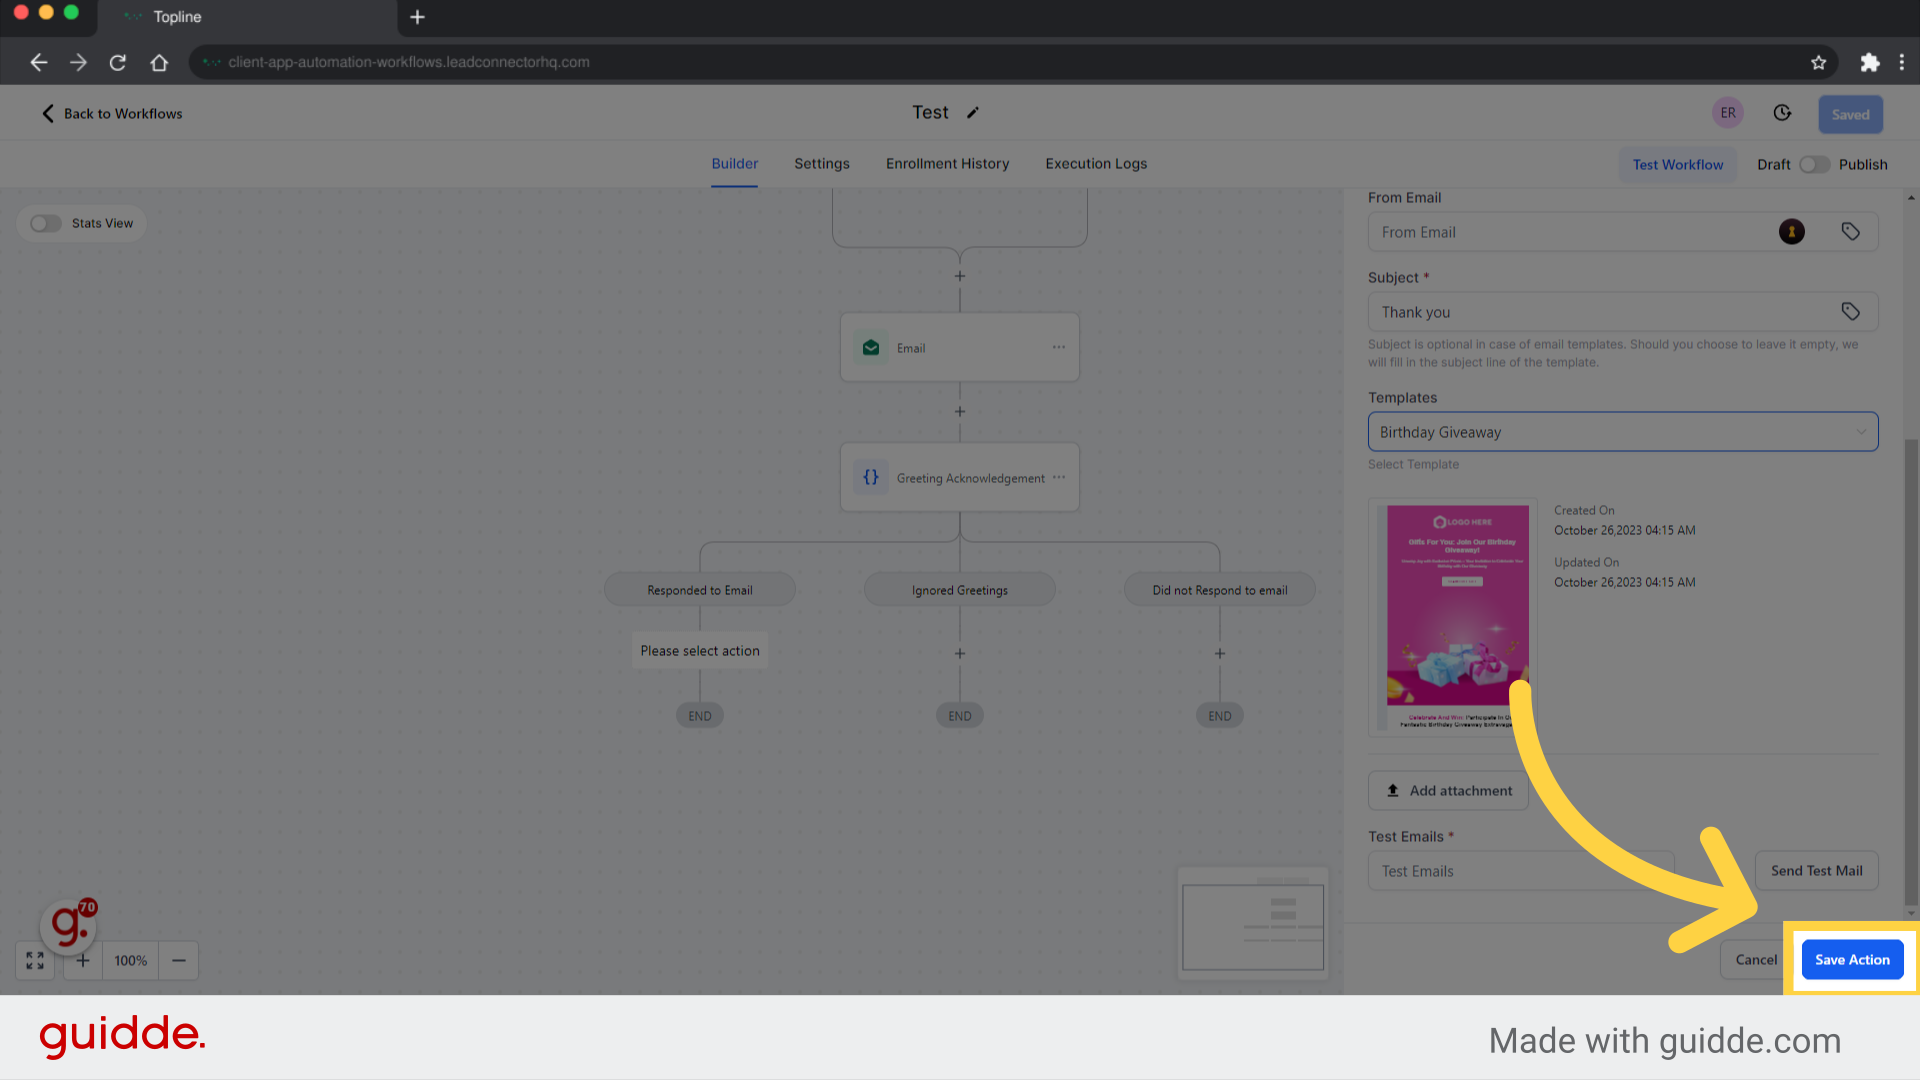
The template can be used to complete the task quickly, or you can personalize and build your email according to your contacts' preferences.

Click on the save action button to proceed to the next step.
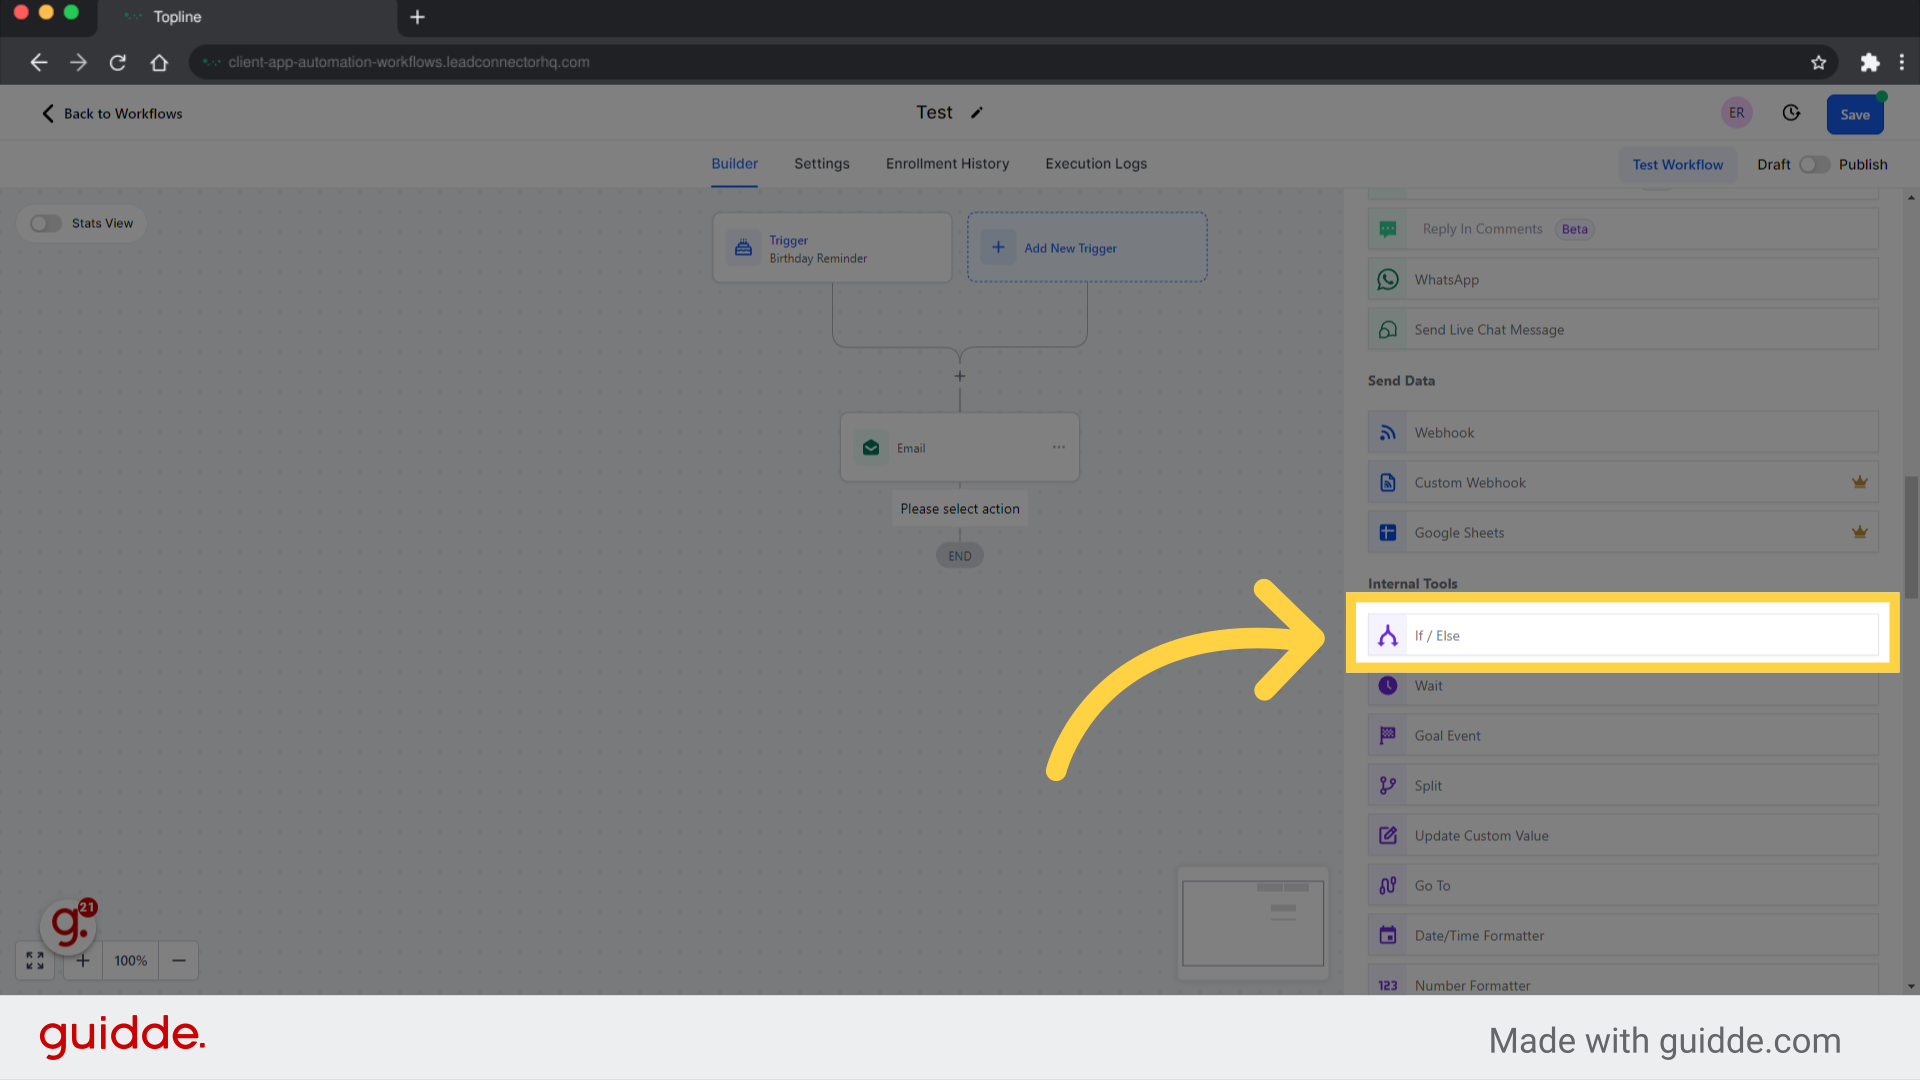
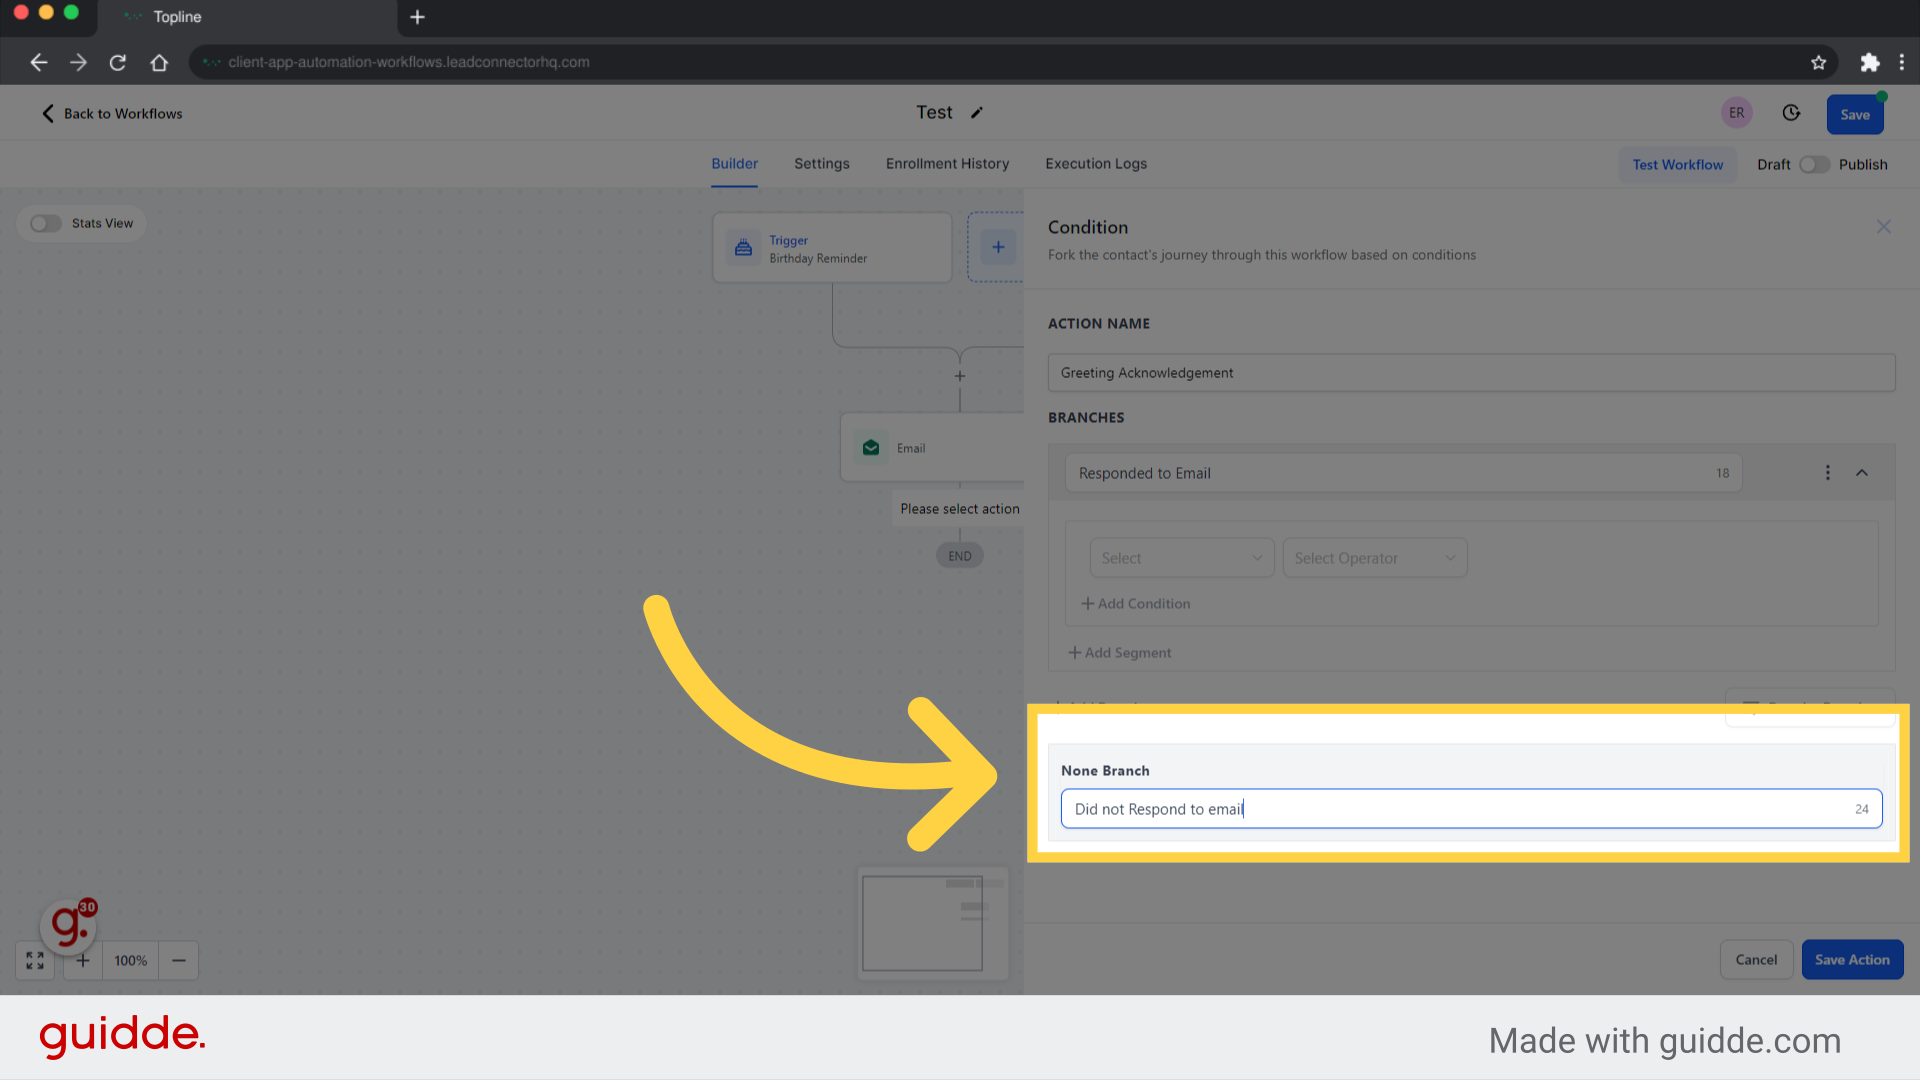
In order to add conditions and branches to your workflow, click on Please select action.

Scroll down and click If/Else action under internal tools, you can add to tailor subsequent actions based on the contact's engagement or characteristics.
Add a name for your action based on your preferences.
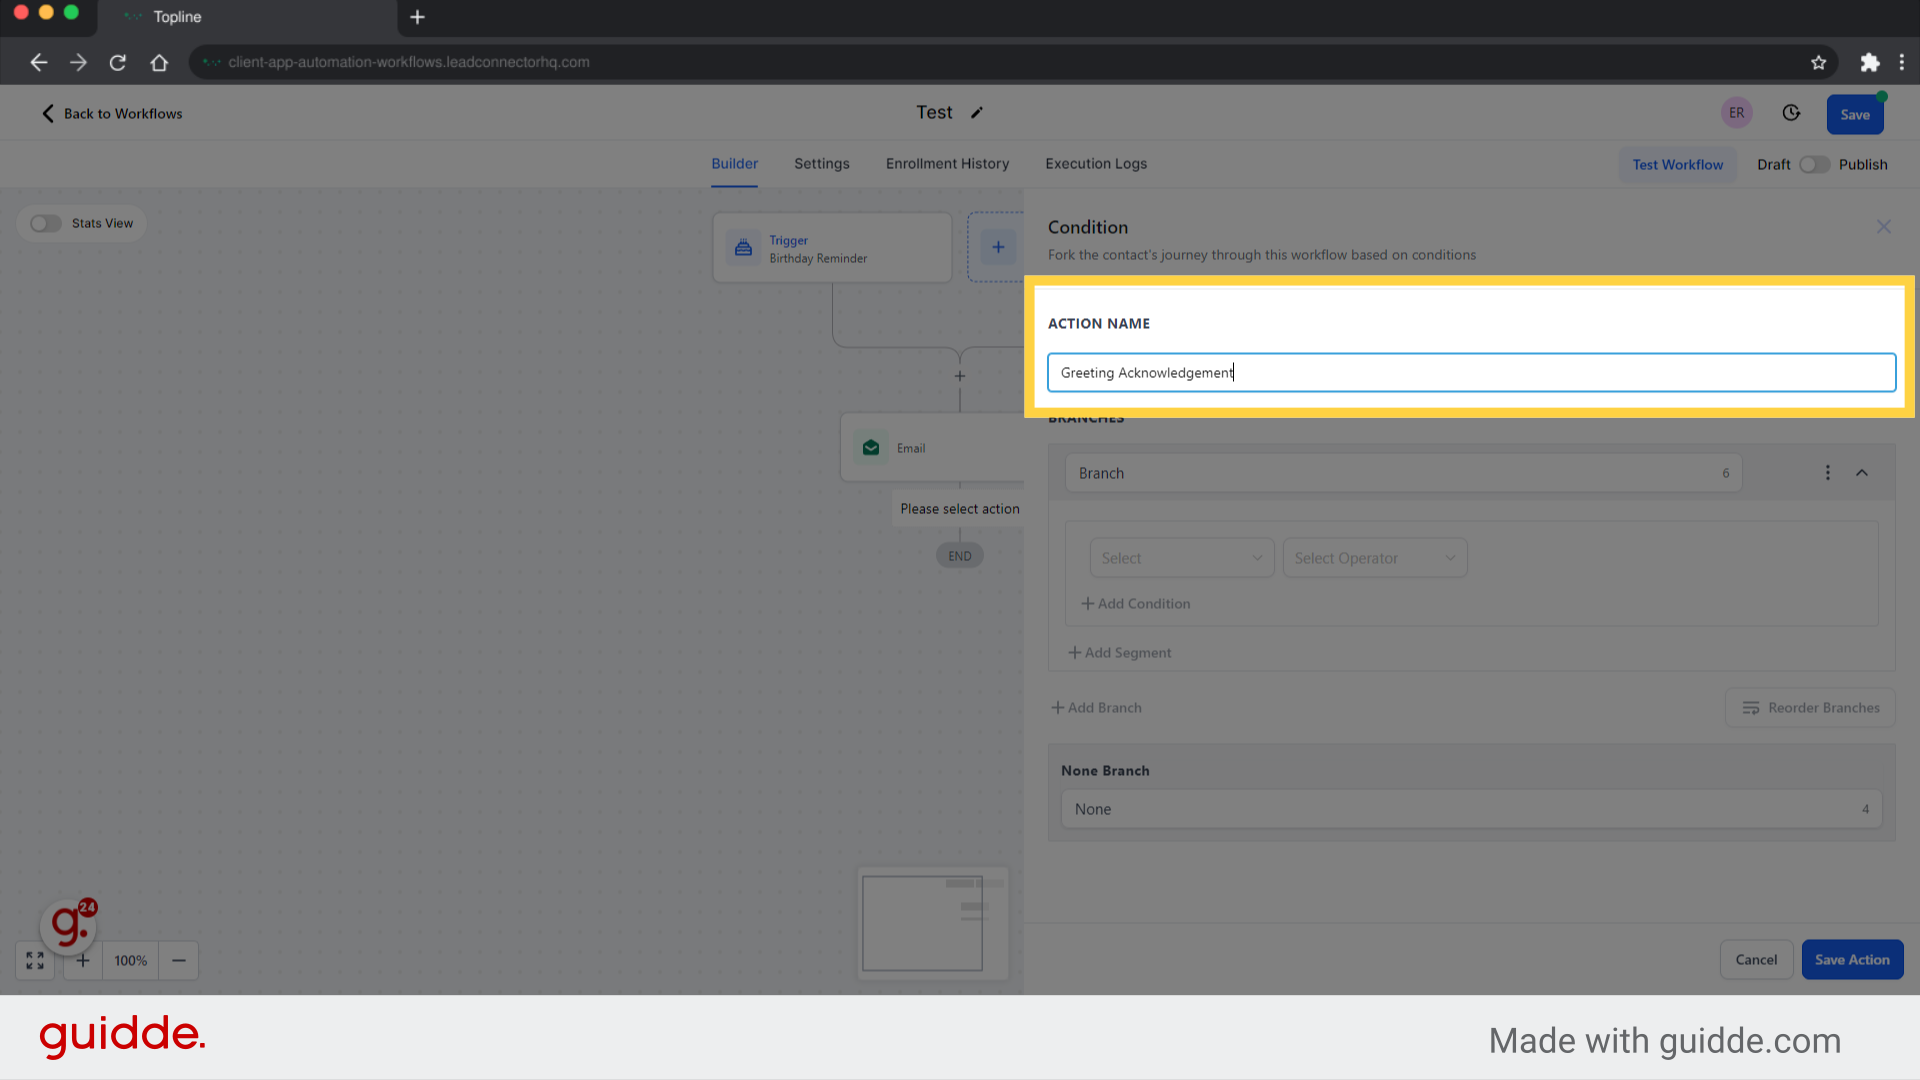
Add branches name to create a unique set of actions for a new contact.
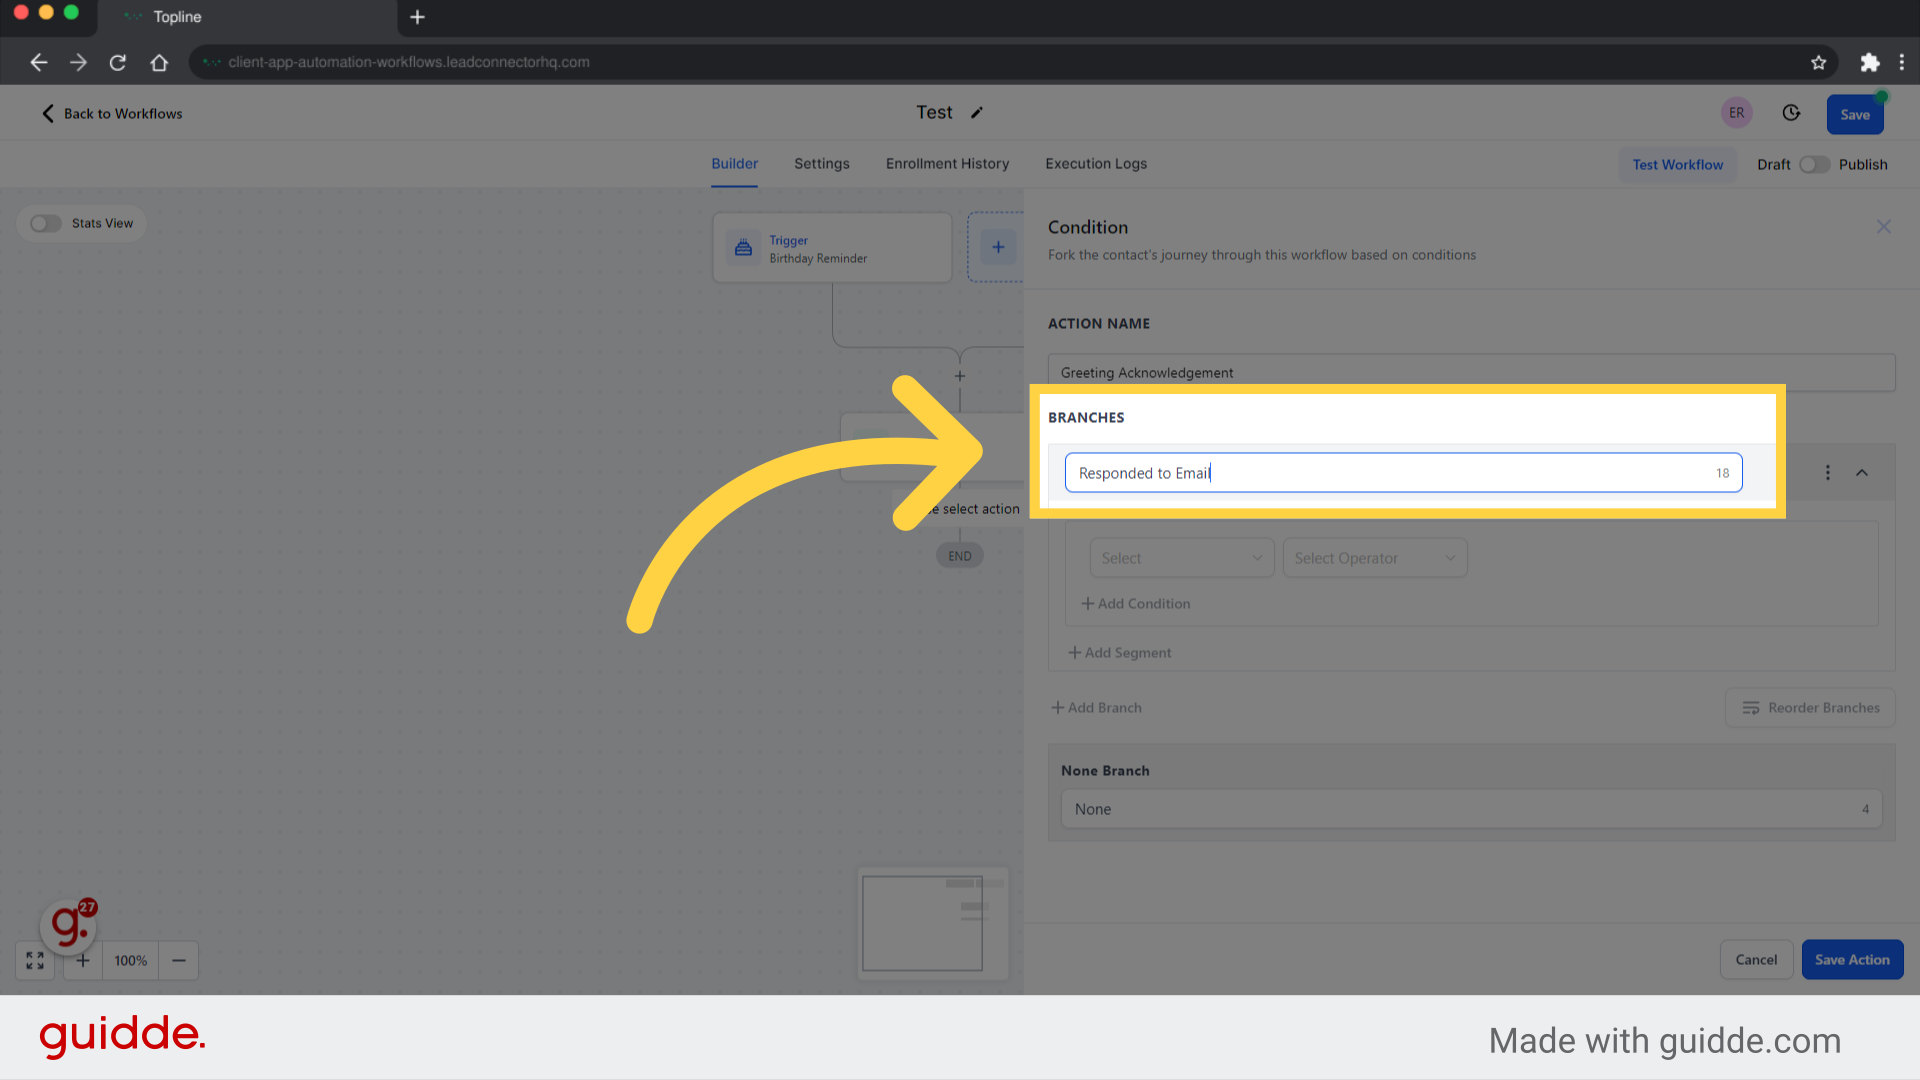
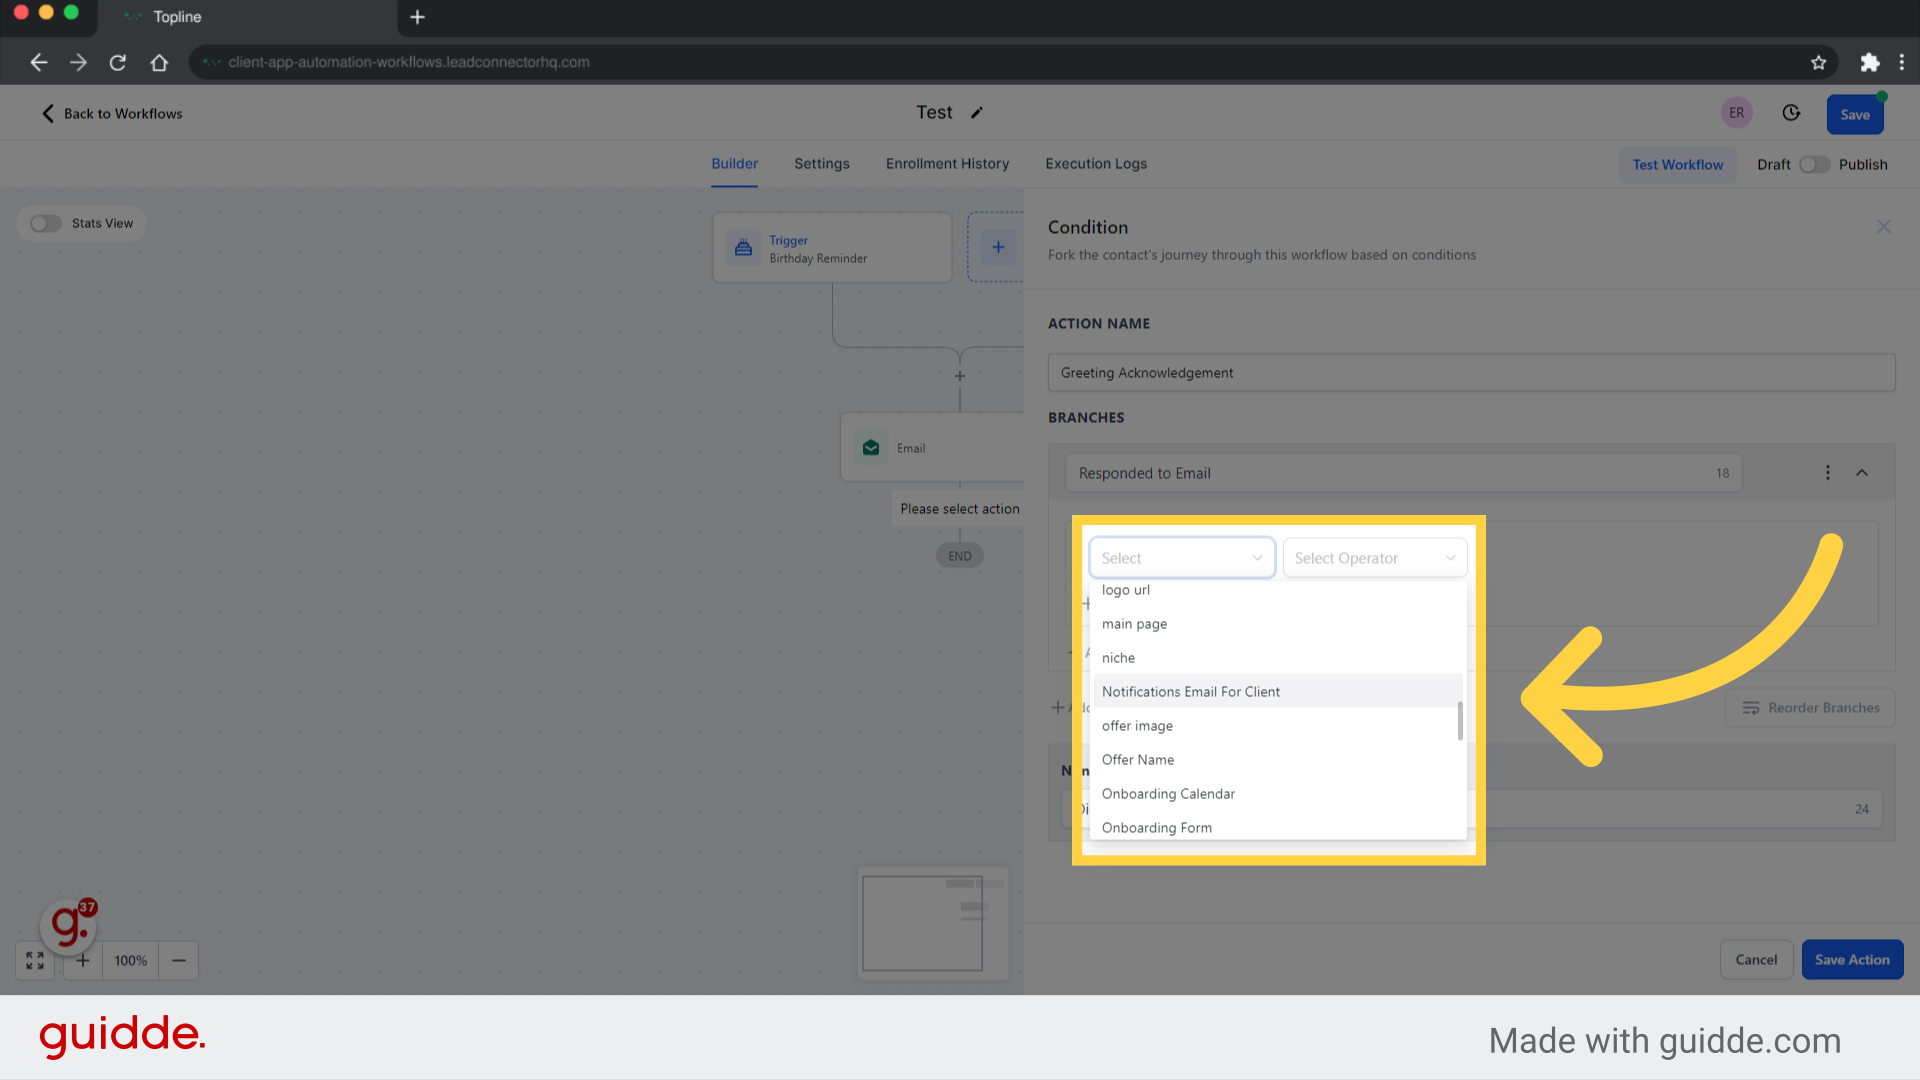
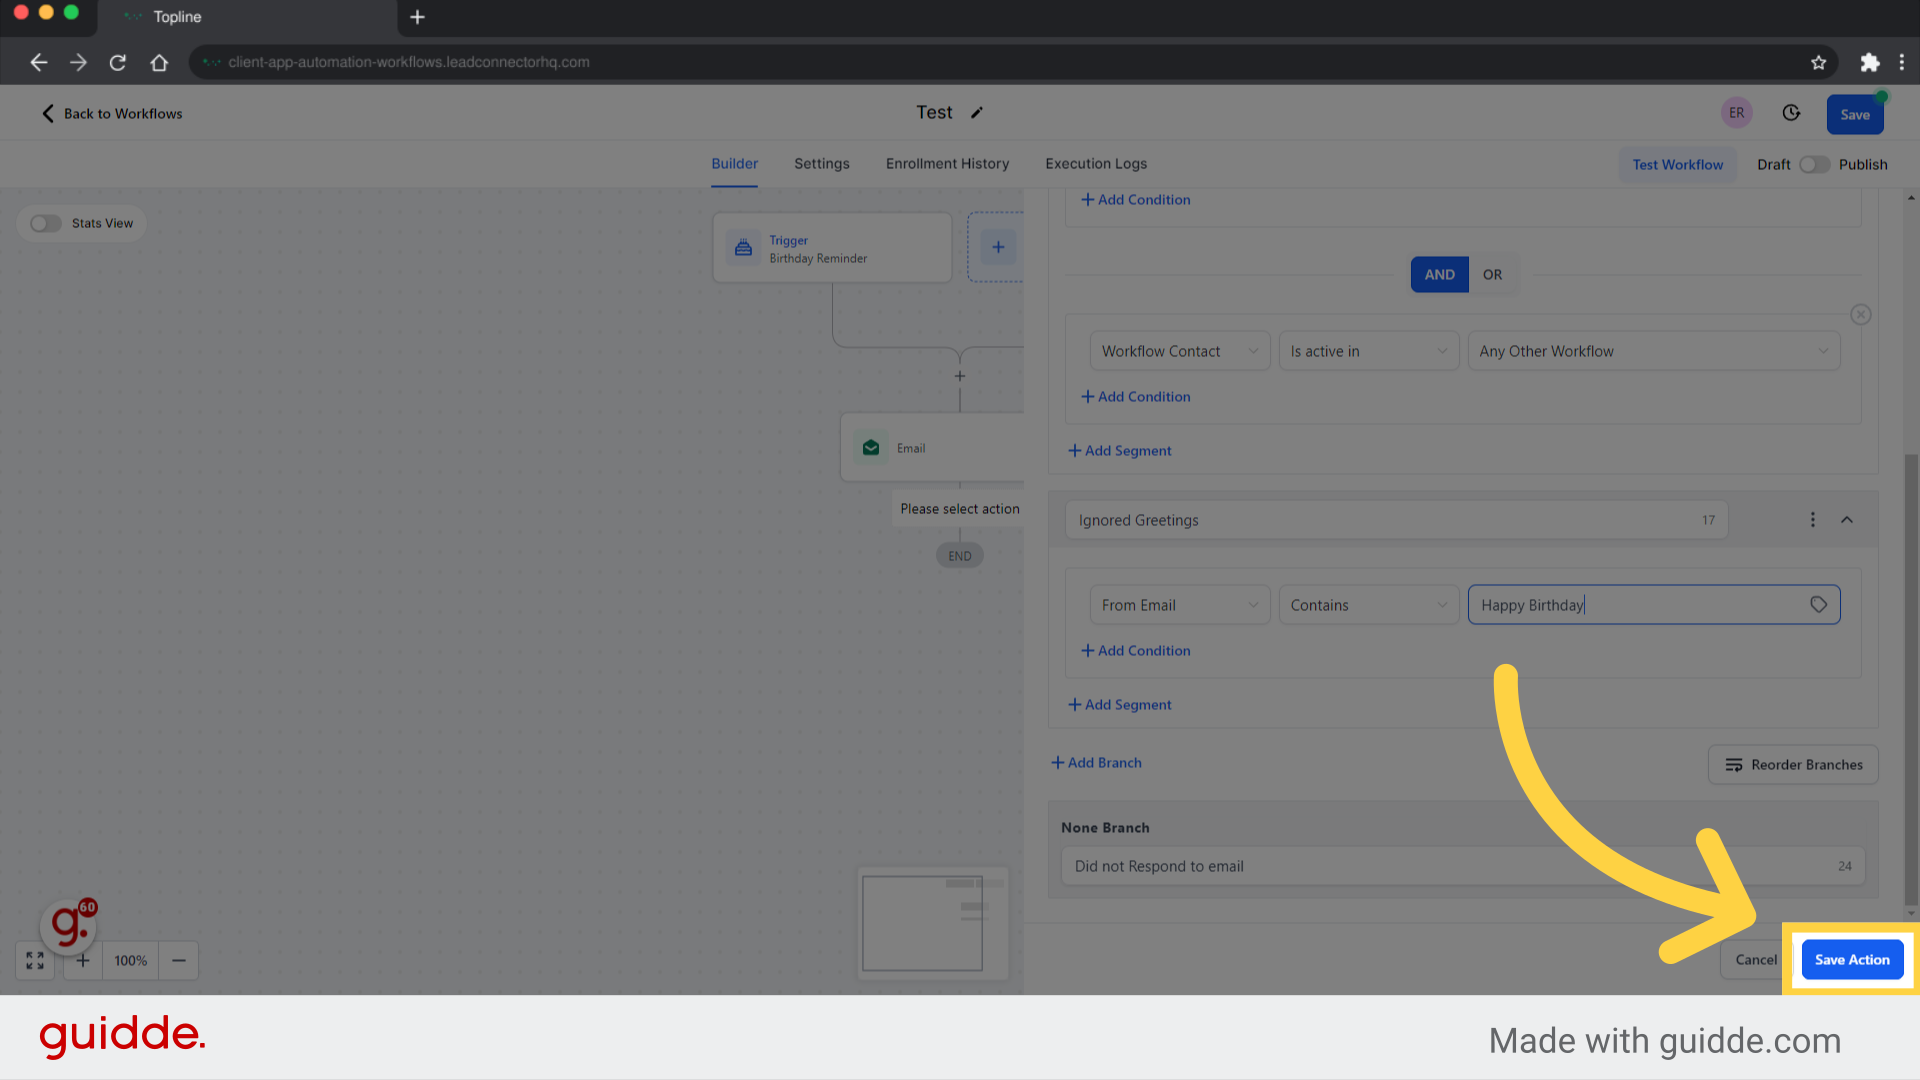
Select the specific condition of the actions that you want to evaluate. Alternatively, you can select and choose the conditions from the drop-down menu.
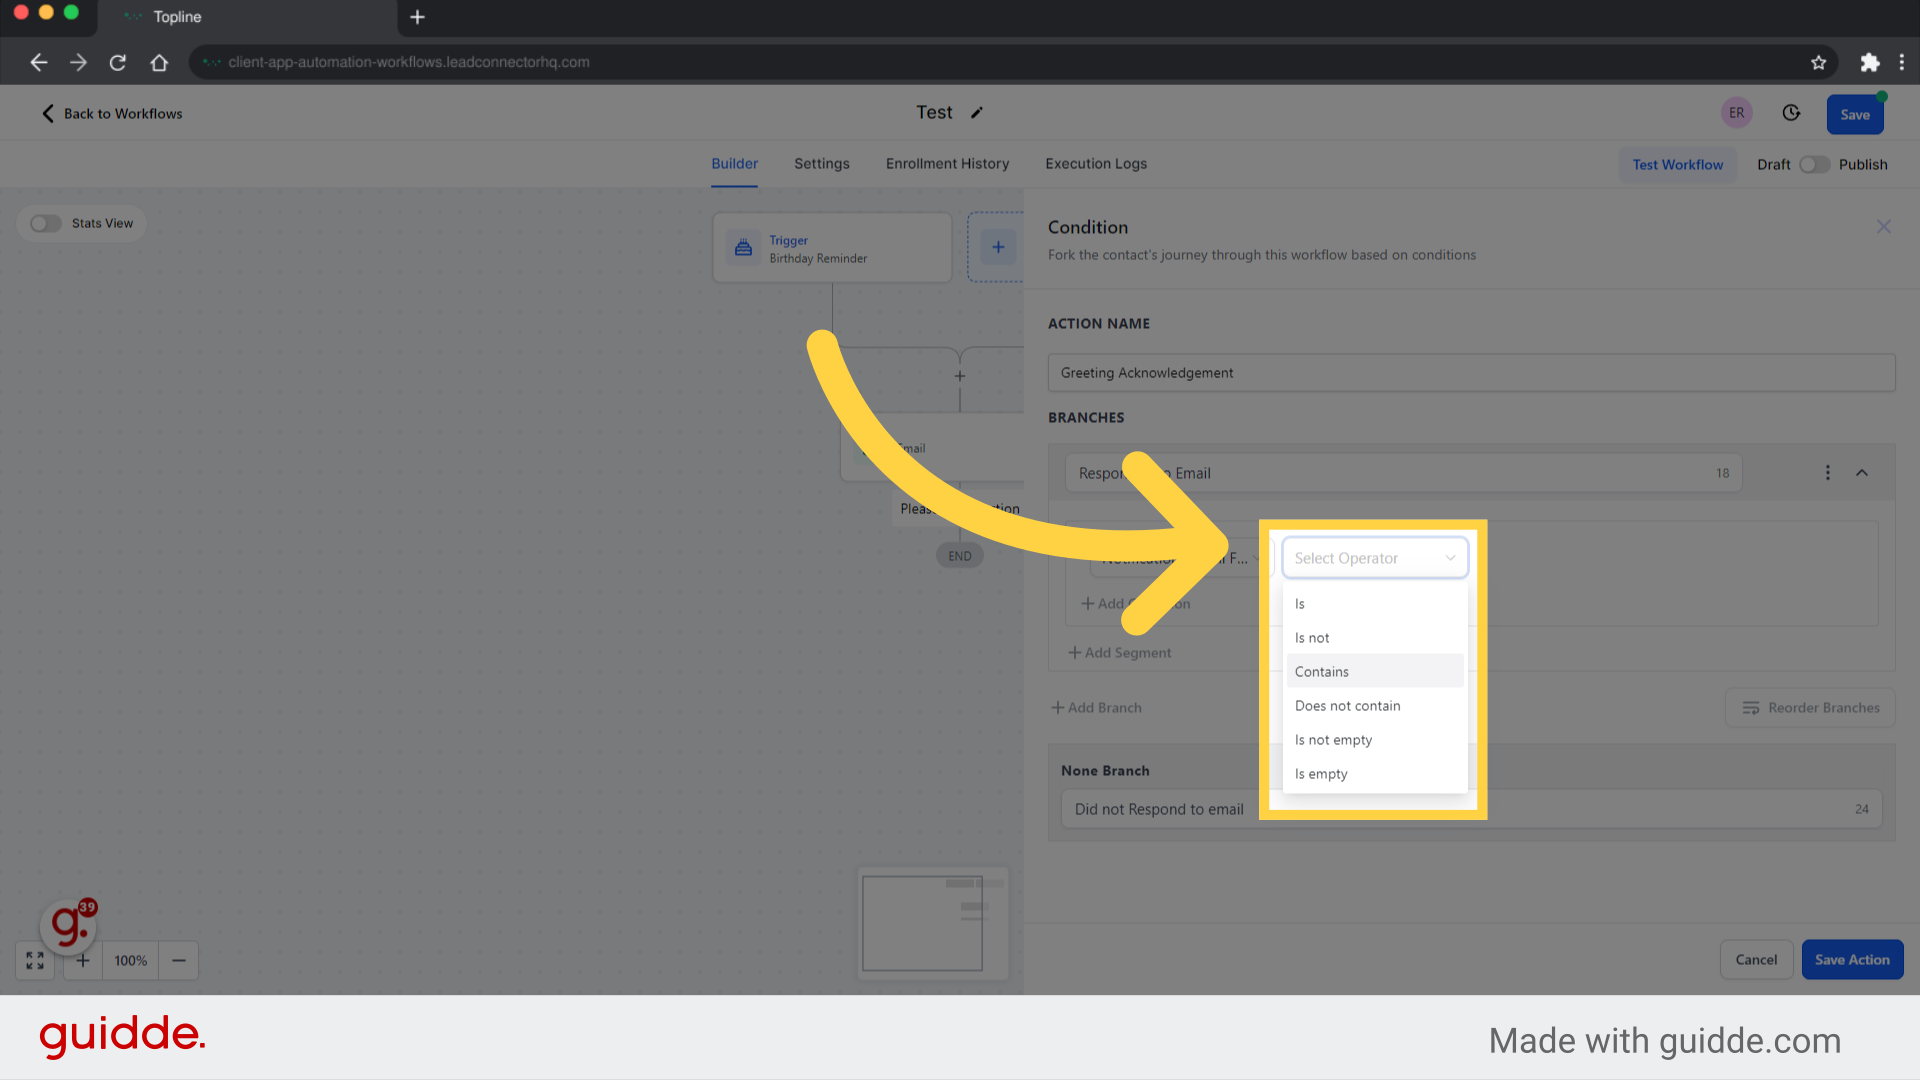
You can select the contains option by clicking on the drop-down arrow. With the "Contains" operator, you can check if a certain value or substring exists within a larger string. As a result, this operator is particularly useful when performing text search or filtering operations, it is also convenient and quick way to identify if an element is present in a dataset.
Fill in this field with a tag. Adding a tag to a dataset can improve the efficiency to determine whether or not an element exists.
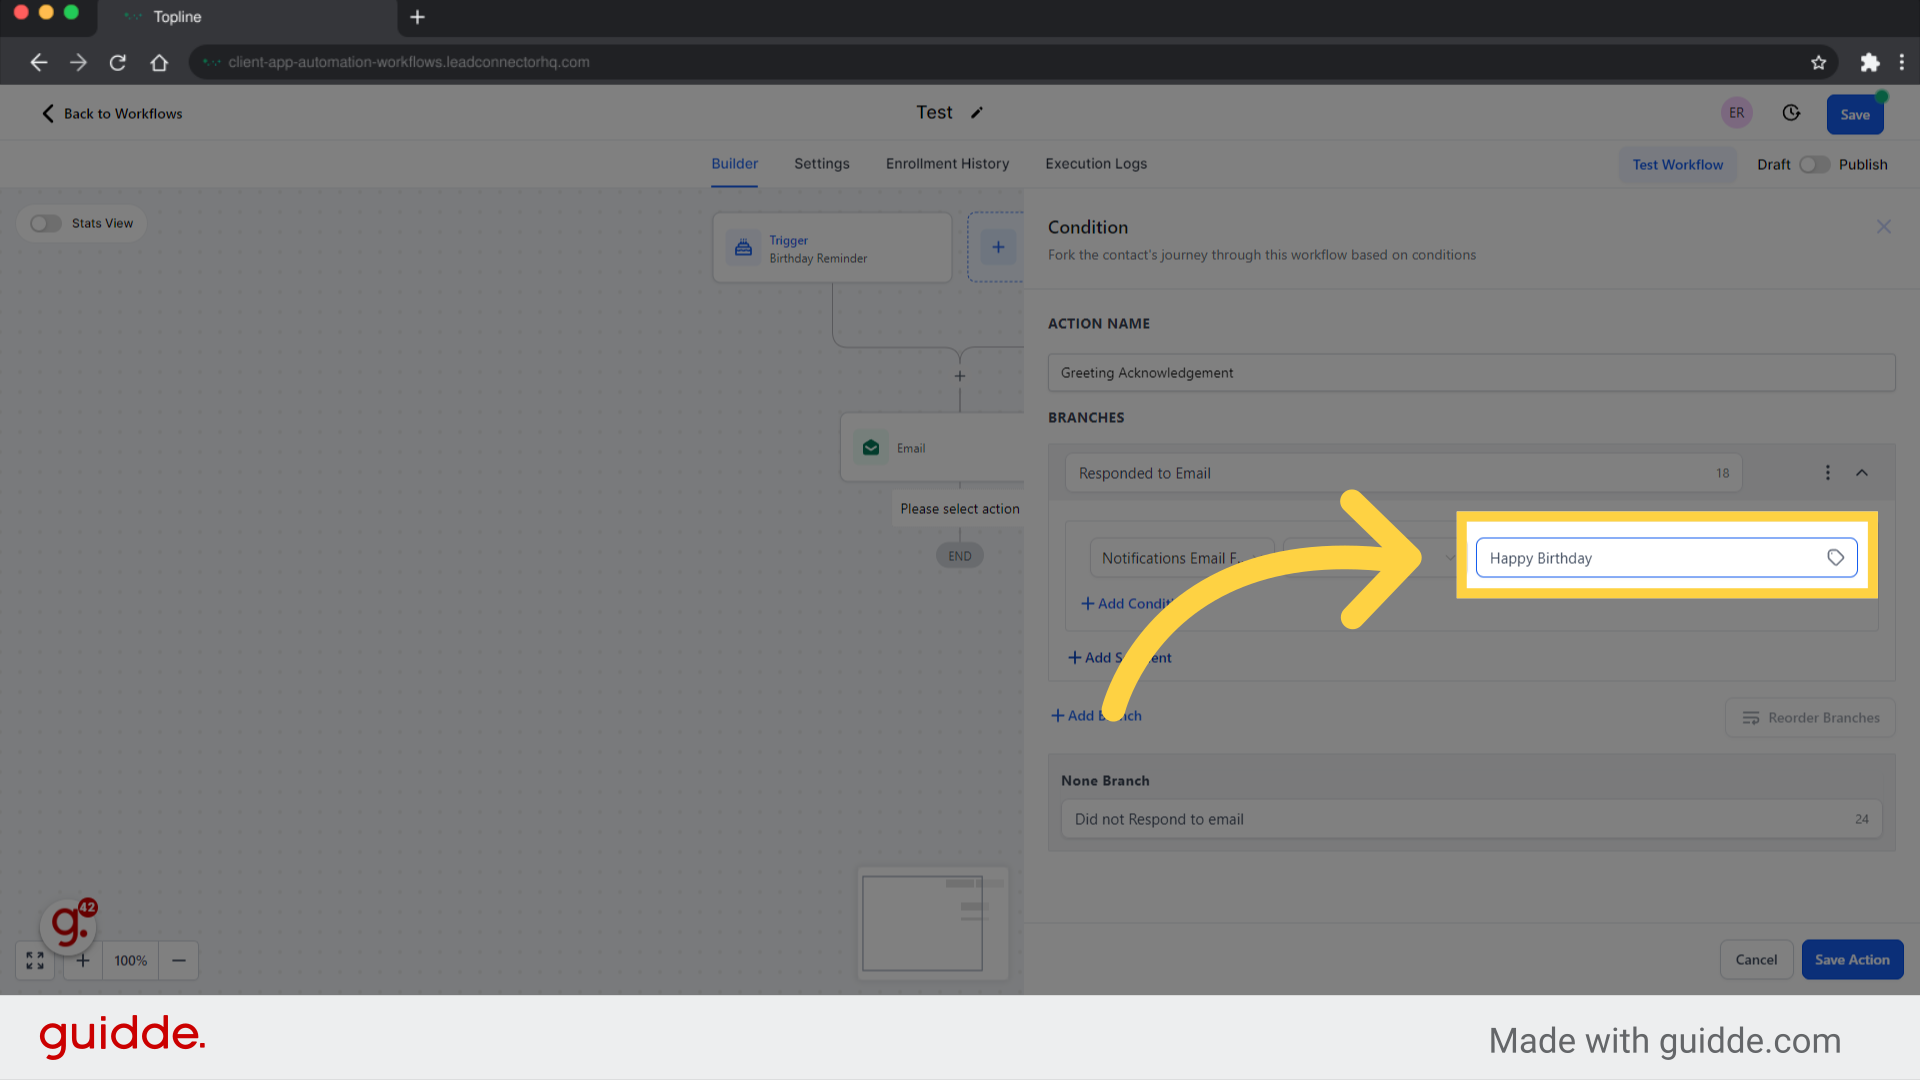
The non branch will be created automatically based on the conditions in the event that the conditions lead to failure.
To proceed to the next step, click on Save action.
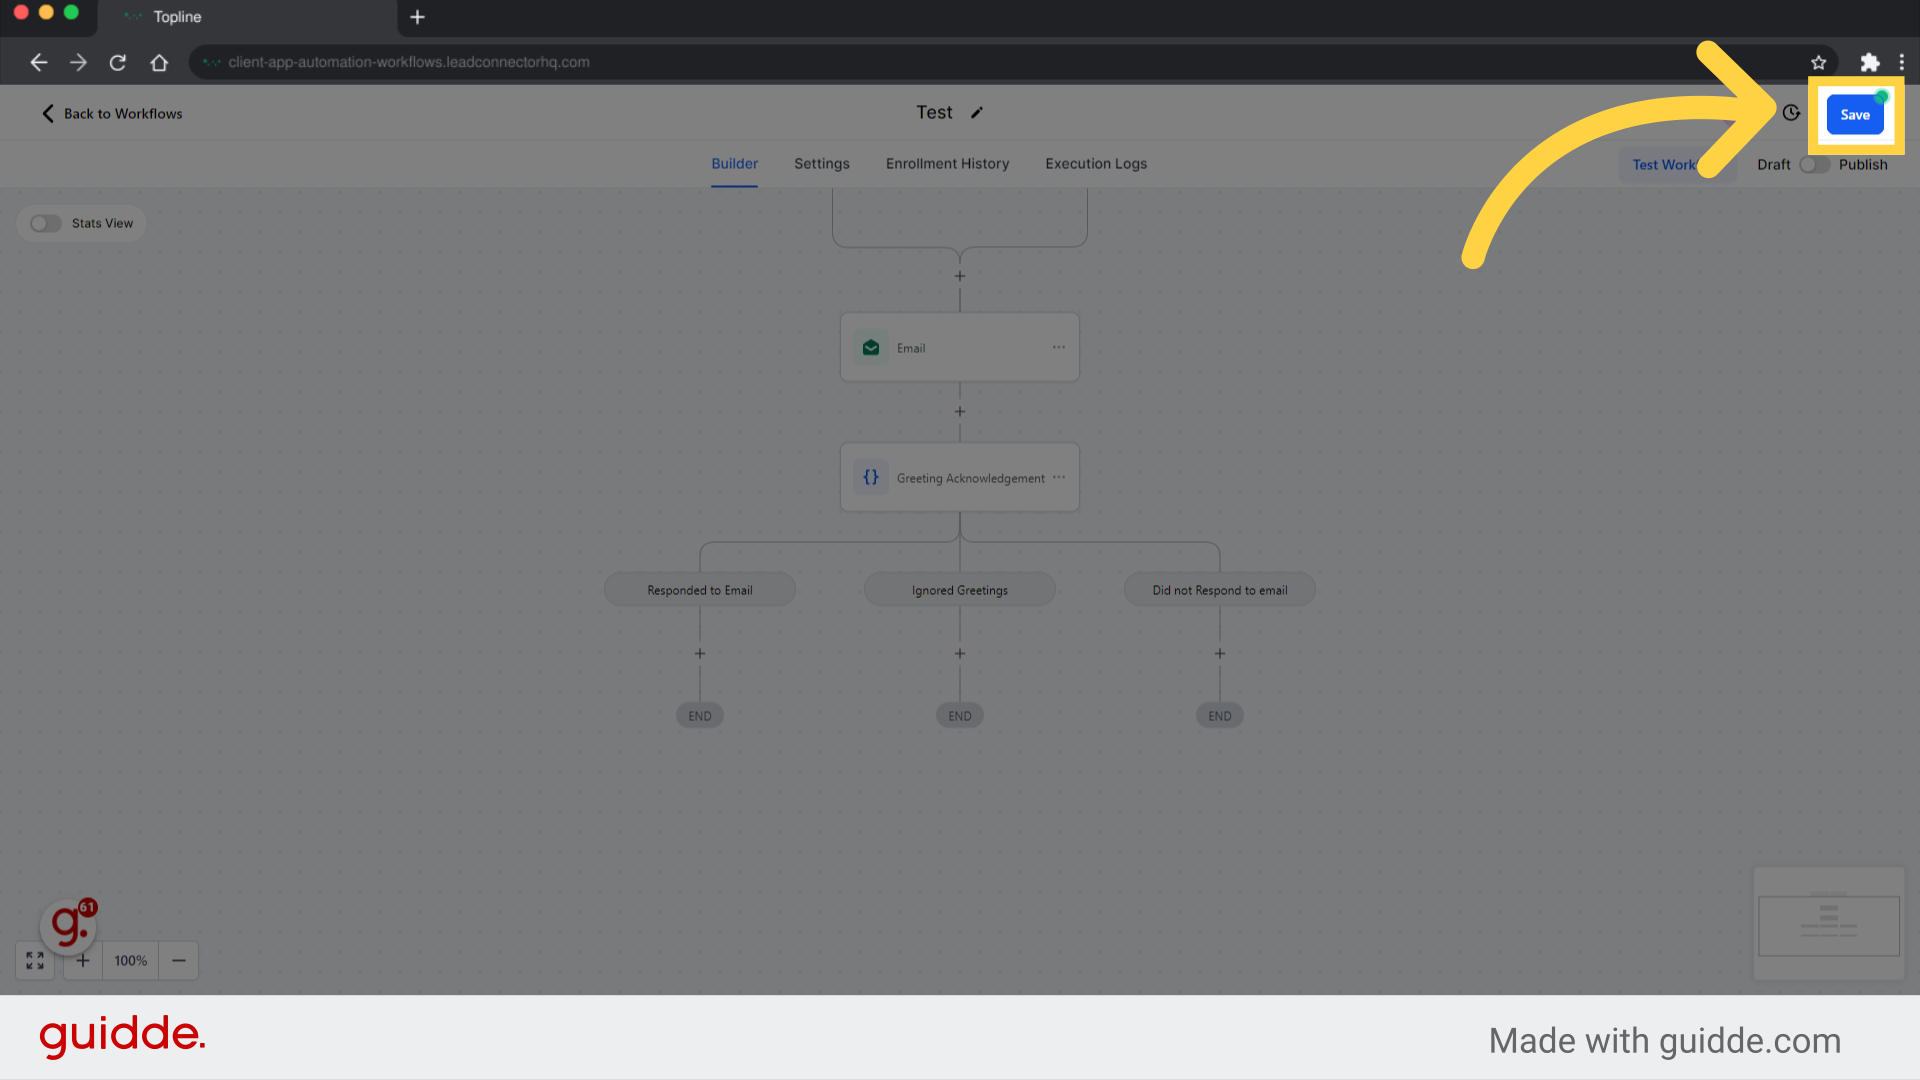
After the action and rules have been added, click on the save button to save the workflow.
At the heart of it, a workflow helps you complete repetitive tasks. You set it up once and it runs without your action required. It saves you SO much time and always allows you to truly scale your time. In more formal terms, a workflow is a chronological list of tasks to be carried out with a “Trigger” that automatically starts the sequence of Actions to take place. For example, someone fills out a form and you want a notification sent to you, your team, and the client. Then you want the client to receive a series of emails. All of this and more is powered by Automation!
There are two main parts to a workflow: Triggers and Actions…
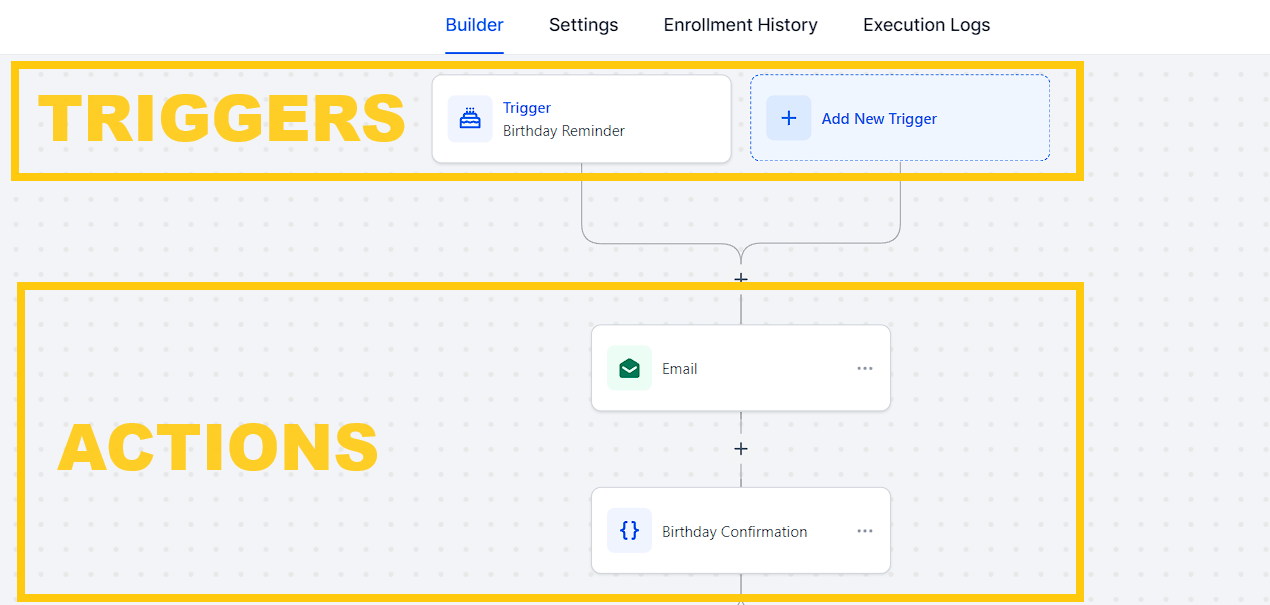
Triggers - The event that adds a new contact to the workflow. The trigger is a circumstance, or set of circumstances, that needs to be met before the actions listed are to be performed.
Example: add a contact to a workflow when they book an appointment on your scheduling calendar. Or in another instance, add a contact to a workflow when a payment is made. To set up automatically adding a contact to a workflow, you create a trigger like these.
Actions - Actions occur after the contact is added to a Workflow. They only begin after a trigger adds a contact to the workflow. Then the Workflow will execute the actions the user creates.
Example: After a contact fills out a form, you may want to send them a confirmation email of the form submission with the next steps. So you can add email actions. In another example, after someone purchases a product, you want to thank them and grant access to what they have purchased. The actions taken after a contact is added (via the trigger) is call actions.
So in summary, workflows are automated with a triggering event that begins an action (or series of actions) that follows the trigger. By automating repetitive and potentially tedious tasks, they are designed to make your work life easier.
What are tasks work automating? What should we be automating? The simple answer is anything repetitive or repeatable.
Automations work faster than manual human processes and once set up, make few (if any) mistakes. Generally, you want to automate anything that is repeatable, which leads to scalability and cost savings.
Here are some examples of tasks worth automating in Topline for a business owner:
Lead Nurturing Campaigns: Set up automated email sequences to nurture leads at different stages of the sales funnel. This includes welcome emails, educational content, product demos, and follow-up emails based on user interactions.
Appointment Scheduling: Implement an automated appointment scheduling system where leads can book appointments directly through your website or emails. Topline integrates with various scheduling tools to automate this process.
Follow-Up Communications: Automate follow-up emails or SMS messages after a lead takes a specific action, such as visiting a pricing page or downloading a resource. This keeps leads engaged and moves them further along in the sales process.
Customer Onboarding: Create automated onboarding sequences for new customers, including welcome emails, setup instructions, and tips for getting started with your product or service.
Feedback Surveys: Automatically send feedback surveys to customers after they make a purchase or use your service. This helps gather valuable insights and shows customers that their opinions are valued.
Lead Scoring and Segmentation: Use automation to score leads based on their interactions with your website, emails, and other marketing channels. Segment leads into different categories based on their interests and behaviors for more targeted marketing efforts.
Data Entry and CRM Updates: Automatically capture leads from web forms, landing pages, or third-party integrations and update them in your CRM. This eliminates the need for manual data entry and ensures that your CRM is always up to date.
Event Registration and Follow-Ups: Set up automated event registration processes for webinars, workshops, or conferences. Send automated reminders and follow-up emails to registered attendees before and after the event.
Abandoned Cart Recovery: Implement automated emails to remind customers about items left in their shopping carts and encourage them to complete their purchases. This can help recover lost sales and improve conversion rates.
These are just a few examples, but the possibilities for automation in Topline are extensive and can be tailored to suit the specific needs of your business.
Did you know… we have pre-built Workflows ready for you to configure and use? They save you a bunch of time and reveal the most common use cases of Workflow.
To use recipes, create a new workflow and when prompted, select “Recipes.” We recommend starting here and then editing what is provided - this is especially important for beginners.


When using workflows, you will soon find that you can do “almost” anything. But as you increase the complexity, you also increase the likelihood of encountering unexpected issues or errors. So let's go over how to get started with Advanced Workflows and Automation.
Within a workflow you can add an if/else condition, allowing you to redirect the flow of contacts to specific paths and actions. This is powerful. Allowing you to split actions into new branches providing a unique experience based on the current contact details within the workflow.
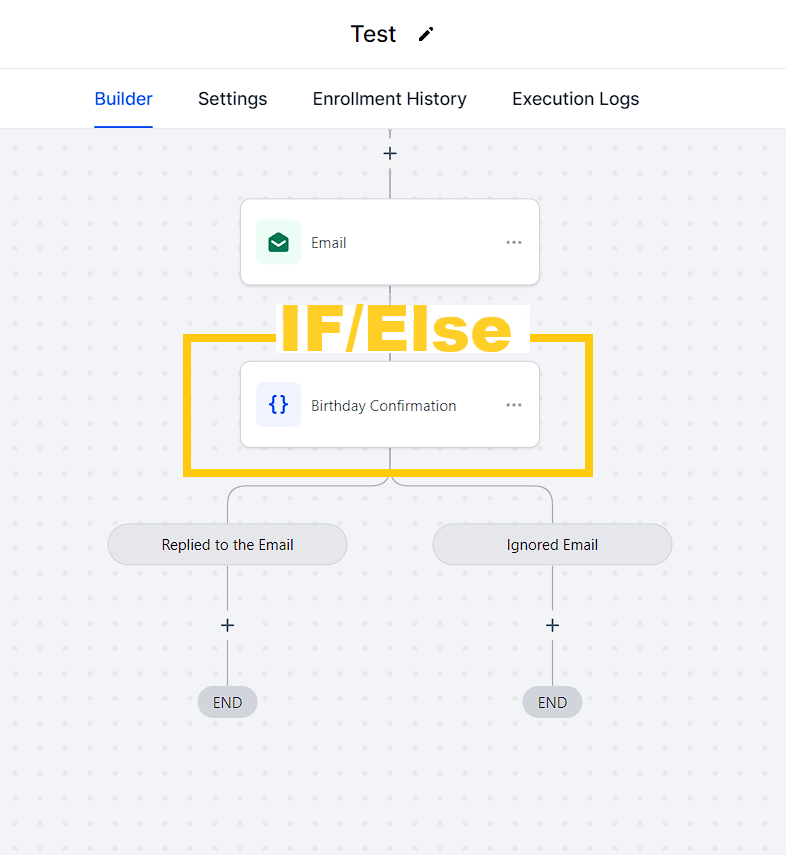
After adding an IF/Else you can create branches based on conditions, so a new contact must match a branch to be put down a unique set of actions. This allows a split and unique experience based on the contact within a workflow. Powerful when customizing a message and experience to contact or flow.
Please Note:

In the example below we are using the AND condition. The system is searching to make sure that the contact Tags - "Does NOT include" both the 'consultation_booked' AND 'consultation_confirmed' tags.
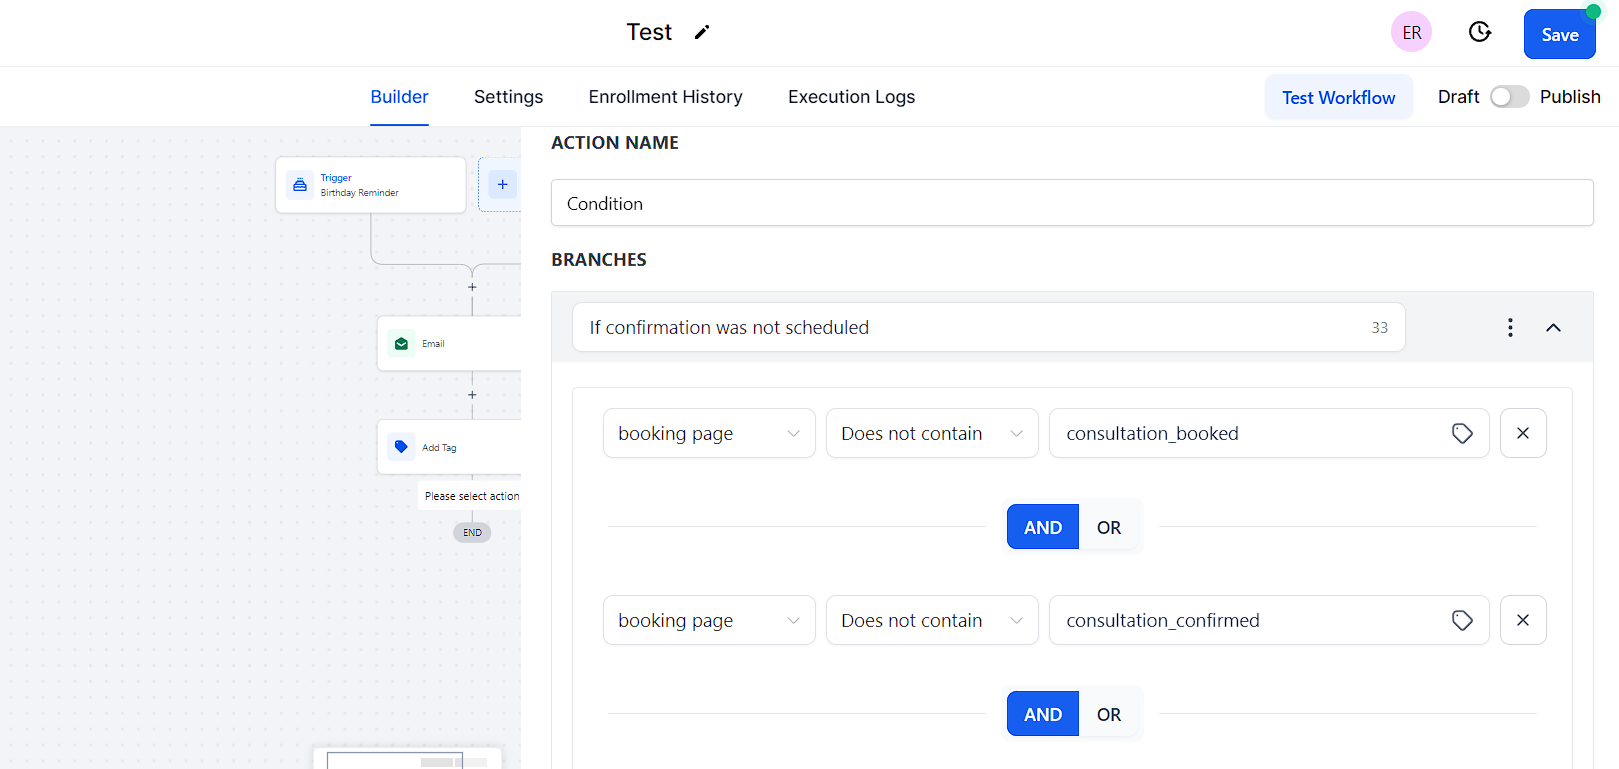
System is looking for any true result. If any conditions are true, system will go down yes path. Only way it will go down no path if all result are false.
If one of the two tags is present on the respective contact, then the condition will fail.
In this example in order for this contact to go down the "YES" path, both tags would NOT be present on the contact profile/record.
If your intention is to create an "OR" scenario, you would want to break the two tags into separate conditions and choose the OR option like this:
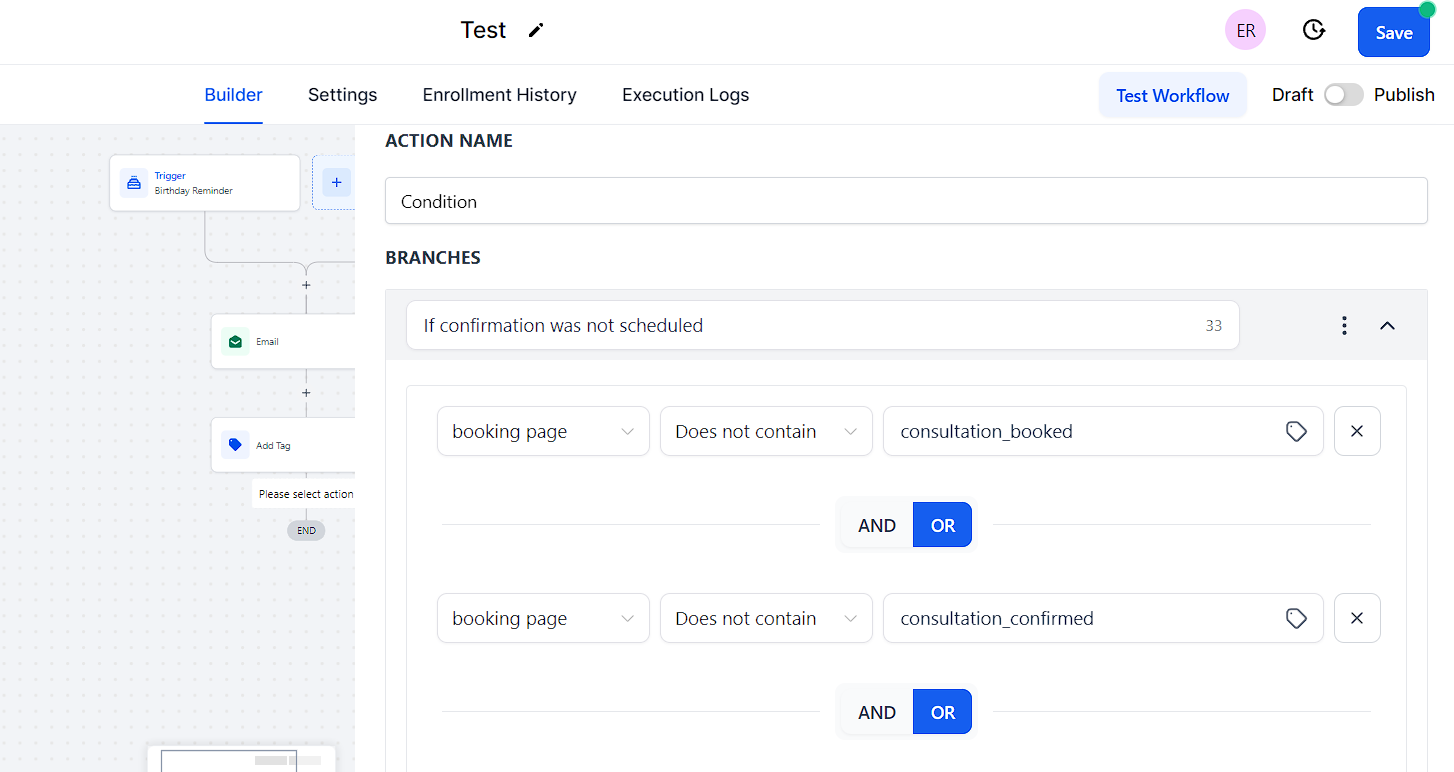
In this case, if the contact meets ONE or both of the "Or tags" then the condition is true. The system is only looking for one or both conditions to be correct before pushing the contact down the "Yes" path.
Please Note:
No, the system will push the lead down the first correct path/branch in your setup. So it goes top down in the order you built the conditions/branches.
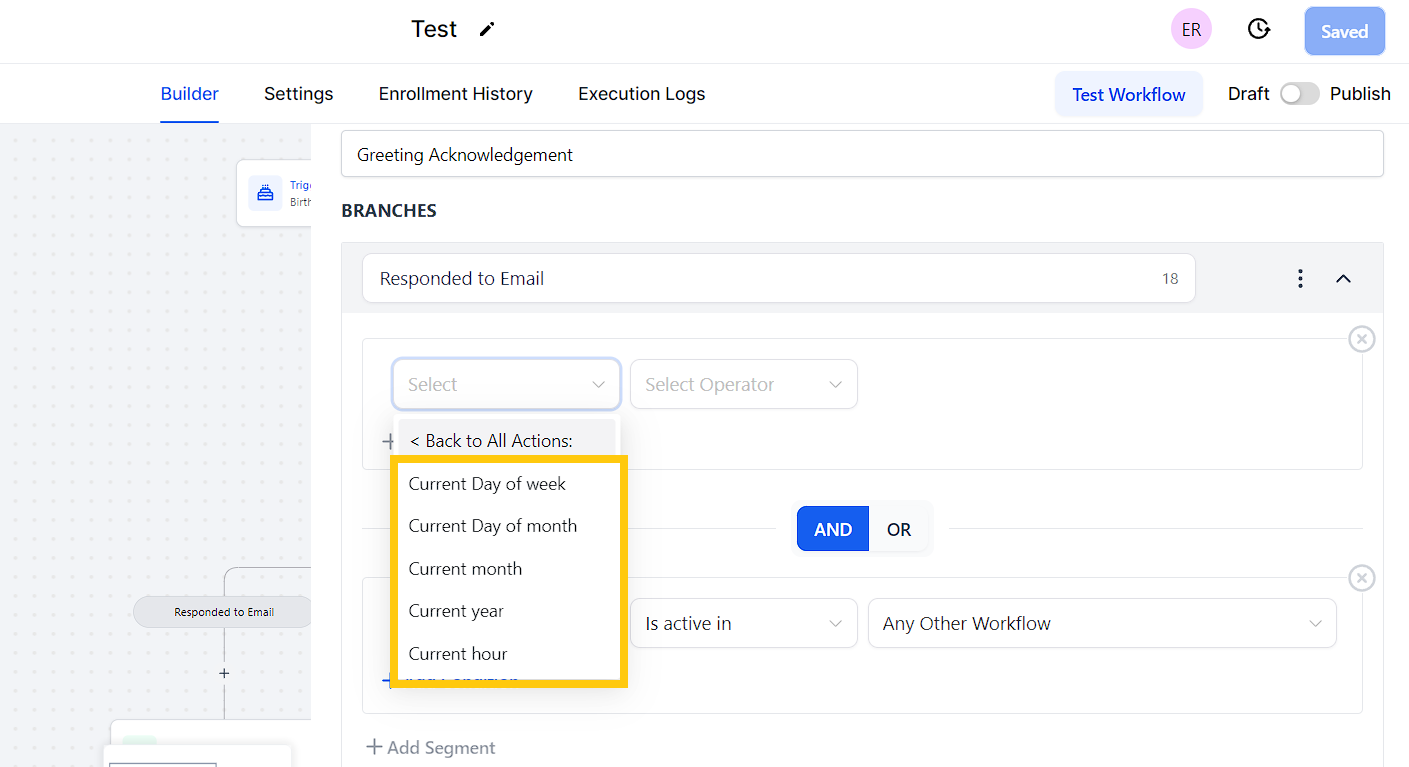
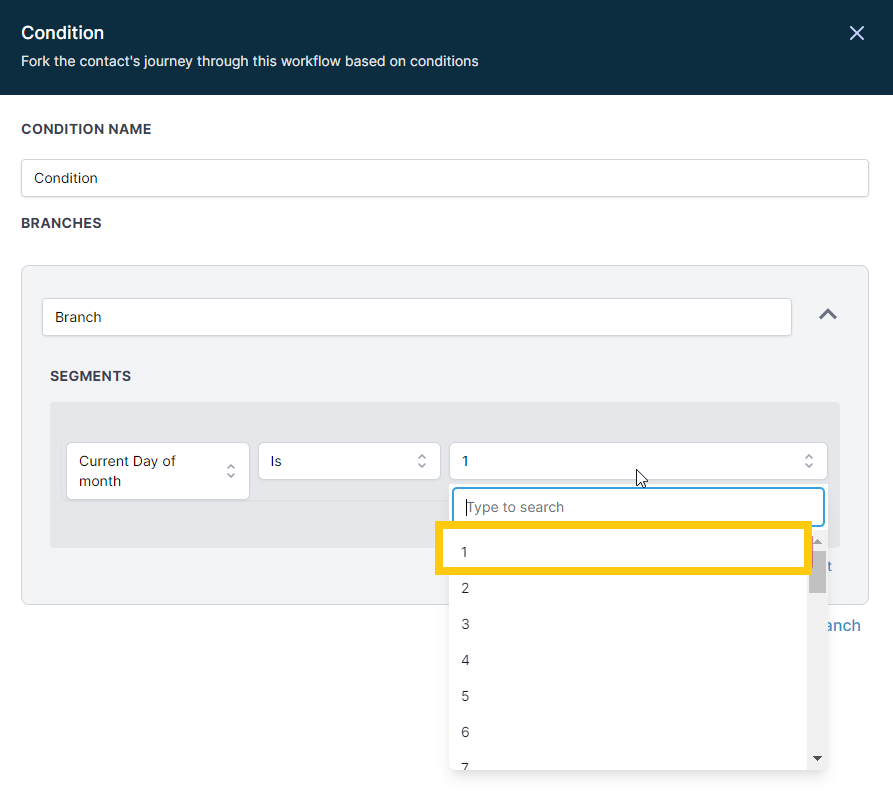
Time Comparison Operators are essential components in workflows used to compare the current date and time with a specified input value. These operators enable workflow automation systems to make informed decisions based on time conditions. The different date and time units that can be compared using these operators include the current day of the week, the current day of the month, the current month, the current year, and the current hour.
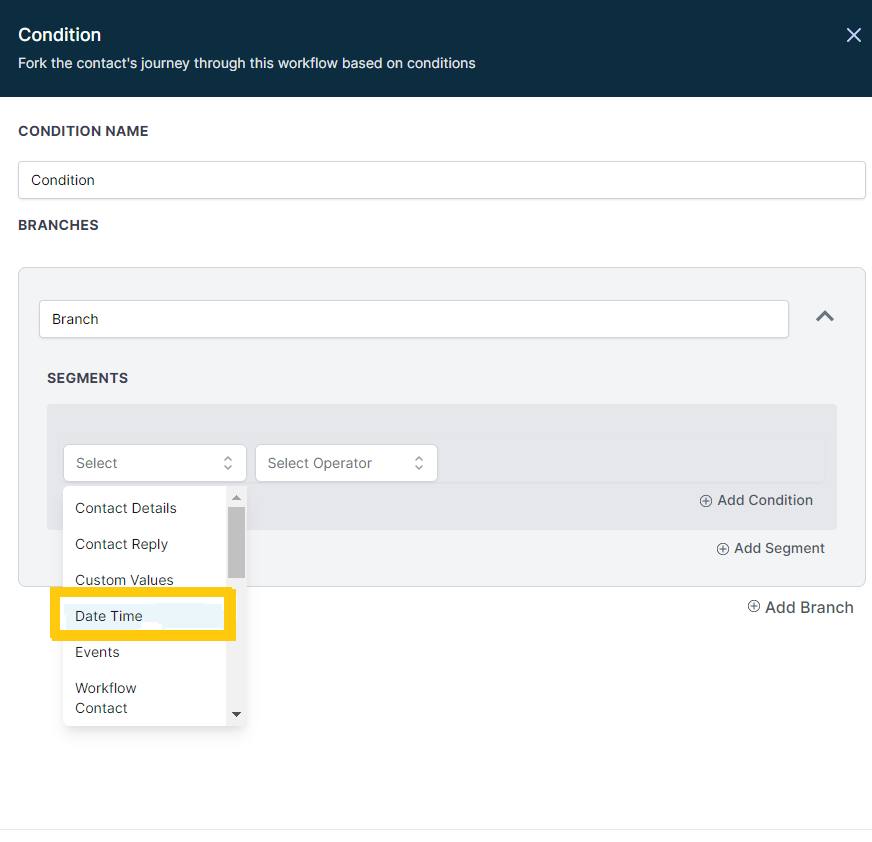
Once you choose the specific Time Parameter for which you want to use a Time Comparison Operator for, you need to choose the Time Comparison Operator from the drop down for Select Operator:
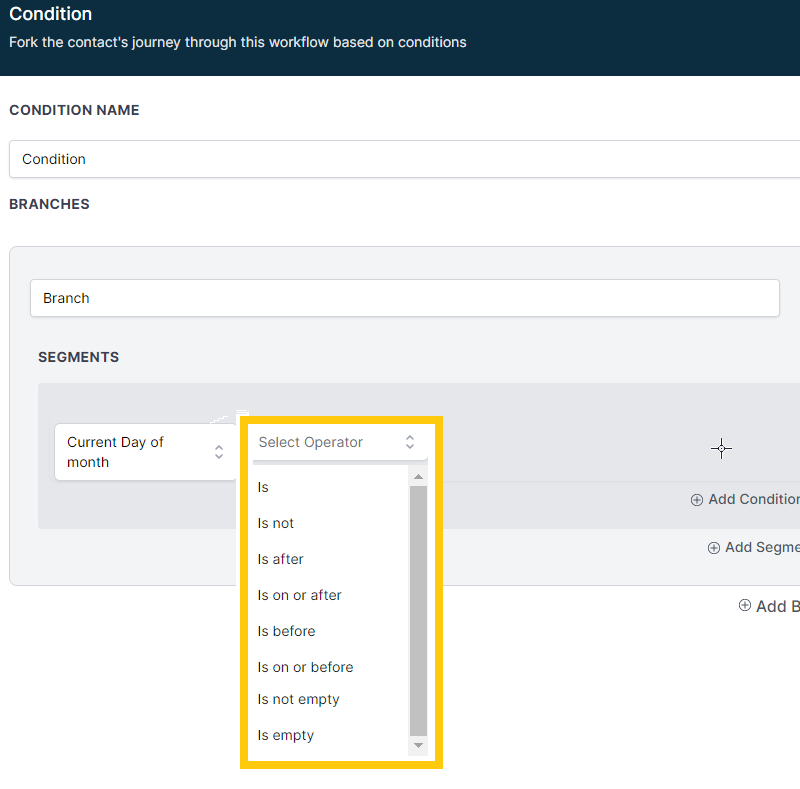
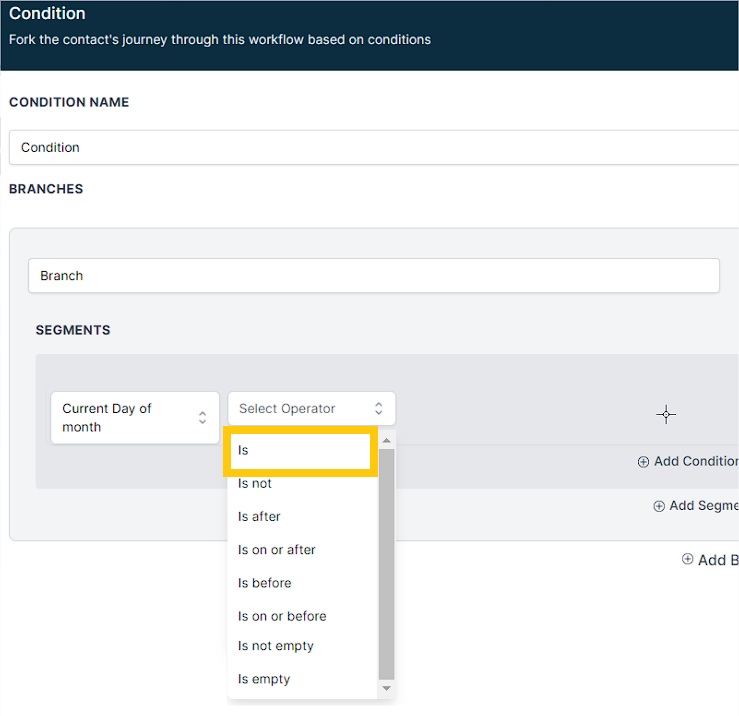
The "Is" comparison operator checks whether the selected date unit is the same as the input value. For instance, "Current Day of the Week Is Monday" will only return true if today is Monday. Similarly, "Current Month Is January" will only return true if it is currently January. For the options like Current day of the Month is, you need to specify the date of the current month like the 1st, 2nd, 3rd .
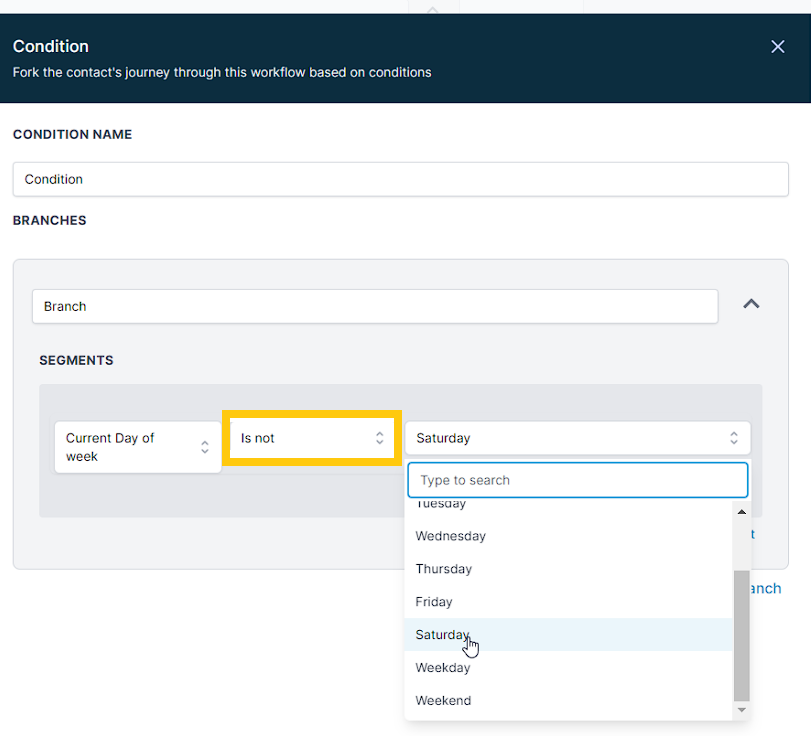
The "Is not" operator, on the other hand, checks if the selected date unit is different than the provided input. For instance, "Current Day of the Week Is Not Saturday" will return true for all days except Saturday.
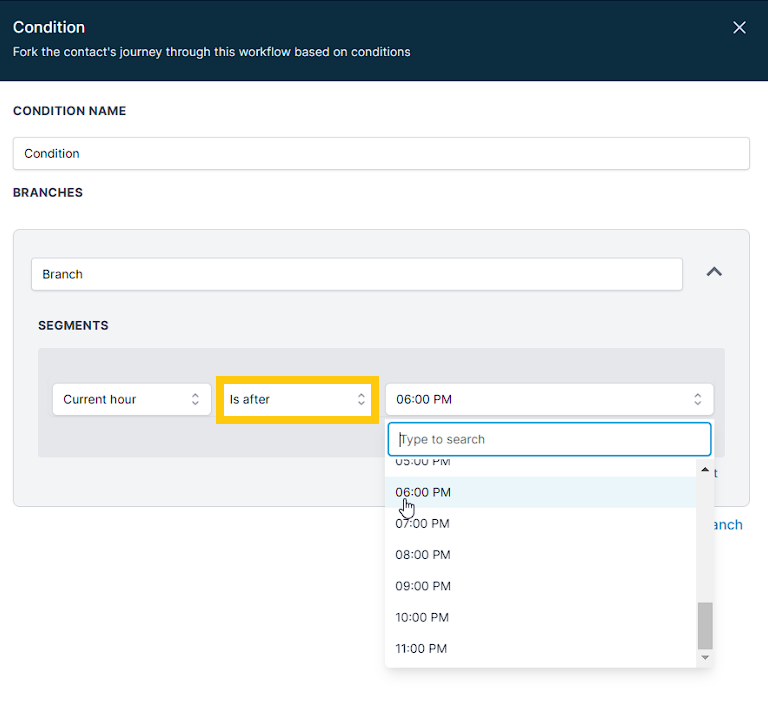
The "Is after" operator checks if the selected date unit is after the provided input. However, in the case of hours, this operator only considers minutes that start on the next hour. For instance, "Current Hour Is After 6 PM" will only return true if the time is 7:00 PM onwards because 6:59 PM is still considered inside of 6 PM.
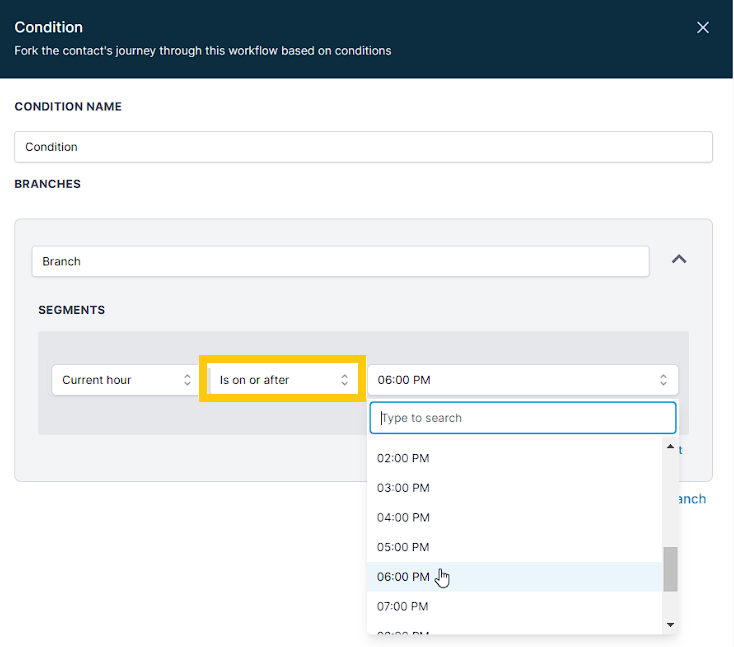
The "Is on or after" operator checks if the selected date unit is on or after the provided input. For hours, this operator considers minutes from the same hour and onwards. For instance, "Current Hour Is On or After 6 PM" will return true for 6:59 PM because it is considered to be "On" 6 PM. And it will also be true for any time after 6PM because of the on or After logic in it.
The "Is before" operator checks if the selected date unit is before the provided input. For example, "Current Month Is Before June" will return true for all months before June.
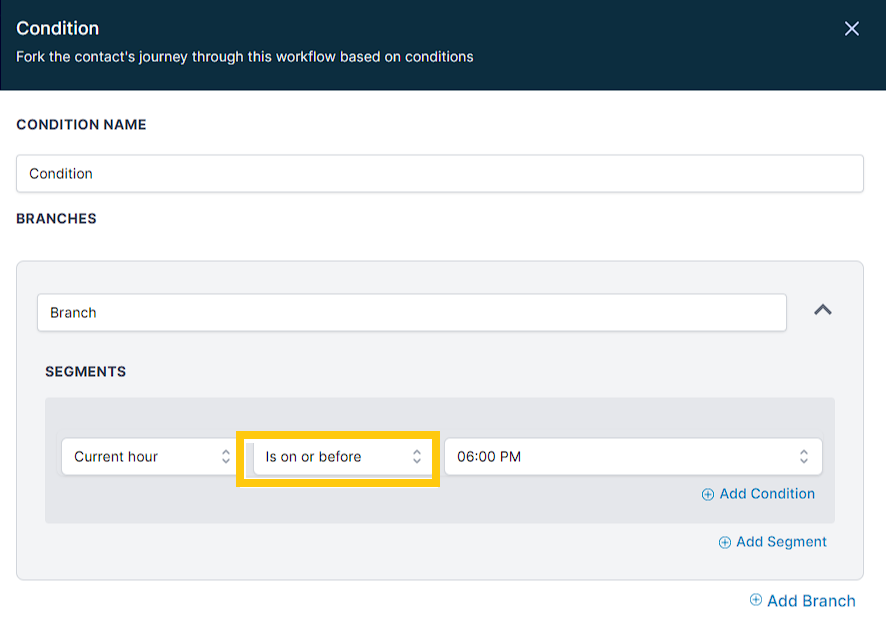
The "Is on or before" operator checks if the selected date unit is on or before the provided input. For hours, this operator also considers minutes from the same hour. For instance, "Current Hour Is On or Before 6 PM" will return true for 6:59 PM because it is considered to be "On" 6 PM.
Lastly, the "Is not empty" operator checks if the field has a value, while the "Is empty" operator checks if the field does not have any value. These two operators are used to ensure that the workflow automation system receives valid input values.
When working with automation, you will notice the need for multiple workflows to achieve a task. Or even that using multiple workflows is cleaner to manage. For example, creating a workflow for each stage of your current pipeline and sales motions.

In this example, we have 5 workflows (A, B, C, D, and E) working together with our booking and contract pipeline. The goal is to reach out to our leads, have them book on our calendar, itch them a sale, and have them sign a contract to begin service with us. Note how the workflows interact with each other and the pipeline…
You should see a pattern here to guide your future automation creation:
A workflow per stage in our sales process pipeline.
The new triggered workflow removes the contact from the previous workflows to prevent unrelated flows from triggering out of turn.
The opportunity is updated to move the opportunity in the correct stage of the pipeline
There are countless ways to set up this flow above. The same goes for any other needs... What matters is you see your options and start to get a picture of how workflows talk and interact.
Webhooks run the internet and nearly every interaction you have with technology - you just might not notice or see them. You can use webhooks in Topline Workflows to make other non-Topline platforms talk to Topline. This enables you to further automate your business needs. For example, if you use another contact management system and you want contacts to flow into Topline at a specific time, you can do this (and much more) with Webhooks.
Be warned, webhooks can feel complicated at first, but for those who learn them - you will unlock the full power of workflows in Topline. Webhooks require some advanced know-how, which is why we have a dedicated article and detailed video here: How to Use Webhooks in Topline (Zapier).
