Webhooks, or HTTPS requests, power nearly everything you interact with on the internet. They allow applications like Topline to communicate with services like Stripe, Twilio, Mailgun, Zapier, and more. With full access to webhooks, your business needs can come alive!
Webhooks are an excellent way to connect applications, enabling platforms to communicate and complete unique tasks by integrating different applications together. Below, we will review common terms used when dealing with webhooks.
HTTPS Request: The official term for the type of request a webhook is. An HTTP is the primary way to send information between websites and web browsers. HTTPS is a more secure version, encrypting the data when it is transferred.
Triggering Event: The unique event that occurs, signaling an app to send information to the Webhook URL of another app.
Webhook URL: A unique URL created by the app receiving a webhook request. It’s akin to an address or phone number.
Payload: Refers to all of the information packaged and sent from one app to another.
Query Params: Similar to UTM Parameters, they are used to map information using the Webhook URL, enhancing the capacity of the receiving application to utilize the payload.
Mapping: The process of aligning the payload received with the correct fields for use in the receiving application. For instance, mapping the payload's contact name, email, and purchased service name to the appropriate custom fields in Topline Workflow.
Webhooks generally connect applications. They require a triggering event that signals one app to send a request to another. For example, a purchase in your payment software Stripe sends a payload to Topline. The received information in Topline can then be used to perform specific tasks.
To use webhooks, one application must provide the Webhook URL, a unique address used to make a call request. Think of it like needing a business's unique phone number to reach the correct department.
Suppose you own a Shopify eCommerce store using Stripe for payments. You want to use Topline to send emails to customers who purchase a specific course. However, the purchase information is not in Topline, so you don't know who bought what. To email the correct contacts in Topline, you create a webhook event to fire every time that specific product is purchased in Stripe. Topline then uses this information to perform tasks, such as sending emails to those customers.
In this scenario, you will use the Topline Workflow trigger "inbound Webhook" to capture information from Stripe. For simplicity, we recommend using Zapier or another automation software to trigger when a purchase is made in Stripe. When the purchase occurs, a payload is sent with all the necessary information to Topline.
Topline then performs tasks like marketing to the customers who bought the product.
That’s an overview of webhooks, but there’s much more to learn. This guide will get you started, and below, we will review the two ways to use webhooks in Topline.
There are two primary ways to utilize webhooks in Topline: "Catching" and "Sending" Webhooks.
Catching an Inbound Webhook Request in a Topline Workflow Trigger:
As the name suggests, "Catching" involves receiving or capturing a webhook request sent to the Topline Webhook URL. In Topline, this is achieved through a Workflow Trigger known as an "Inbound Webhook."
Sending an Outbound Webhook Request with a Topline Workflow Action:
In contrast to "Catching," "Sending" involves making a request to an external Webhook URL. In Topline, this is executed through a Workflow Action called "Webhook."
Below, we will walk you through each scenario and how to implement it in Topline.
Another helpful way to understand webhooks is by recognizing the pattern in the order of operations. Whether dealing with an inbound or outbound webhook, we generally see a trigger and action in one app that sends information to another app. In the second app, there is another trigger followed by a final action.
This pattern can be summarized as "trigger, action, trigger, action," denoting the flow of webhooks between the two apps. Each app has a trigger and an action that facilitates their connection.
You will see this pattern in the examples below, where the first app has a trigger and an action that sends a payload to the next app, which then has an inbound webhook trigger followed by another action.
Catching an Inbound Webhook Request in a Topline Workflow Trigger
In this scenario, we aim for Topline to capture information from an external application. The external app will send the payload to the Topline Webhook URL, which is provided when creating an Inbound Webhook Workflow Trigger.
For example, in the use case mentioned above, an inbound webhook request sends information from an external purchase into Topline, enabling the platform to perform specific tasks for the contacts who purchased the product.
1. Enable Inbound Webhooks
Before proceeding, ensure that you have enabled "LC Premium Triggers & Actions." This feature is required to catch an inbound request using an "Inbound Webhook," available exclusively with LC Premium Triggers & Actions.
Quick Tip: Most Topline users prefer using integration and automation software like Zapier, Make, or Pabbly. These platforms offer user-friendly triggers and actions for many of the applications you may already use. Often, it is simpler and more powerful to combine these platforms with Topline Workflows.
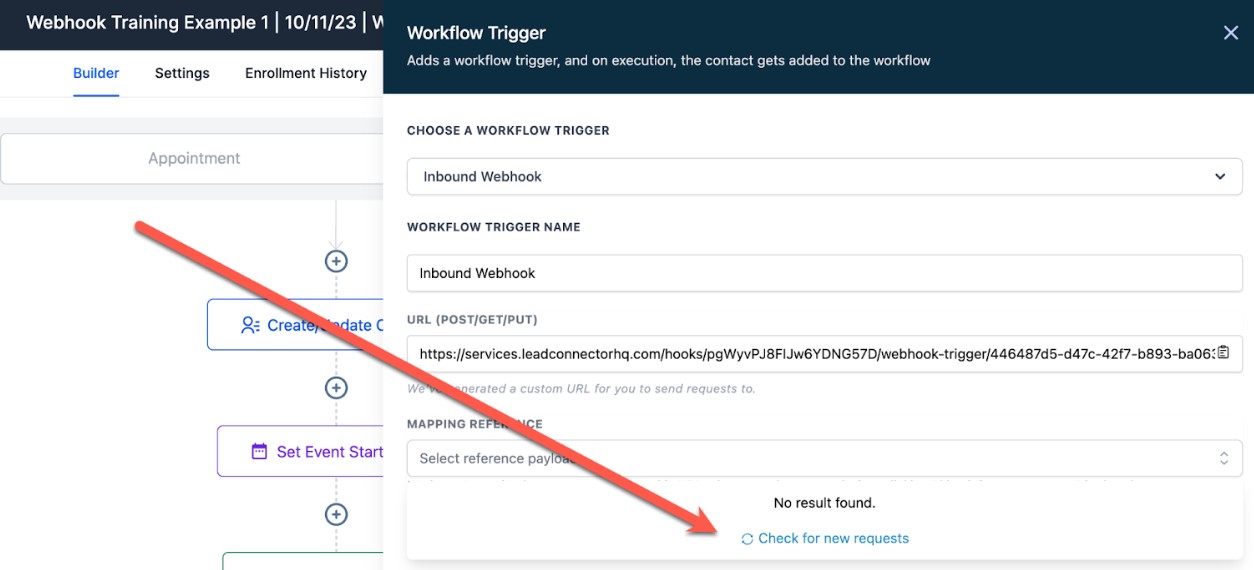
2. Create the Webhook URL in a Topline Workflow Trigger
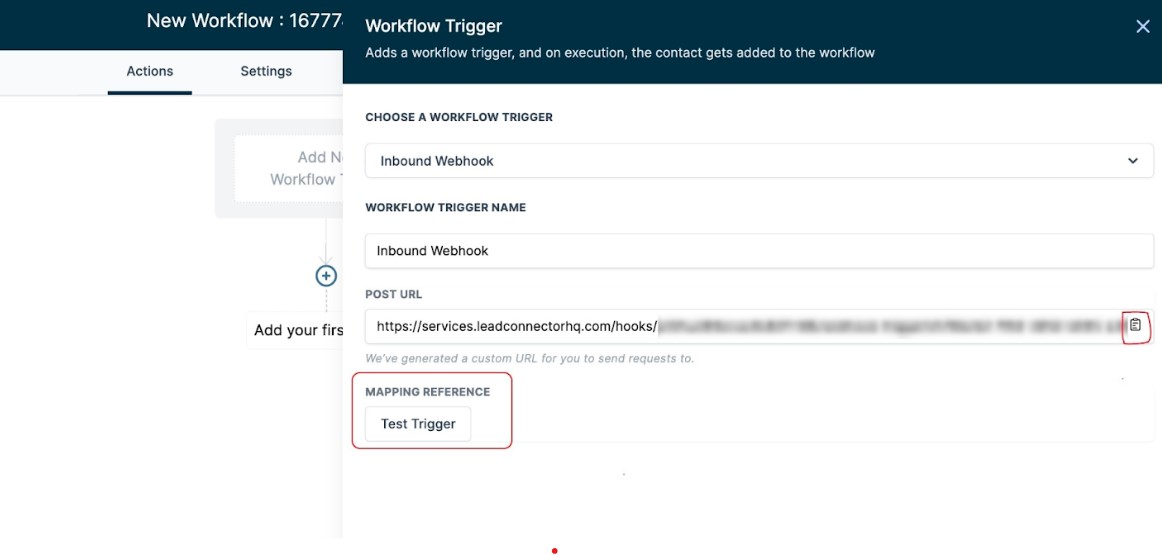
Next, open your Topline Workflow and create the Webhook URL. Open or create your workflow, then select “Inbound Webhooks” as the Workflow Trigger. Topline will generate a Webhook URL for you. Copy this Webhook URL, as you'll need it for the next step.
3. Create a Webhook Action Step in the External App
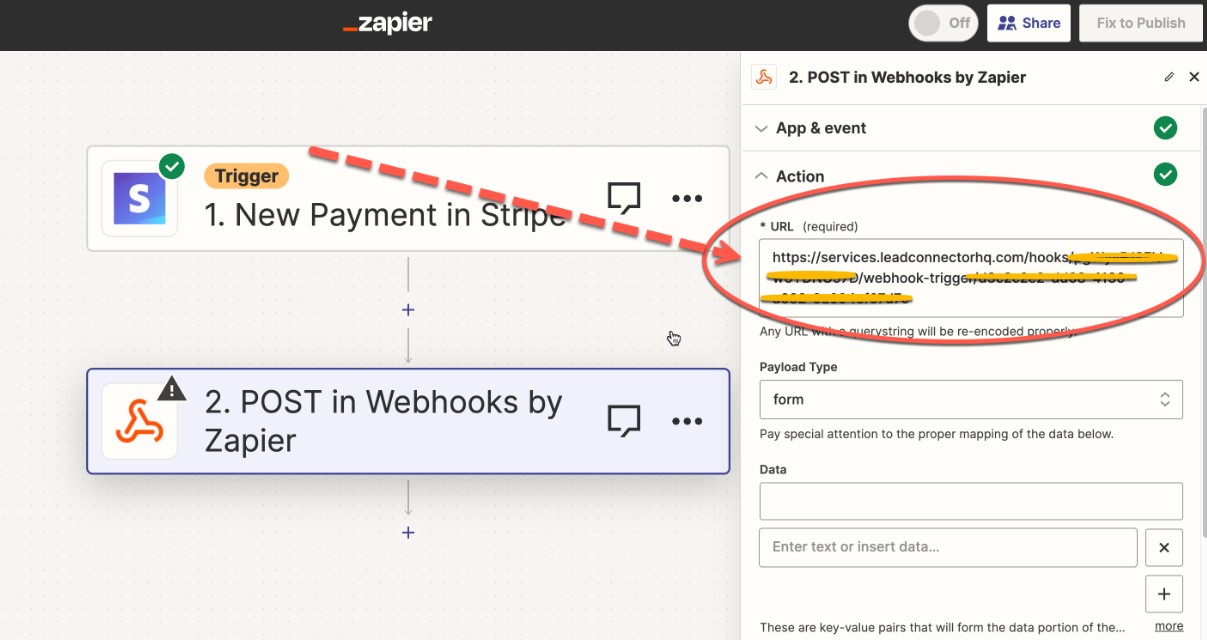
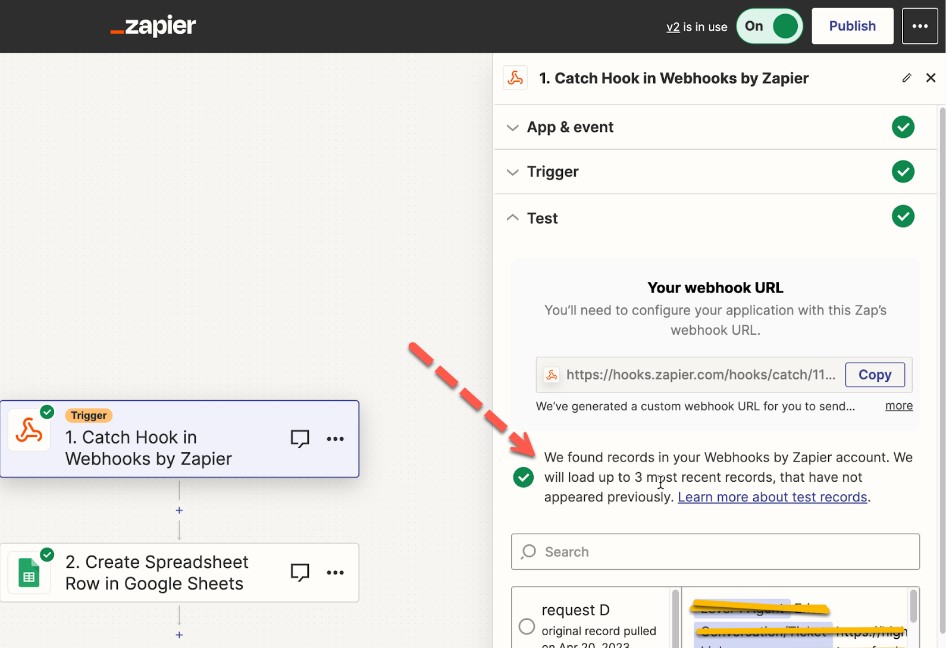
In your chosen external app, you will need to create a trigger and a webhook action step. For instance, in Zapier, you can use a “Payment” trigger to activate when a payment is made. Then, utilize “Webhooks by Zapier” to POST the payload to the Topline Webhook URL. Paste the Topline Webhook URL obtained from step two into the Zapier Action Step.
4. Send a Test
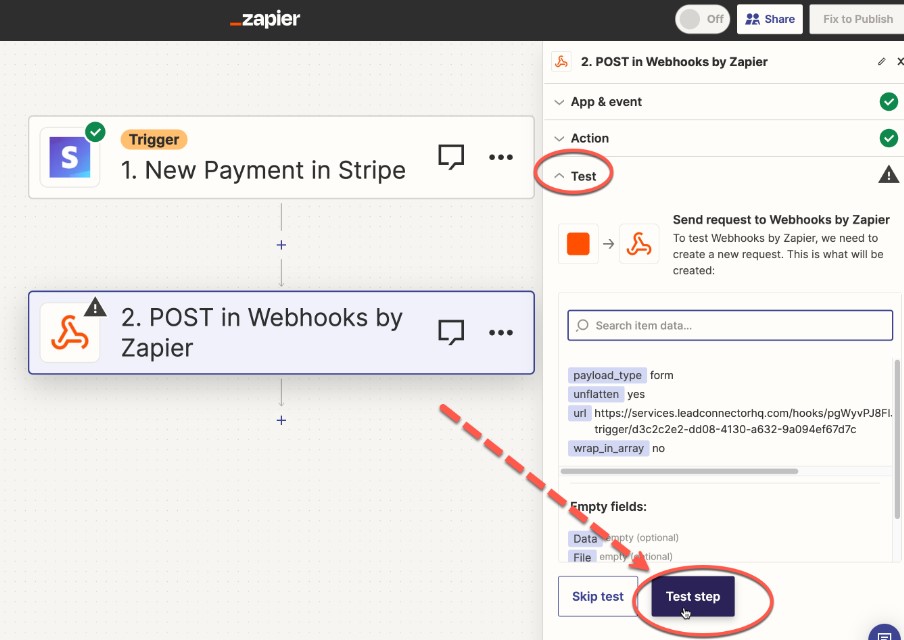
Next, we need to send a sample payload to our Topline Webhook URL to ensure everything is set up correctly. In your external app—for example, Zapier—go to the end of the step and click “Test Step.” If you need to send a test payload for a different external app, consult its documentation and support resources. In Topline, wait and refresh the “Mapping Reference” section until a “Mapping Reference” appears and is available for selection.

5. Create/Update Contact
For Topline, a contact is necessary for every automation to run. Therefore, the “Create/Update Contact” action will open automatically. You can also use the "Find Contact" action to locate a contact based on a custom field or another value. It is essential to complete this step; otherwise, the workflow will not function correctly and will break. At a minimum, create or update the contact's phone number or email from the inbound webhook payload, or find a contact based on a custom field or similar criteria. A contact must be found or matched for the process to work.

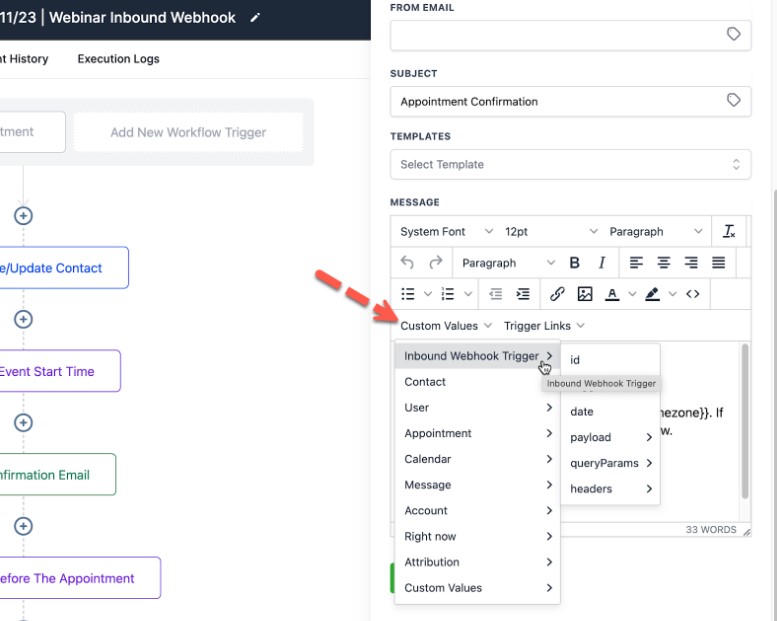
You can now utilize this information by going to "Custom Values" > "Inbound Webhook Trigger" to map the payload data into the appropriate fields or actions in Topline. This ensures that when the workflow runs, the correct information from the inbound webhook will populate in the designated areas within Topline.
Sending an Outbound Webhook Request with a Topline Workflow Action
In this scenario, we aim to send information from a Topline Workflow Action to an external app. For example, when someone fills out a form in Topline, we want this contact information to be sent to an external app so that the contact details are accessible there.
1. Ensure the External Application Allows for Receiving Webhook Data
For some external applications, receiving data from a webhook is a premium feature. Other apps may simply require enabling the appropriate trigger. Consult the application's documentation and upgrade if necessary. In Zapier, which we'll use in this example, you must be on a paid plan to use inbound Webhooks (known as Catchhooks) by Zapier.
Not Seeing Webhooks in Your External App?
In some cases, webhooks may not be available within many external apps. If this is the case, you can use automation/integration software like Zapier, Pabbly, or Make to bridge the information gap between your apps.
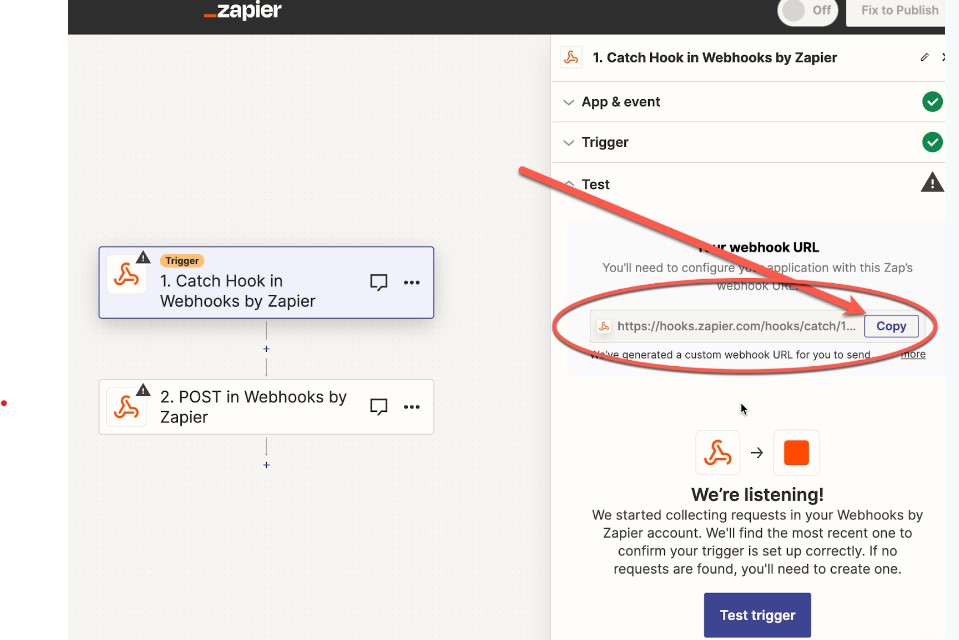
2. Create a Webhook URL in the External App
Within your external app, create a trigger for the inbound webhook. Once this trigger is created, a Webhook URL should be generated for use in later steps. For example, in Zapier, you can use the “Webhooks by Zapier” trigger with the “Catch Hook” event. Proceed to the trigger step and copy the generated Webhook URL from the external app.
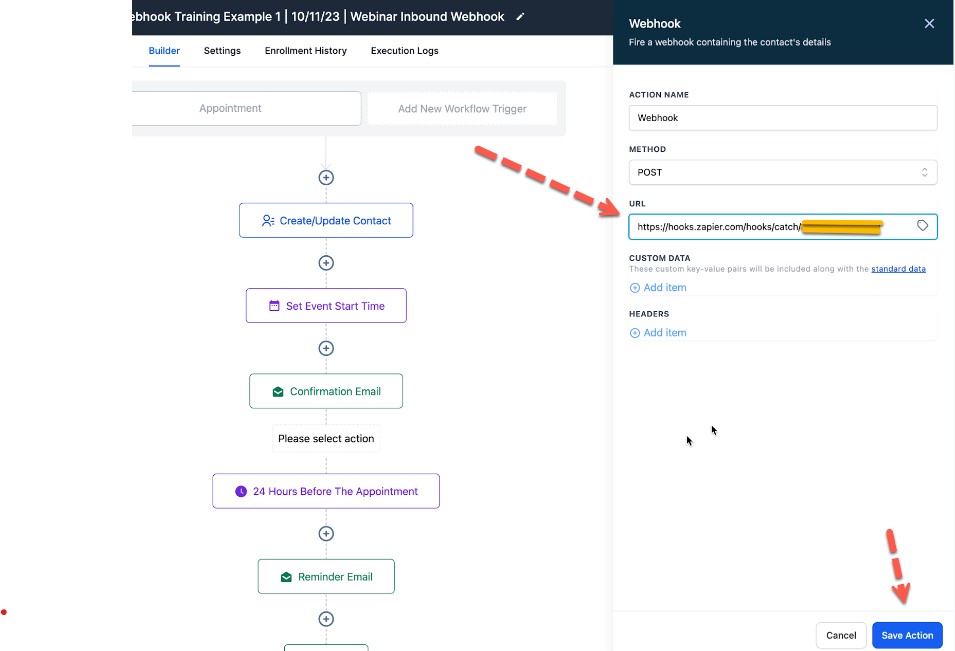
3. Add the External Webhook URL to Your Topline Workflow Action
Now, you can add the External Webhook URL to a Topline Workflow Action. Create or open your Topline Workflow. Then, add the External Webhook URL to the relevant Topline Workflow Action. Save the workflow and publish it.
4. Send a Test From Topline to the External App
Next, we need to send some sample information from Topline to the external app. To do this, trigger the workflow. For example, you can complete a test purchase to activate the Workflow Trigger, sending the information to Zapier. It’s best to perform the workflow trigger as if it were a live action to ensure that all example data is included in the payload when used in the external app.
Continue testing until the information is successfully sent to and received by the external app.
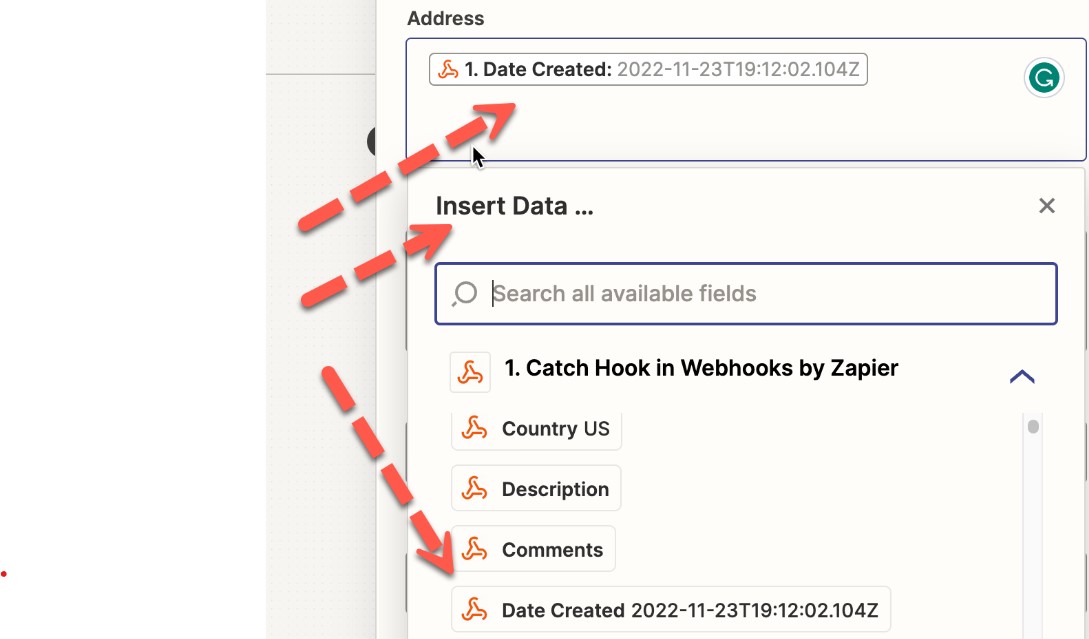
To map the information, select a field to update in your Zapier action. A popup will appear with an "Insert Data" option, allowing you to select a placeholder (known as a Custom Value in Topline) within the Zapier action. This process ensures that the data you want is correctly stamped and updated in Zapier or any other third-party app each time the webhook runs.