Custom values are user-defined data placeholders that store and manage specific information within a system or application. They allow users to organize and retrieve personalized or standardized data efficiently. These values are often used in various contexts, such as customer relationship management (CRM) systems, content management systems (CMS), marketing automation platforms, and more.
In the context of Topline OS, these custom values store personalized information such as contact details, preferences, or specific identifiers. By leveraging custom values, businesses can efficiently populate and personalize messages, emails, and website or funnel pages to enhance customer interactions and improve engagement.
Personalization: Custom values enable the storage of individualized information for each entity, such as customers, users, or leads. This information can range from names, contact details, and preferences to unique identifiers like account numbers or booking references.
Efficiency: By storing data in custom values, users can easily access and manipulate this information across different parts of a system. This eliminates the need to repeatedly enter the same information in multiple places, reducing manual effort and the likelihood of errors.
Automation: Custom values often support automation. They can auto-populate fields, generate personalized emails, customize messages, and streamline workflows. For instance, in email marketing, a custom value for a recipient's first name can be inserted to address them personally.
Consistency: Custom values can be used to ensure consistency for data that remains constant for a group of entities. This is valuable for details like company addresses, support contact information, and branding elements.
Flexibility: Users can define custom values based on their specific needs. This flexibility makes custom values adaptable to various scenarios, industries, and organizational structures.
Updates: Modifying a custom value's data doesn't require changes in every instance where it's used. Altering the value at its source automatically updates it wherever it's employed.
Data Integrity: Custom values help maintain data integrity. For instance, using a custom value for an appointment time ensures consistency and reduces the risk of discrepancies.
Segmentation and Filtering: In systems that support segmentation, custom values can be used as criteria for dividing and categorizing data sets. This aids in targeted communications and reporting.
Centralized Management: Custom values often have a central management interface. Users can add, modify, or delete custom values as needed, providing a streamlined way to oversee information organization.
Integration: Many systems allow integration with external sources like databases or APIs. Custom values can be linked to these sources, enriching the system's data capabilities.
Using custom values empowers users to make the most of their data by enhancing personalization, automating processes, ensuring accuracy, and enabling more effective decision-making. They play a significant role in optimizing data-driven workflows and providing tailored experiences for users and customers alike.

Imagine you're managing a digital marketing campaign for a fitness club. Each member of the club has different fitness goals, preferred workout types, and communication preferences. By using custom values in Topline OS, you can store this personalized information and use it to tailor your marketing efforts. These custom values might include data points like the member's name, preferred workout type, membership level, and last visit date.
By using Topline OS custom values, you can:
Personalize Emails: Automatically populate email templates with each member’s name, preferred workout type, and other relevant details.
Customize Messages: Use custom values to create targeted messages that address each member’s specific needs and preferences.
Enhance Web Pages: Dynamically display personalized content on your website or funnel pages based on the stored custom values.
If you were to run a re-engagement campaign for your fitness club members, you could use custom values to make your communications more relevant and appealing. Let’s break this down:
1. Collecting Data:
Member A: Name: John, Preferred Workout: Yoga, Membership Level: Gold, Last Visit: June 1, 2024.
Member B: Name: Sarah, Preferred Workout: Cardio, Membership Level: Silver, Last Visit: May 25, 2024.
2. Storing Data:
In Topline OS, you create custom value fields for any and all types of data including name, preferred workout, membership level, and last visit date.
Each member’s profile stores their specific information in these fields.
3. Utilizing Data:
Personalized Emails: Send an email to John that starts with “Hi John,” and includes content about upcoming yoga classes and exclusive Gold member perks.
Targeted Messages: Send a text message to Sarah saying, “Hey Sarah, we miss you! Join us for a high-energy cardio session this week.”
Customized Web Pages: When John logs into his member portal, he sees a welcome message like “Welcome back, John! Ready for your next yoga session?”
4. Enhancing Customer Experience:
By using custom values, your communications feel more personal and relevant to each member, increasing the likelihood of engagement and re-engagement.
By incorporating Topline OS custom values, you can transform generic communications into personalized interactions. This not only enhances the customer experience but also drives higher engagement and loyalty.
So, if you were to launch a new promotional campaign, you can use custom values to populate data into your messages, emails, and web pages, ensuring that each touchpoint is tailored to the recipient’s unique preferences and needs. This approach helps you connect more effectively with your audience and achieve better results from your marketing efforts.
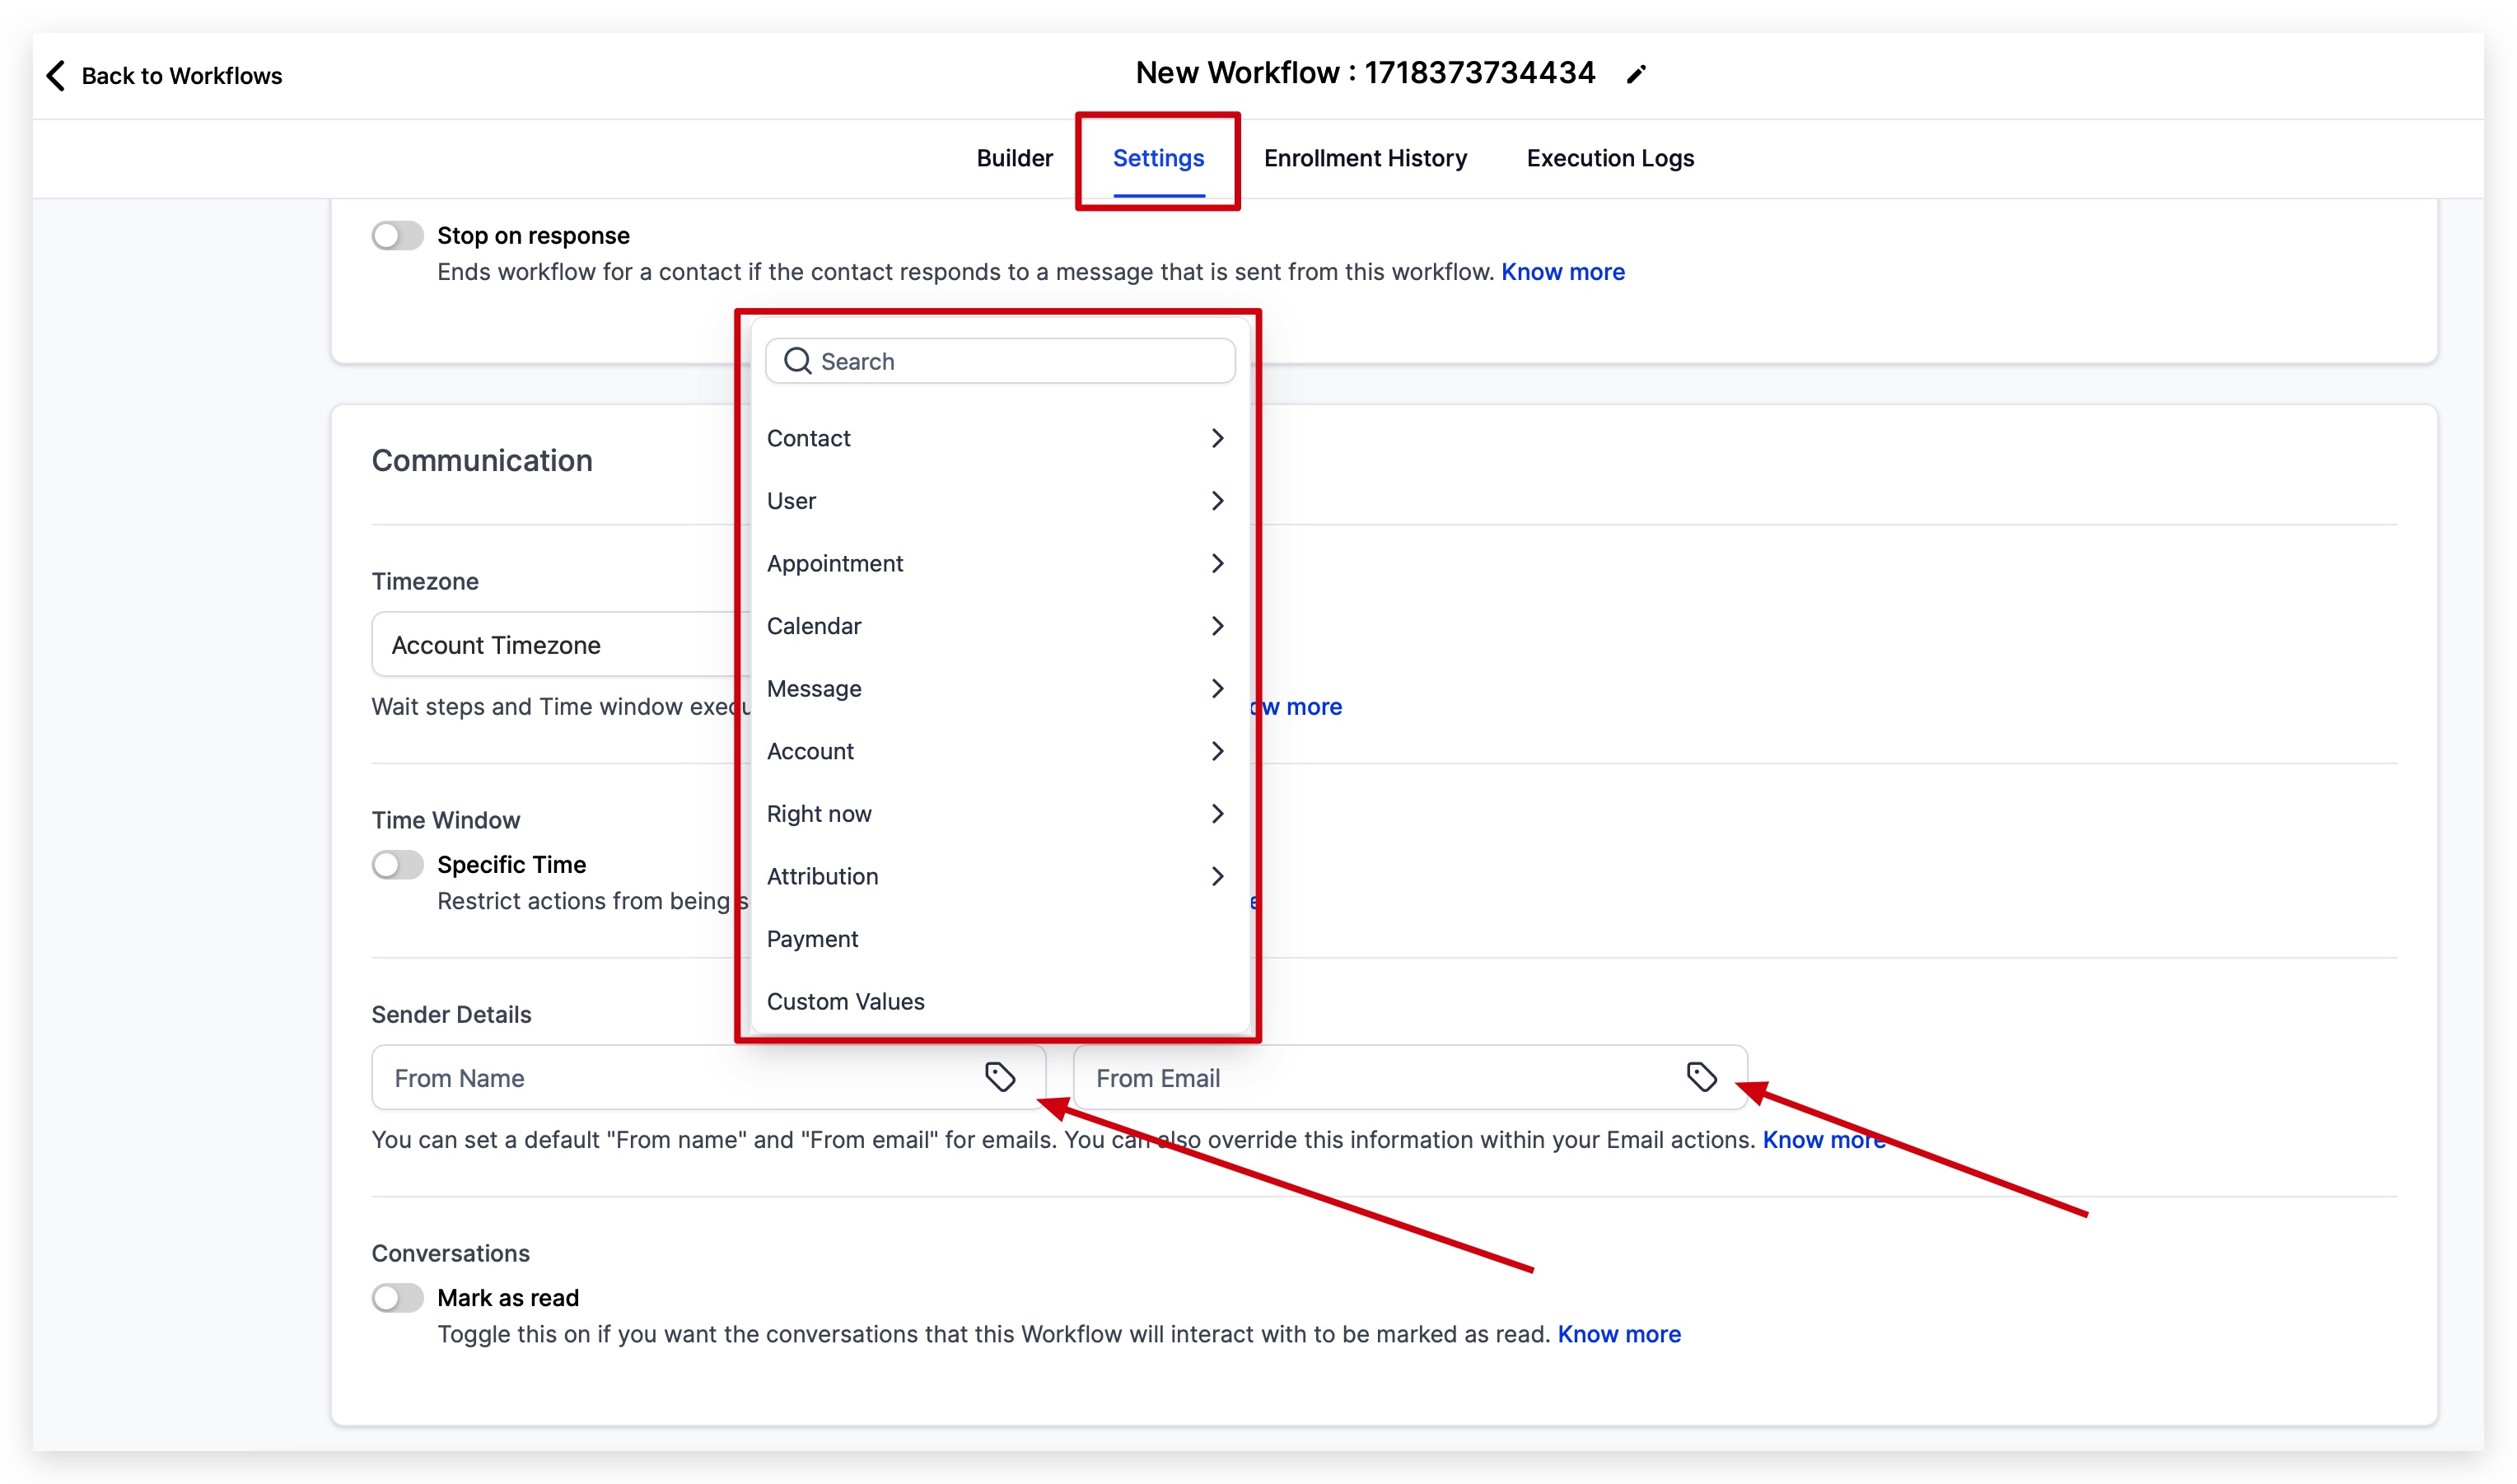
Accessing and using custom values is quick and easy, and Topline OS makes it very intuitive for you and your customers to not only start using custom values but also understand the WHY & HOW. There are many different areas within your Topline OS where you can access and use custom values, including:
While in the conversations section, you can use custom values while messaging back and forth with prospects and customers!
You can use custom values in EVERY type of communication channel supported by Topline OS such as SMS, Email, Facebook Messenger, Instagram Messaging, WhatsApp, and more!
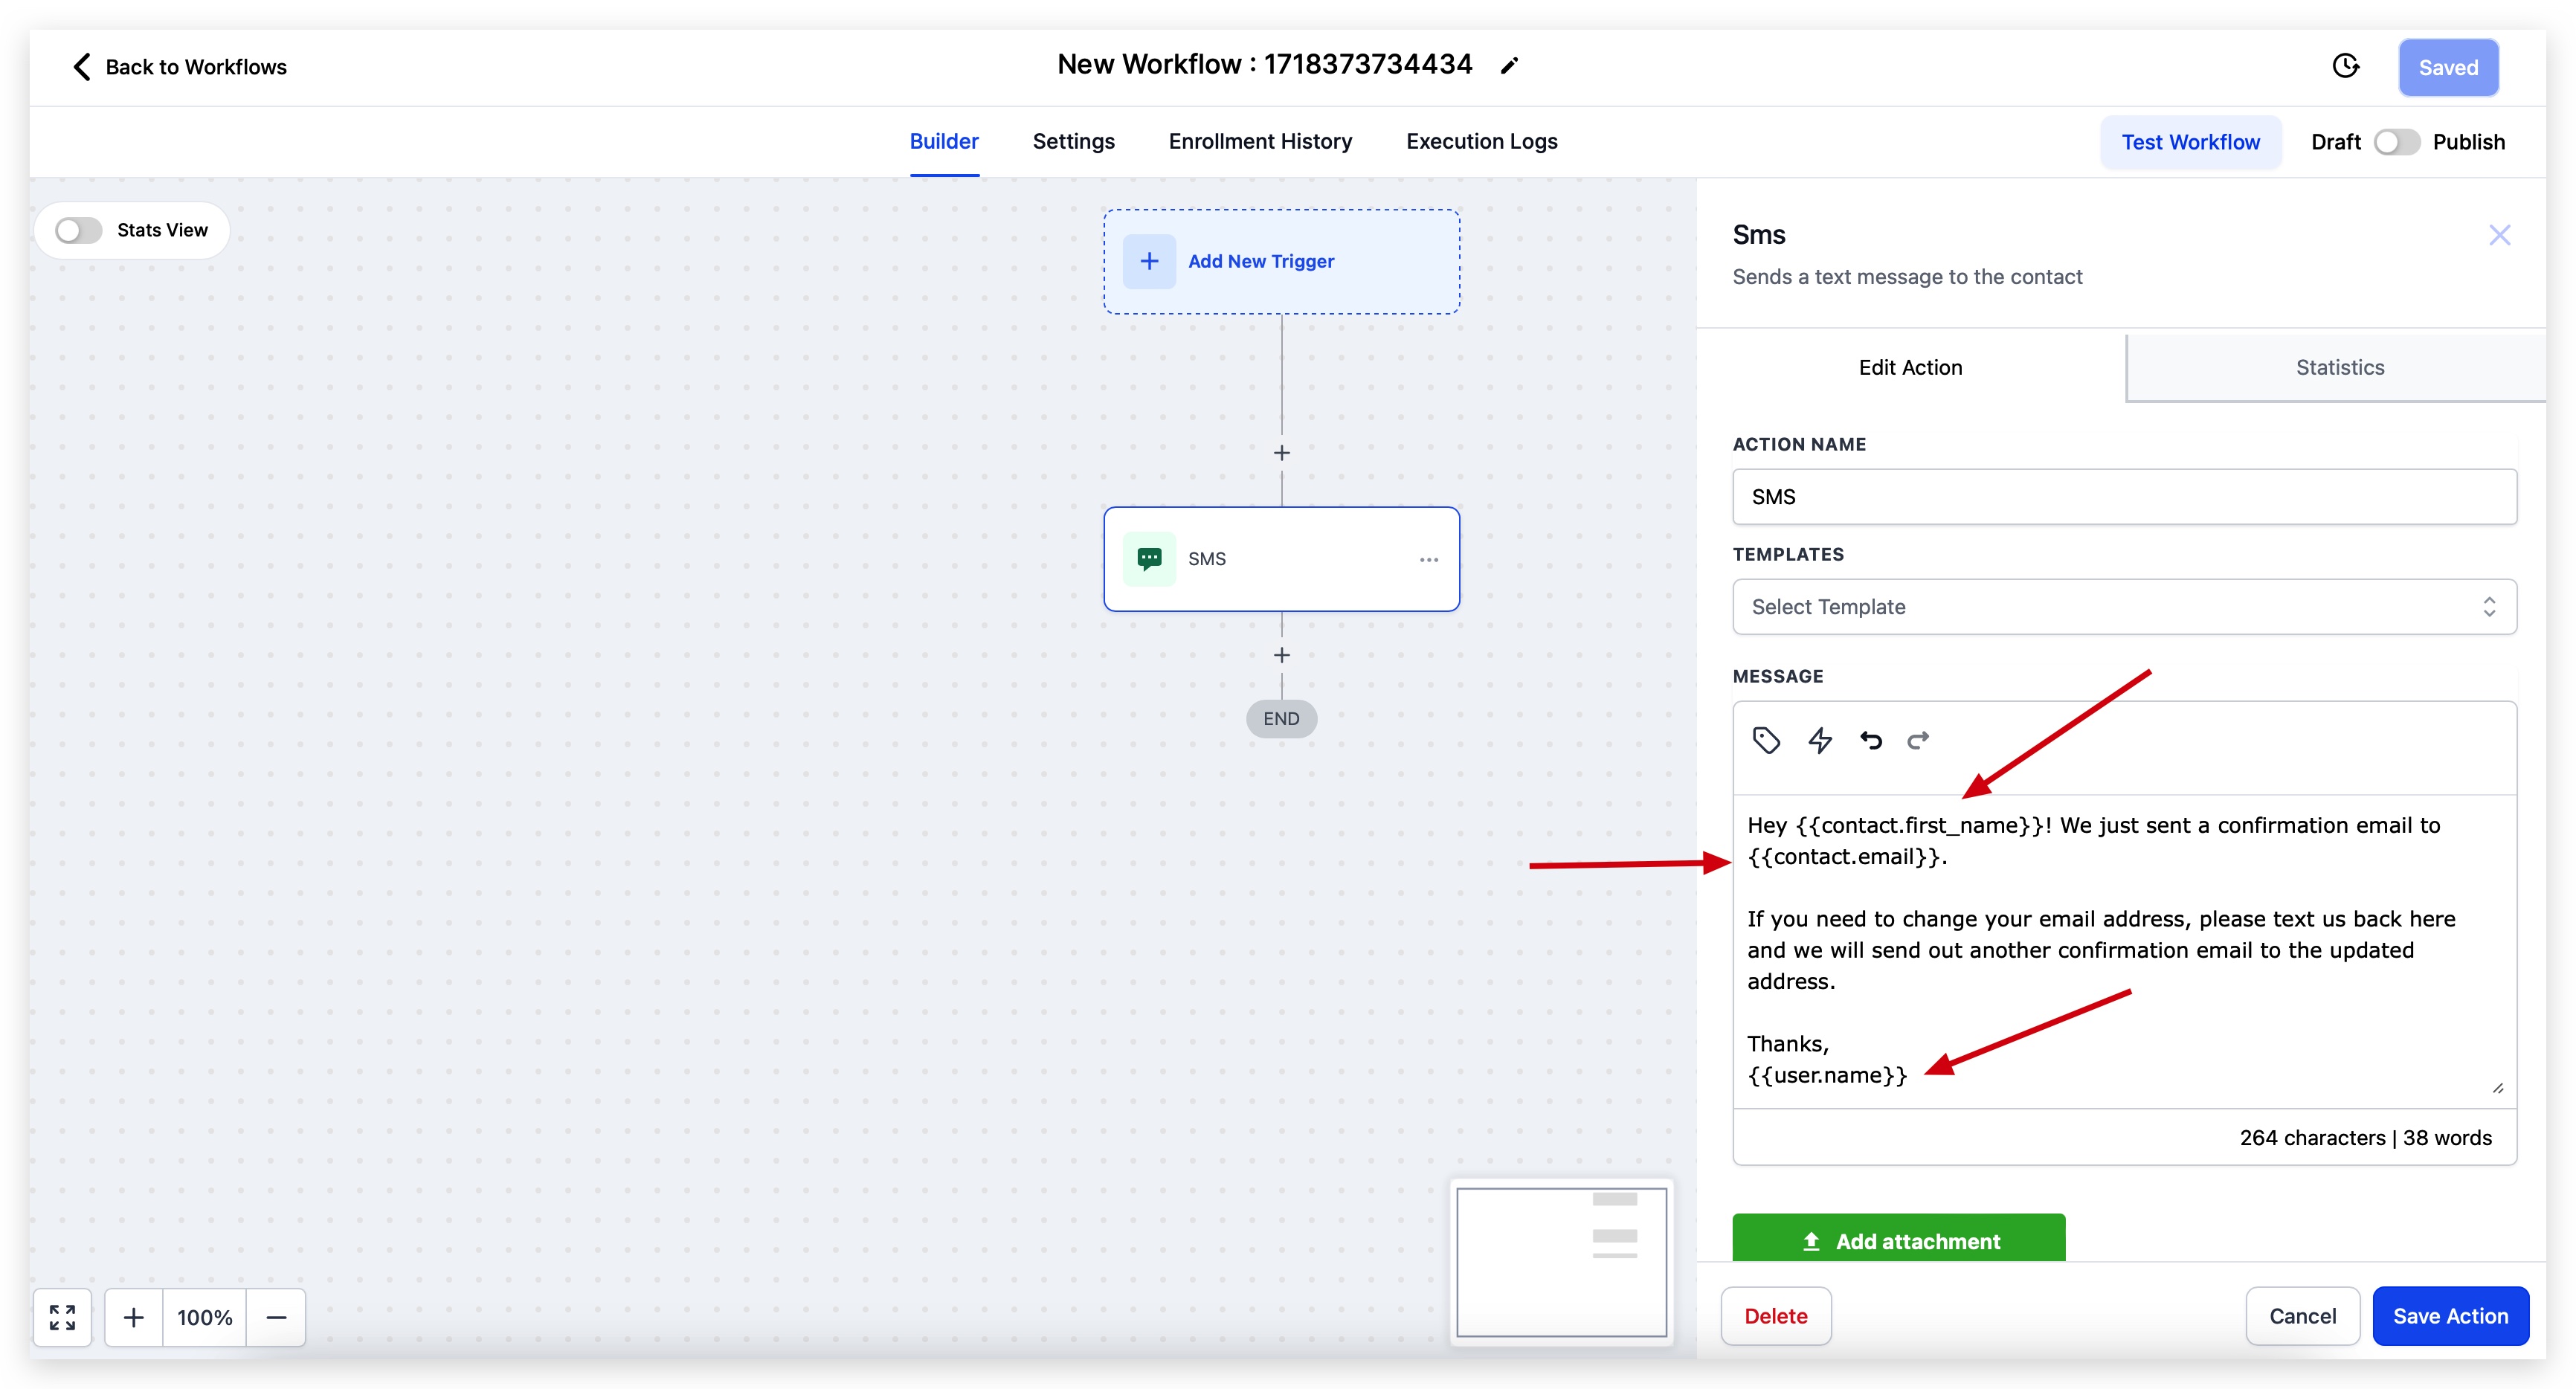
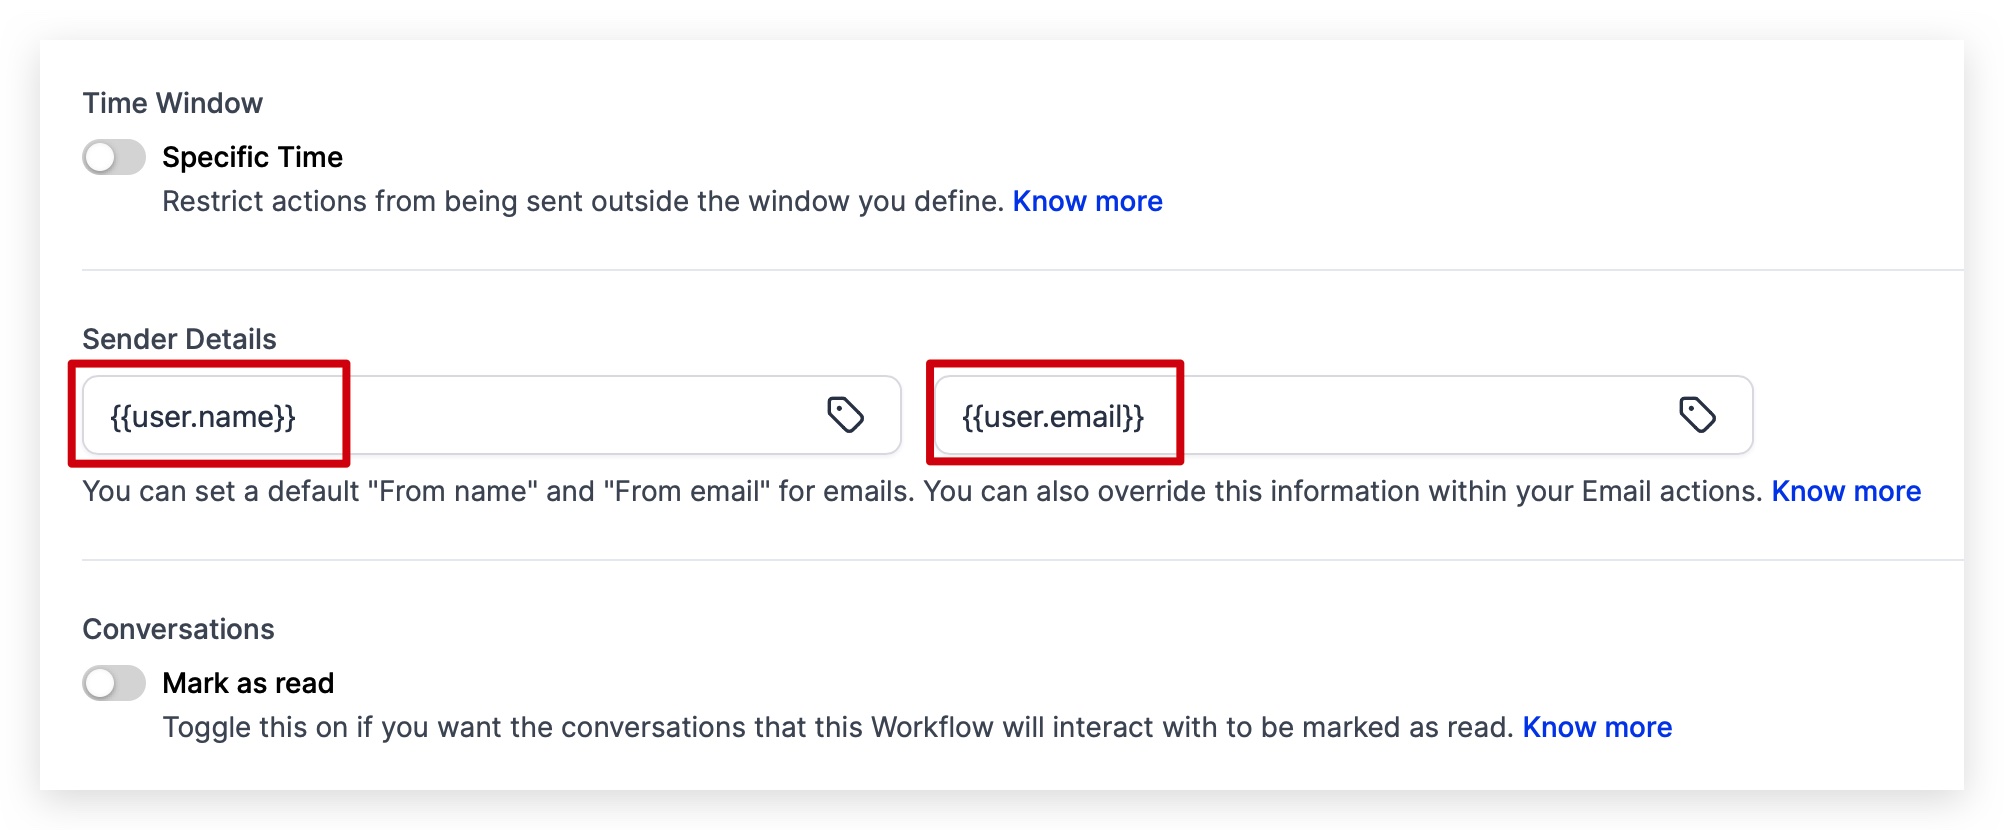
While building workflows, you can add custom values in so many places to help personalize your automation, messaging, and notifications based on the custom values being added.
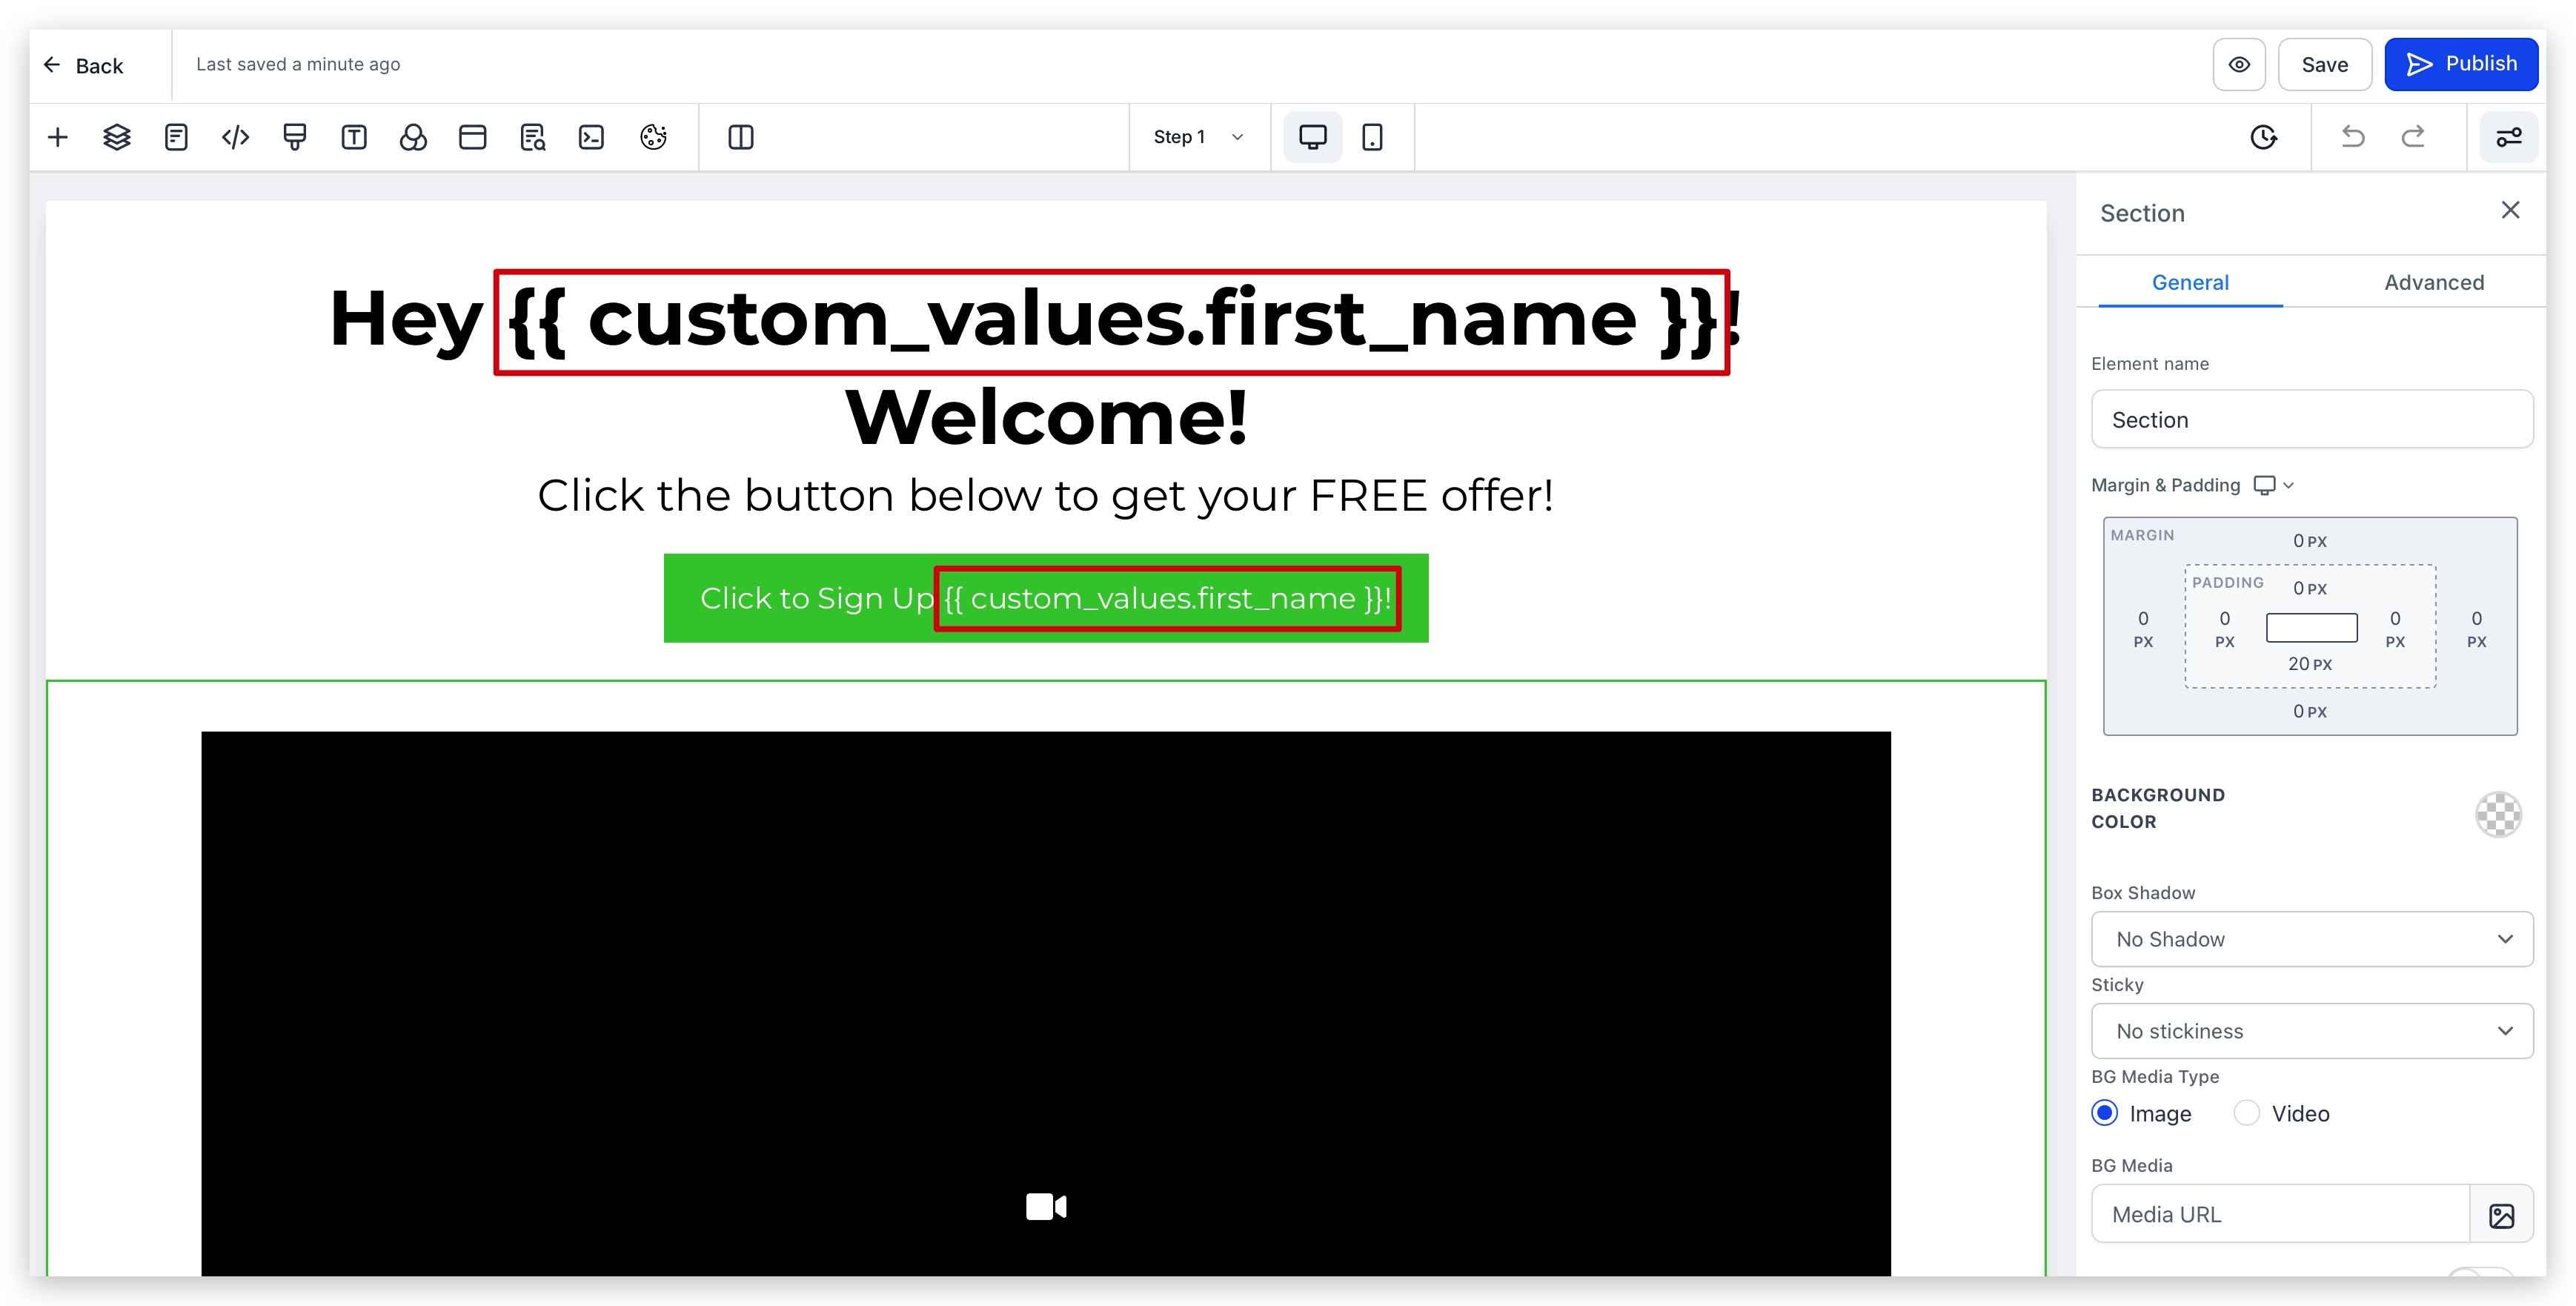
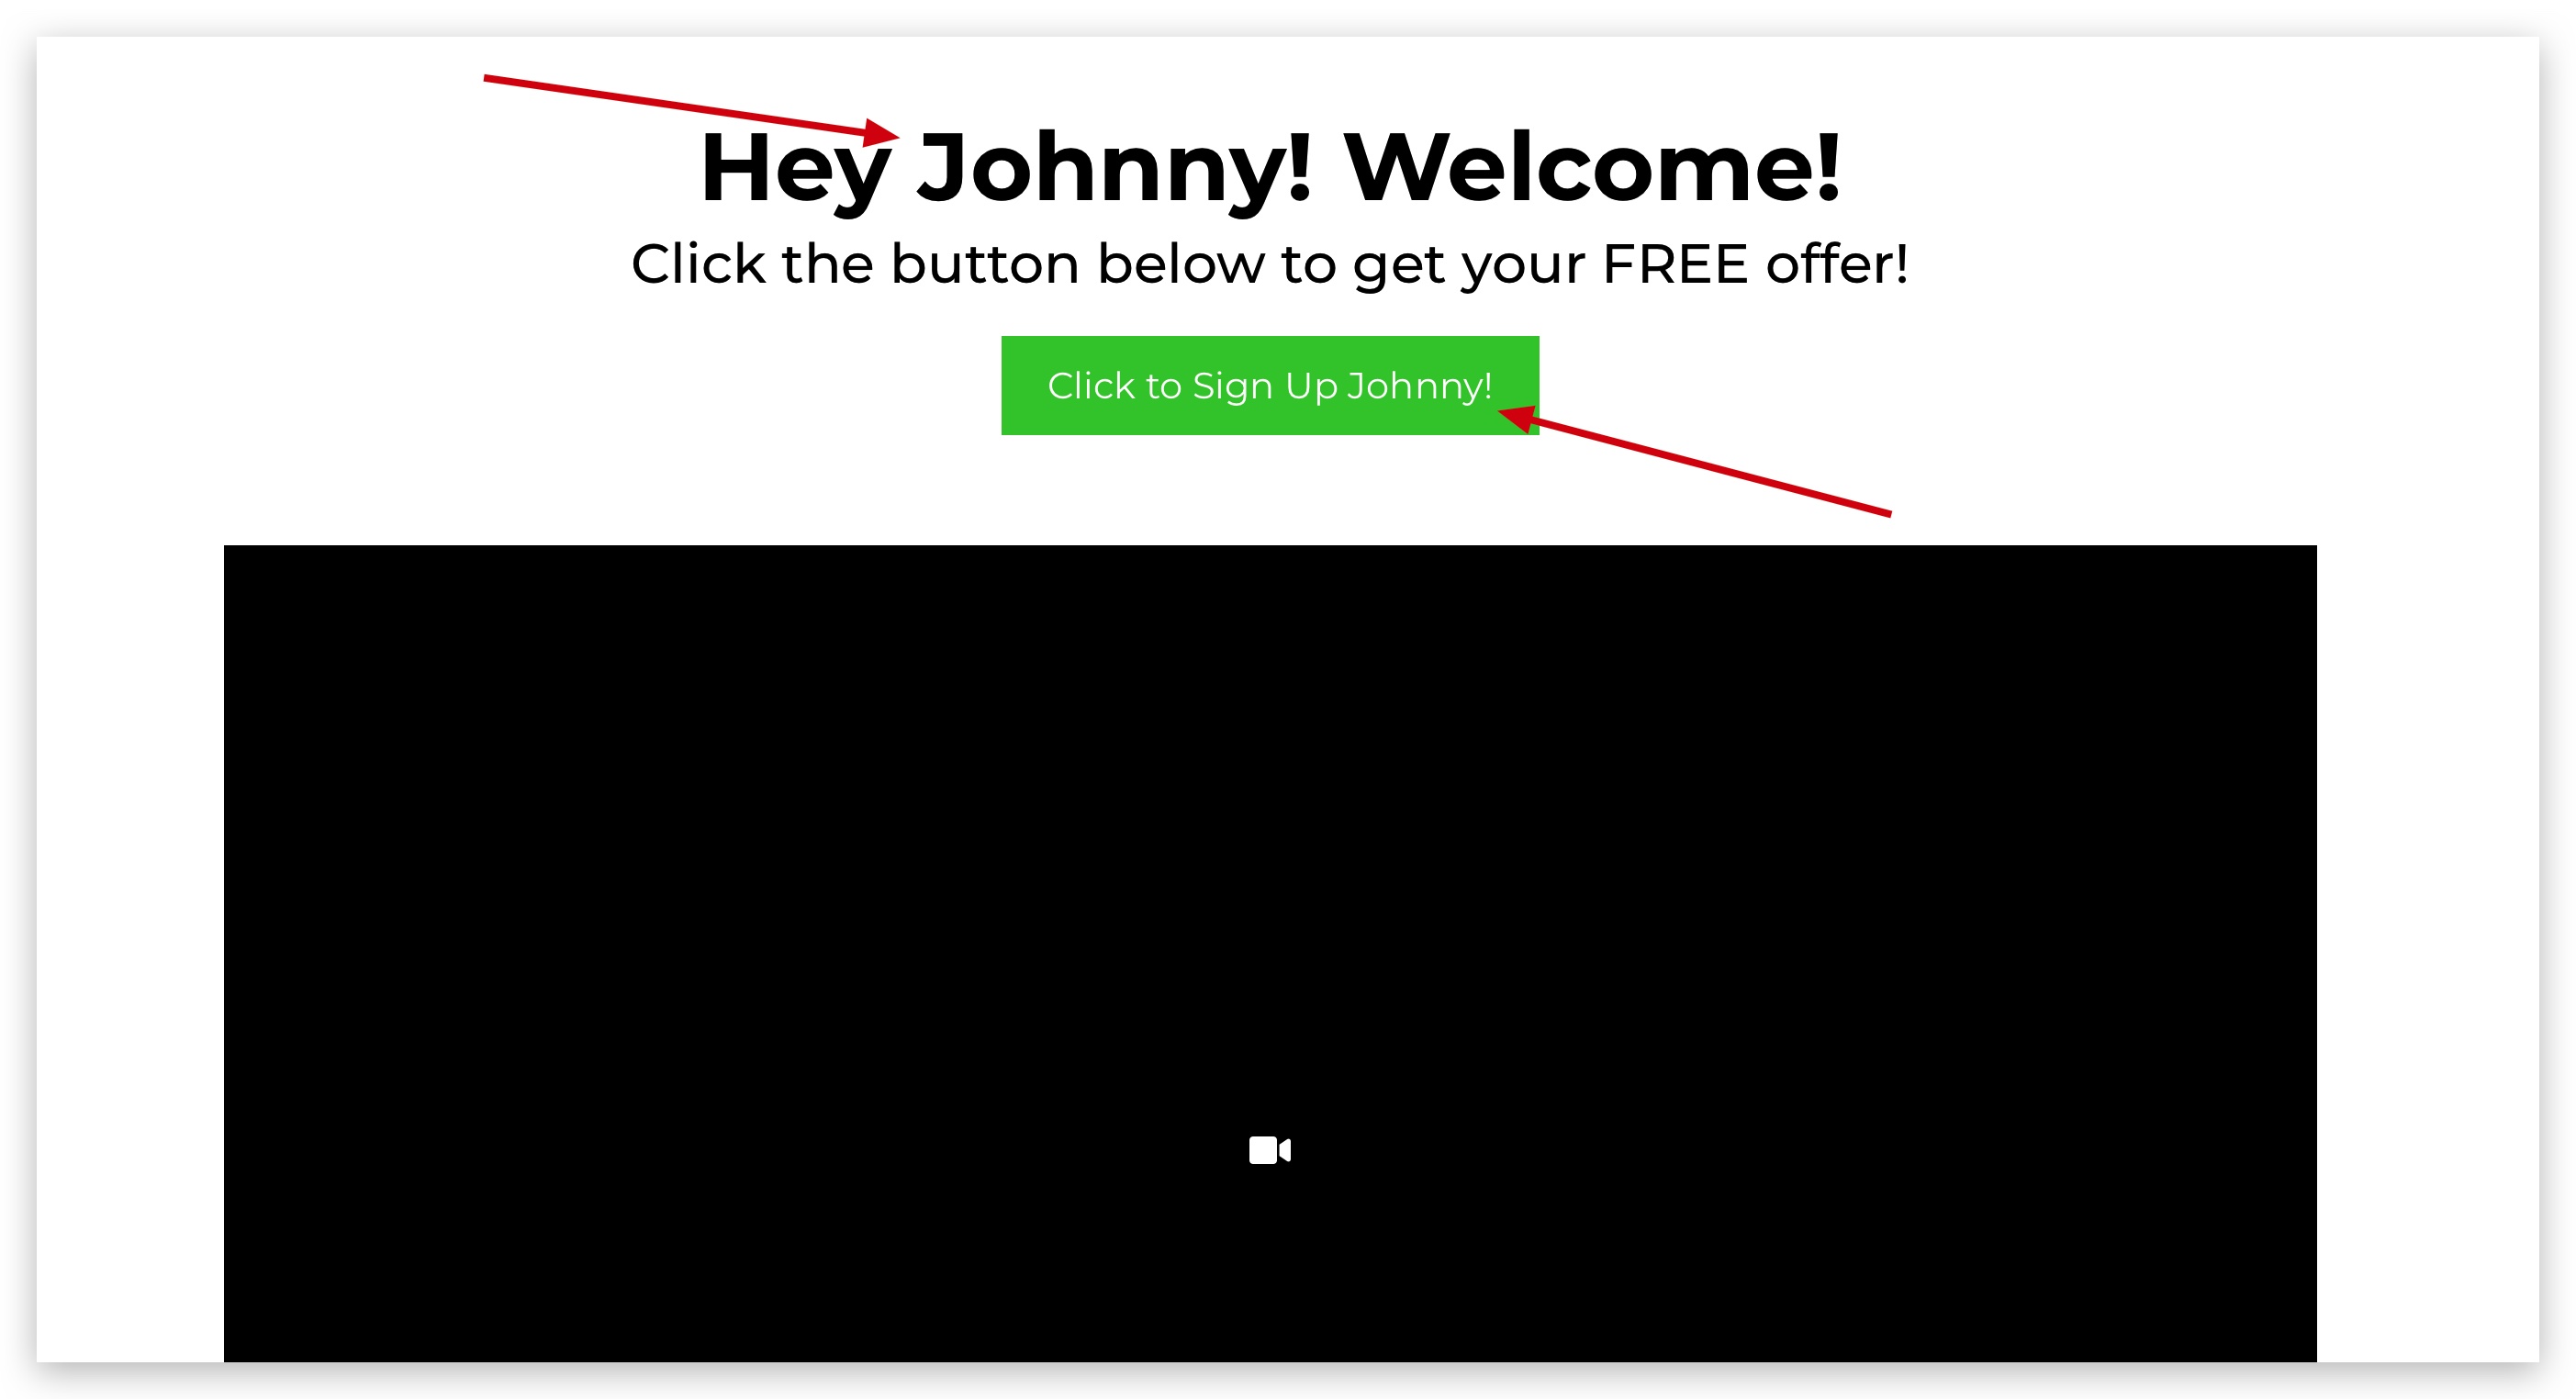
You can add custom values directly inside your website and funnel pages to give your websites and funnels a flare of personalization and speak directly to your prospects and customers.
In order to utilize custom values inside of websites and funnels, the prospect or customer visiting the page must have stored data from previously submitting a form or booking an appointment on your website or funnel.
You can also add custom value data into the URL address bar using Trigger Links
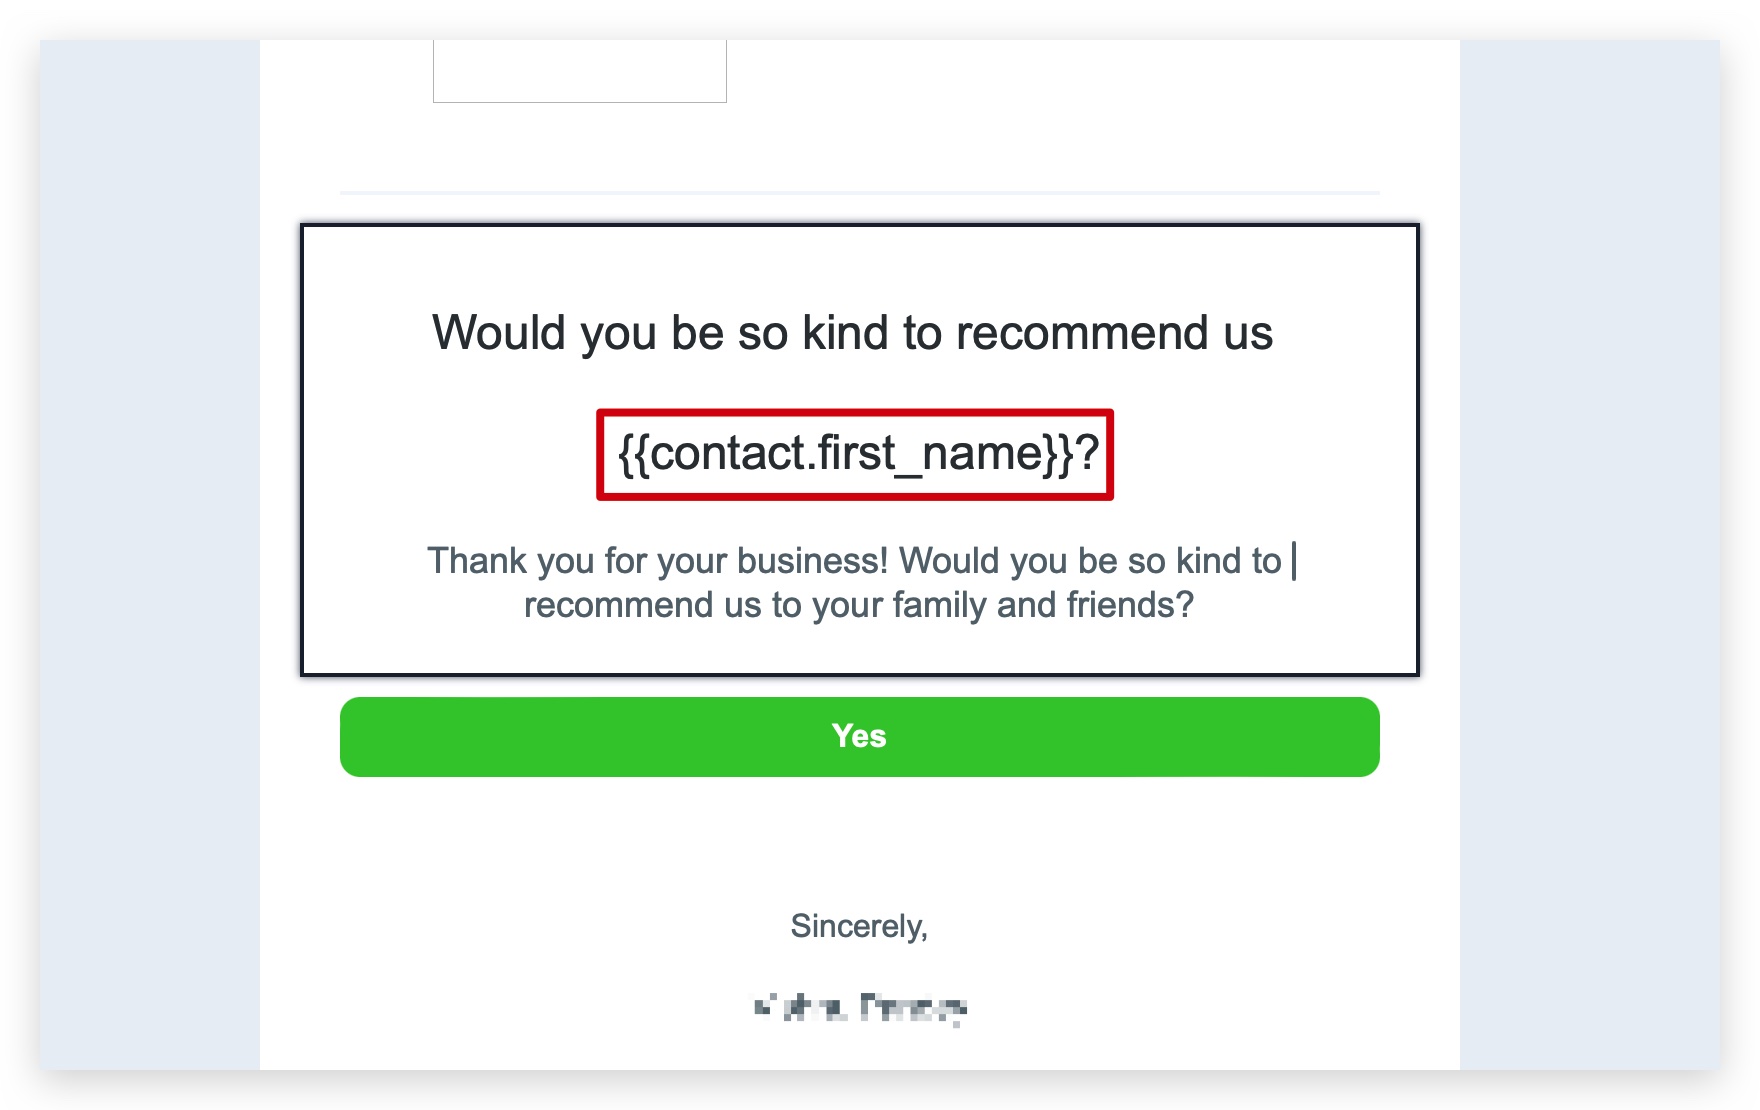
When building emails templates and email campaigns inside the Marketing section, you can add custom values in a few different area to add personalization to your emails.
You can add custom values in the copy of the email, in the subject line, in the email description, and even in the "from name" and "from address".

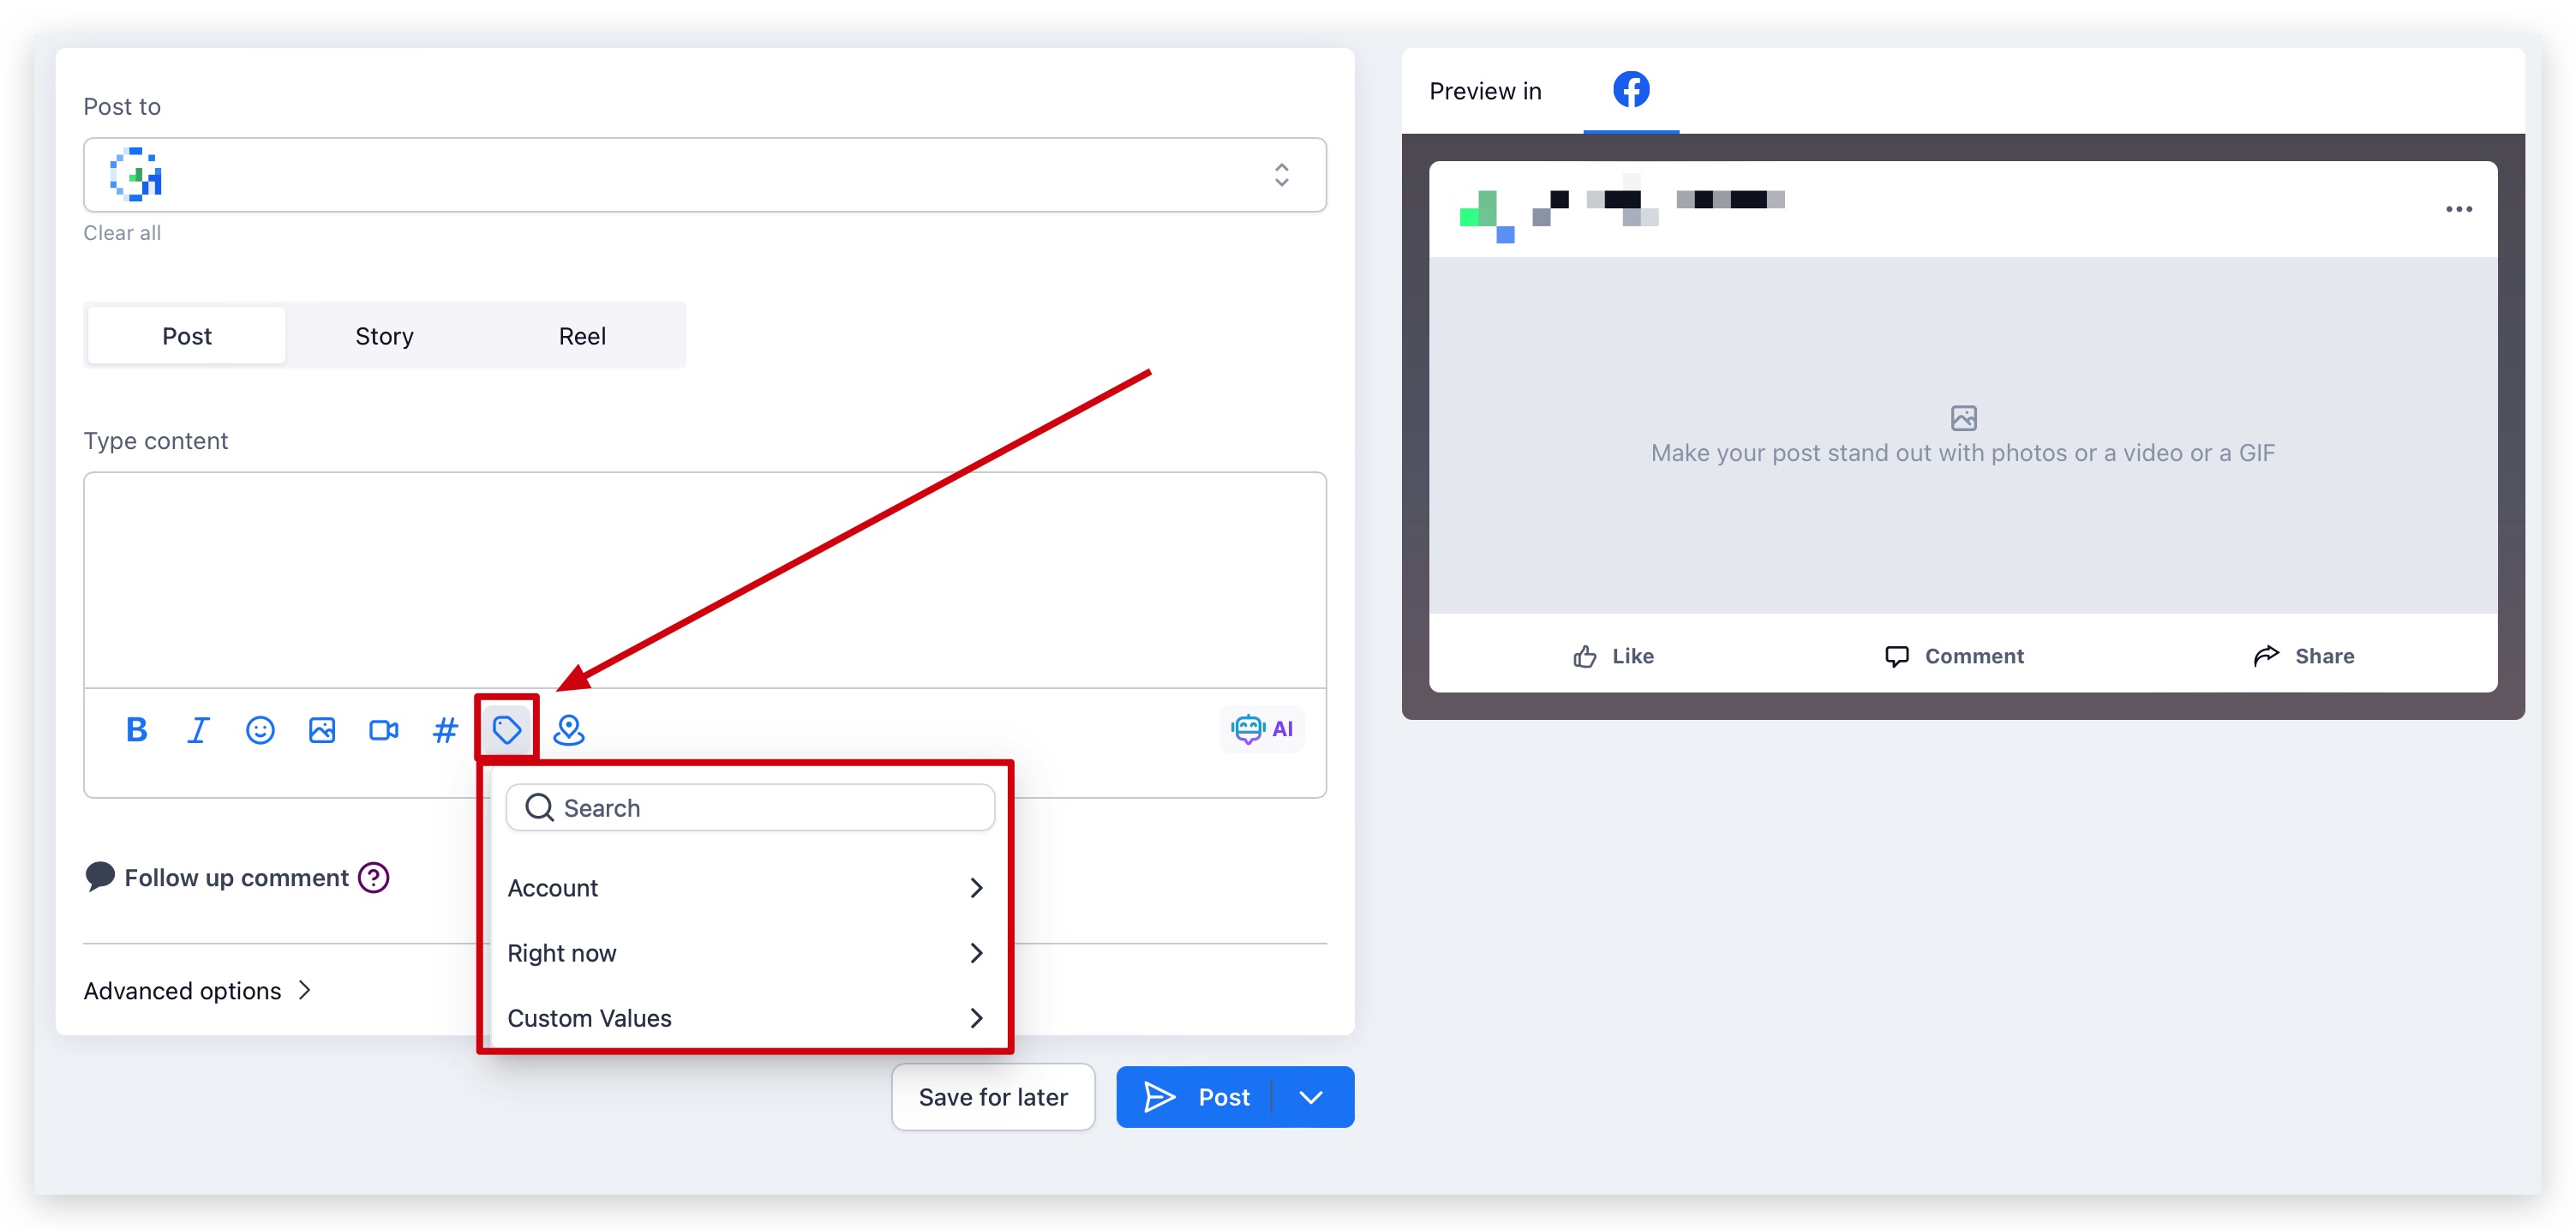
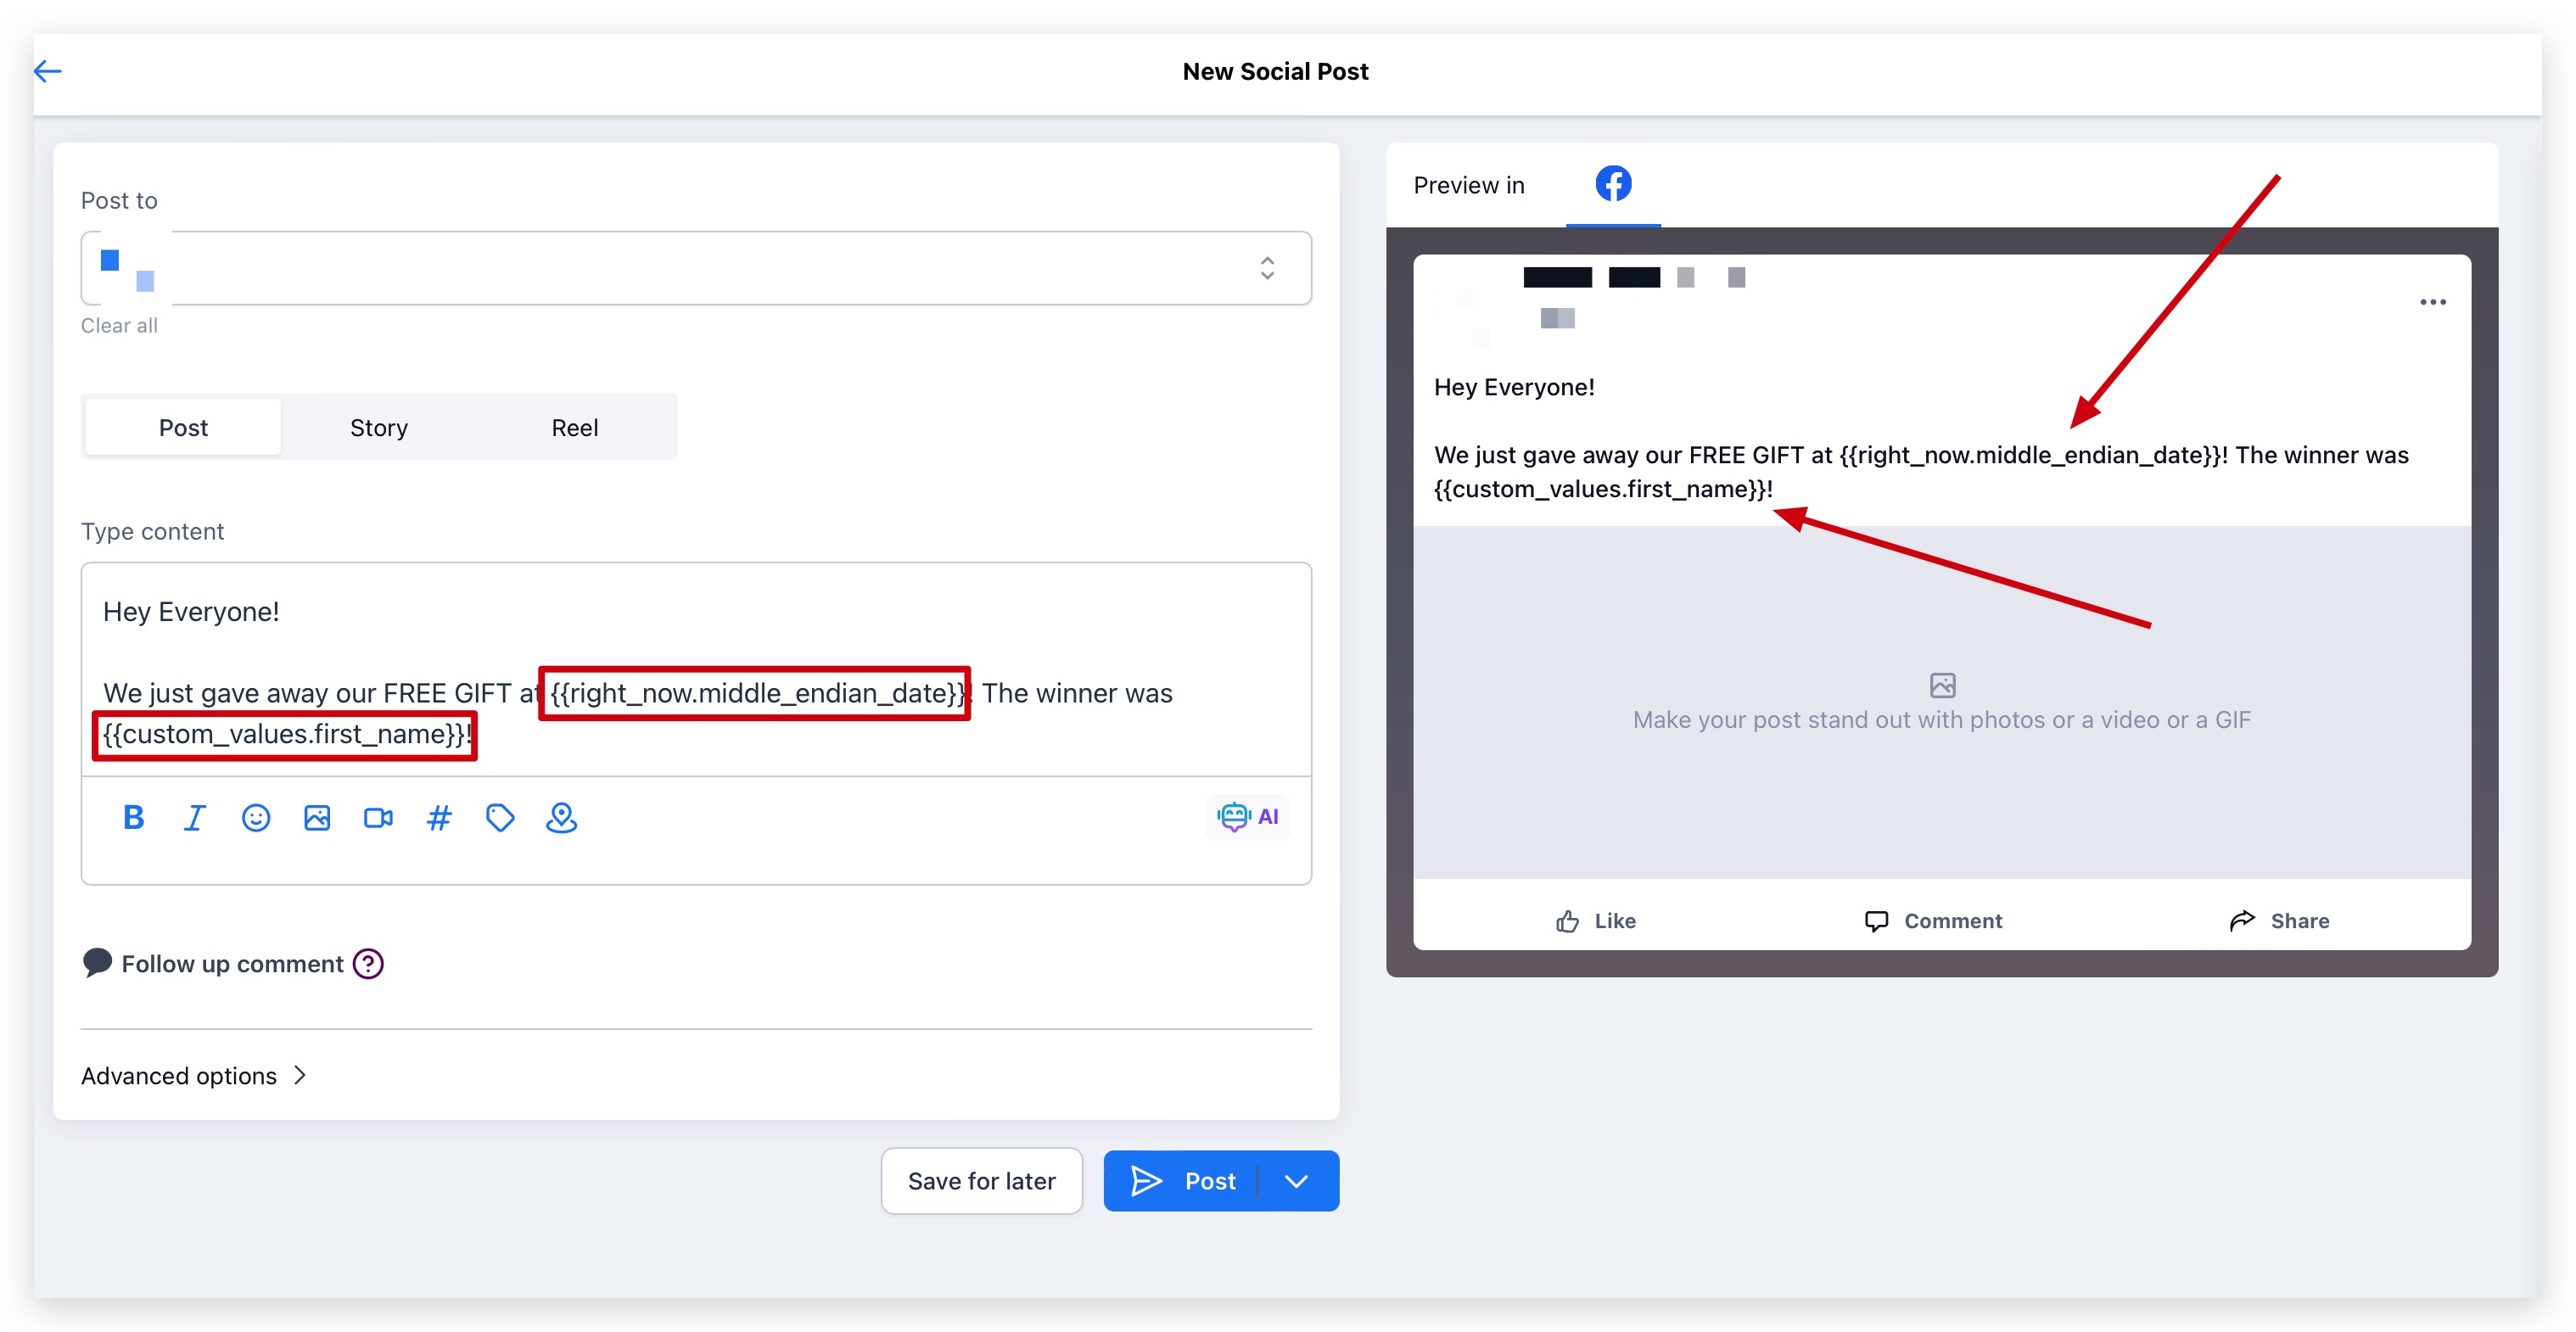
Adding custom values in your social media posts can make posting fast and easy, and also add personalization to your posts no matter who is submitting the post
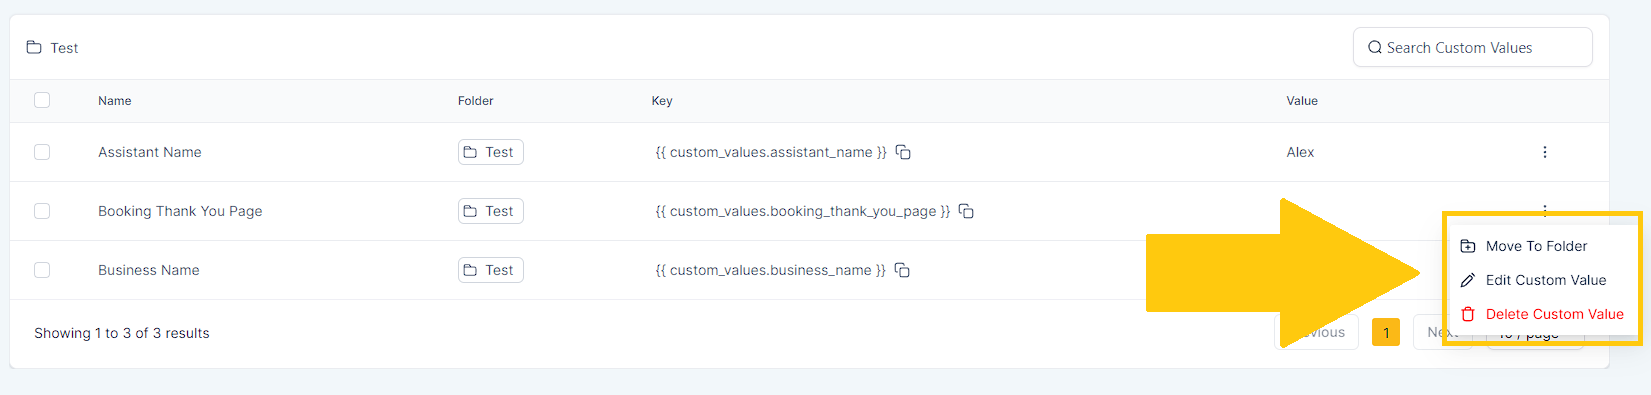
You can organize the custom values and them by ticking the box, clicking the "Add Folder" tab and renaming the folder
1. Tick the box, click "Bulk Action" and select "Move to Folder".
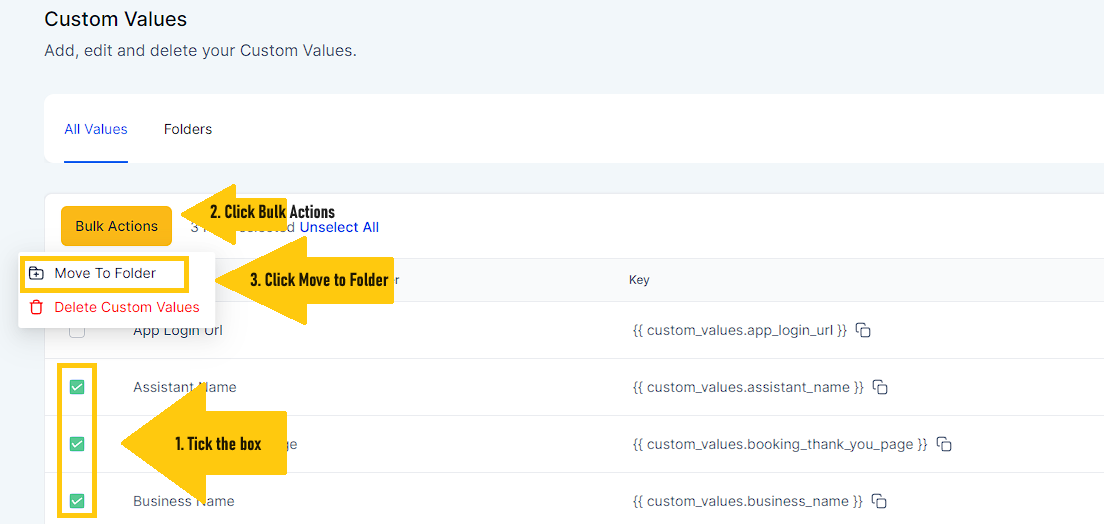
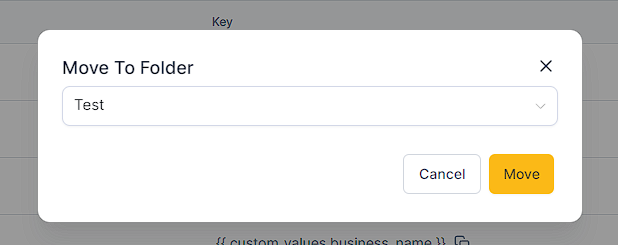
2. Select Folder to move the custom values.
3. You can move, edit or delete the custom value by clicking the 3 dot icon.
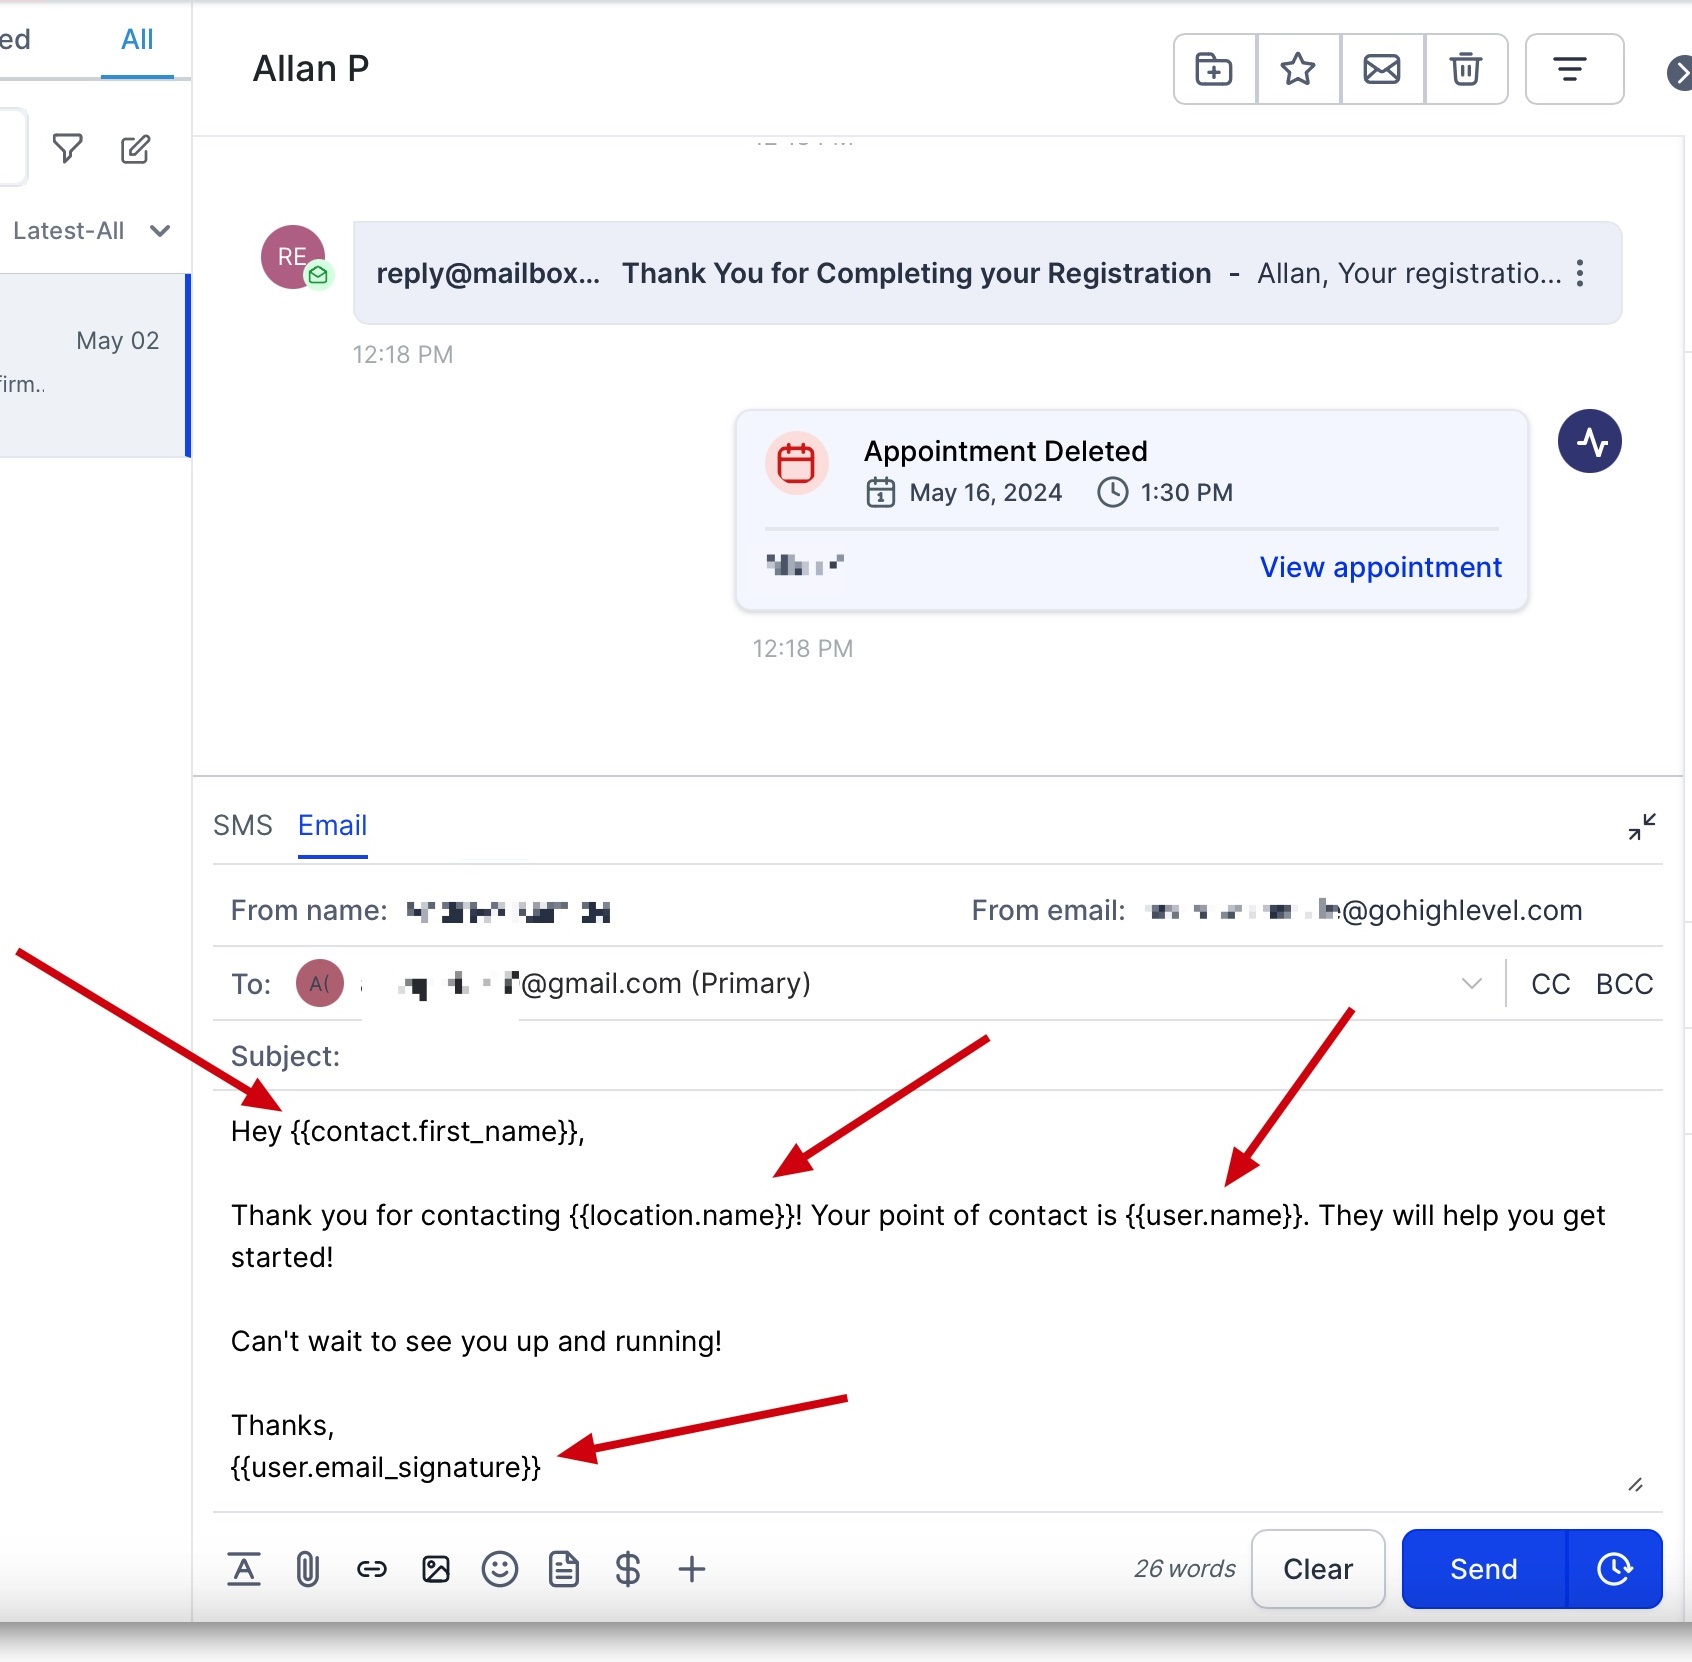
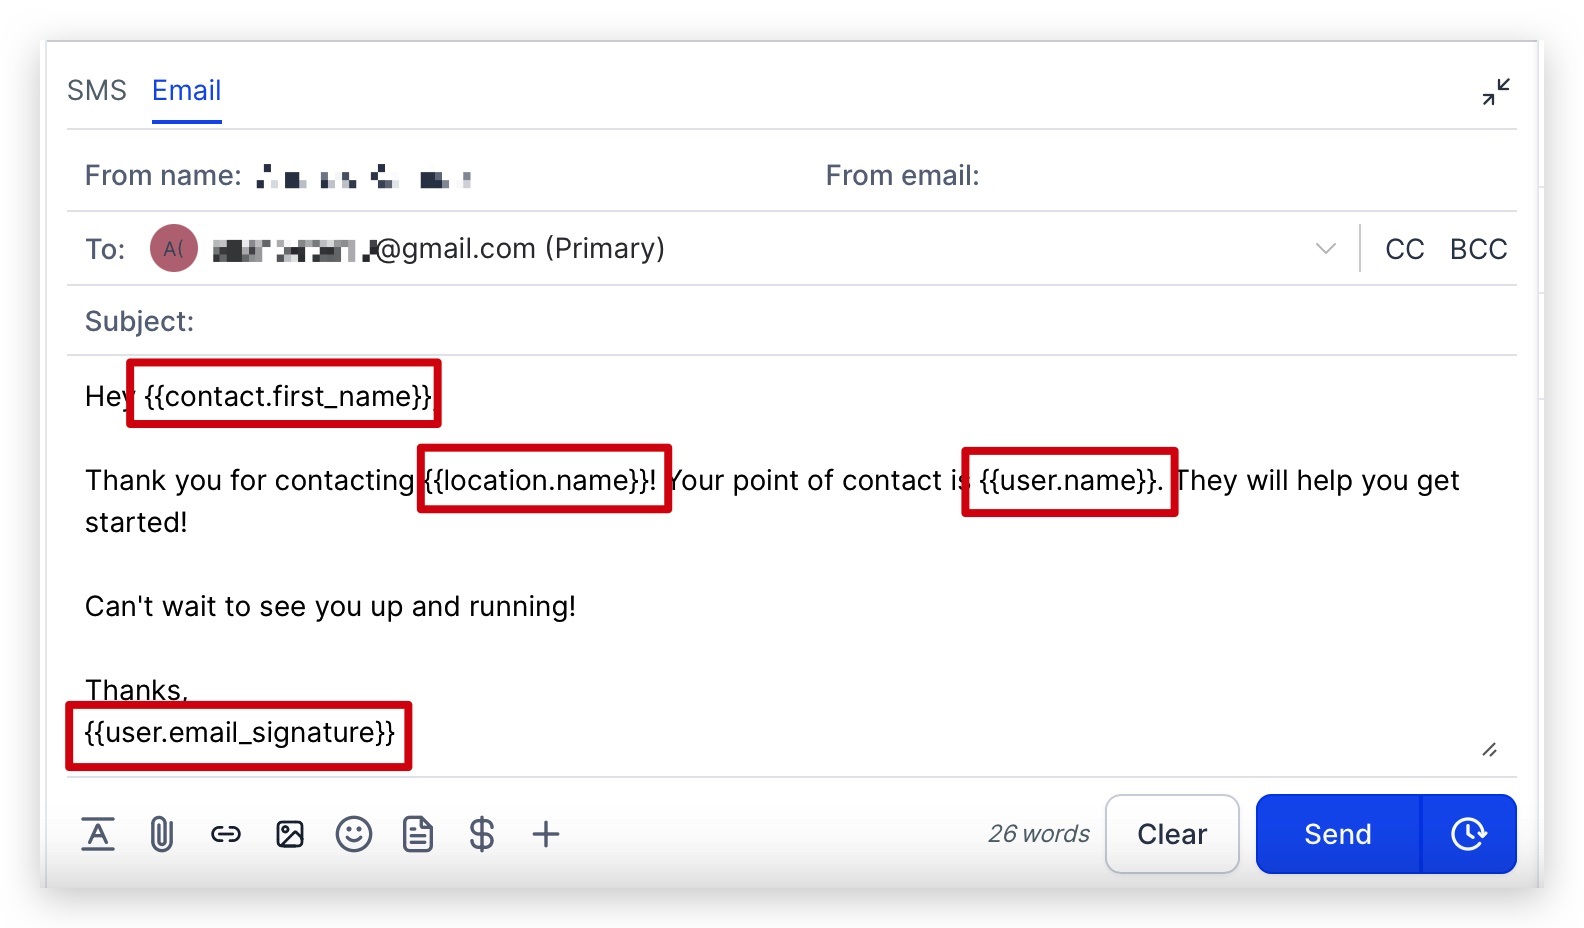
Contact > Full name: {{contact.name}}
Contact > First name: {{contact.first_name}}
Contact > Last name: {{contact.last_name}}
Contact > Email: {{contact.email}}
Contact > Phone: {{contact.phone}} or **{{contact.phone_raw}}
Contact > Phone (Recommended for trigger links & UTM): Tel:{{contact.phone_raw}}
Contact > Company name: {{contact.company_name}}
Contact > Full Address: {{contact.full_address}}
Contact > Address 1: {{contact.address1}}
Contact > City: {{contact.city}}
Contact > State: {{contact.state}}
Contact > Postal Code: {{contact.postal_code}}
Contact > Time Zone {{contact.timezone}}
Contact > Date of Birth: {{contact.date_of_birth}}
Contact > Source: {{contact.source}}
Contact > Website: {{contact.website}}
Contact > ID :{{contact.id}}
User > Full Name: {{user.name}}
User > First Name: {{user.first_name}}
User > Last Name: {{user.last_name}}
User > Email: {{user.email}}
User > Phone: {{user.phone}} or **{{user.phone_raw}}
User > Signature: {{user.email_signature}}
User > Calendar Link: {{user.calendar_link}}
User > Appointment Phone: ** {{appointment.user.phone_raw}}
User > Twilio Phone: {{user.twilio_phone_number}}
User > Twilio Phone raw format: {{user.twilio_phone_number_raw}}
Appointment > Title: {{appointment.title}}
Appointment > Start Date Time: {{appointment.start_time}}
Appointment > Start Date: {{appointment.only_start_date}}
Appointment > Start Time: {{appointment.only_start_time}}
Appointment > End Date Time: {{appointment.end_time}}
Appointment > End Date: {{appointment.only_end_date}}
Appointment > End Time: {{appointment.only_end_time}}
Appointment > Day of the week:{{appointment.day_of_week}}
Appointment > Name of the month:{{appointment.month}}
Appointment > Timezone: {{appointment.timezone}}
Appointment > Cancellation Link: {{appointment.cancellation_link}}
Appointment > Reschedule Link: {{appointment.reschedule_link}}
Appointment > Meeting Location: {{appointment.meeting_location}}
Appointment > Notes: {{appointment.notes}}
Appointment > Add to Google Calendar: {{appointment.add_to_google_calendar}}
Appointment > Add to Ical&Outlook: {{appointment.add_to_ical_outlook}}
Appointment > Recurring > Repeats: {{appointment.recurring.repeats}}
Appointment > Recurring > Times to repeat :{{appointment.recurring.times_to_repeat}}
Appointment > Assigned user > Full Name:{{appointment.user.name}}
Appointment > Assigned user > First Name:{{appointment.user.first_name}}
Appointment > Assigned user > Last Name :{{appointment.user.last_name}}
Appointment > Assigned user > Email: {{appointment.user.email}}
Appointment > Assigned user > Phone: {{appointment.user.phone}}
Appointment > Assigned user >Phone (raw format):{{appointment.user.phone_raw}}
Appointment > Assigned user >Signature:{{appointment.user.email_signature}}
Appointment > Assigned user > Twilio Phone:{{appointment.user.twilio_phone_number}}
Calendar > Name: {{calendar.name}}
Campaign > Event, Date, Time: {{campaign.event_date_time}}
Campaign > Event Date: {{campaign.event_date}}
Campaign > Event Time: {{campaign.event_time}}
Message > Message Body: {{message.body}}
Message > Message Subject :{{message.subject}}
Account > Name: {{location.name}}
Account > Full Address: {{location.full_address}}
Account > Address Line 1: {{location.address}}
Account > City: {{location.city}}
Account > State: {{location.state}}
Account > Country: {{location.country}}
Account > Postal Code: {{location.postal_code}}
Account > Email: {{location.email}}
Account > Phone: {{location.phone}}
Account > Phone (raw format) : {{location.phone_raw}}
Account > Website: {{location.website}}
Account > Logo URL: {{location.logo_url}}
Account > Owner > First Name: {{location_owner.first_name}}
Account > Owner > Last Name: {{location_owner.last_name}}
Account > Owner > Email: {{location_owner.email}}
Account > ID: {{location.id}}
Right Now > Second: {{right_now.second}}
Right Now > Minute: {{right_now.minute}}
Right Now > Time 24h Format: {{right_now.hour}}
Right Now > Time AM/PM Format: {{right_now.hour_ampm}}
Right Now > AM/PM: {{right_now.ampm}}
Right Now > Day of the week extended english :{{right_now.day_of_week}}
Right Now > Name of month : {{right_now.month_name}}
Right Now > Day: {{right_now.day}}
Right Now > Month: {{right_now.month}}
Right Now > Month Extended English:{{right_now.month_english}}
Right Now > Year: {{right_now.year}}
Right Now > Date (month/day/year): {{right_now.middle_endian_date}}
Right Now > Date (day/month/year): {{right_now.little_endian_date}}
Right Now > Day of the week: {{right_now.day_of_week}}
Attribution > First > Session Source: {{contact.attributionSource.sessionSource}}
Attribution > First > URL: {{contact.attributionSource.url}}
Attribution > First > Campaign: {{contact.attributionSource.campaign}}
Attribution > First > UTM Source: {{contact.attributionSource.utmSource}}
Attribution > First > UTM Medium: {{contact.attributionSource.utmMedium}}
Attribution > First > UTM Content: {{contact.attributionSource.utmContent}}
Attribution > First > Referrer: {{contact.attributionSource.referrer}}
Attribution > First > Campaign Id: {{contact.attributionSource.campaignId}}
Attribution > First > FB Clickld: {{contact.attributionSource.fbclid}}
Attribution > First > Google Clickld: {{contact.attributionSource.gclid}}
Attribution > First > UTM Keyword:{{contact.attributionSource.utmKeyword}}
Attribution > First > UTM Match Type:{{contact.attributionSource.utmMatchType}}
Attribution > First > Ad Group ID: {{contact.attributionSource.adGroupId}}
Attribution > First > Ad ID: {{contact.attributionSource.adId}}
Attribution > Lastest > Session Source: {{contact.lastAttributionSource.sessionSource}}
Attribution > Lastest > URL: {{contact.lastAttributionSource.url}}
Attribution > Lastest > Campaign: {{contact.lastAttributionSource.campaign}}
Attribution > Lastest > UTM Source: {{contact.lastAttributionSource.utmSource}}
Attribution > Lastest > UTM Medium: {{contact.lastAttributionSource.utmMedium}}
Attribution > Lastest > UTM Content: {{contact.lastAttributionSource.utmContent}}
Attribution > Lastest > Referrer: {{contact.lastAttributionSource.referrer}}
Attribution > Lastest > Campaign Id: {{contact.lastAttributionSource.campaignId}}
Attribution > Lastest > FB Clickld: {{contact.lastAttributionSource.fbclid}}
Attribution > Lastest > Google Clickld: {{contact.lastAttributionSource.gclid}}
Attribution > Lastest > UTM Campaign :{{contact.lastAttributionSource.utmCampaign}}
Attribution > Lastest > UTM Keyword :{{contact.lastAttributionSource.utmKeyword}}
Attribution > Lastest > UTM March Type:{{contact.lastAttributionSource.utmMatchType}}
Attribution > Lastest > Ad Group ID: {{contact.lastAttributionSource.adGroupId}}
Attribution > Lastest > Ad ID: {{contact.lastAttributionSource.adId}}
