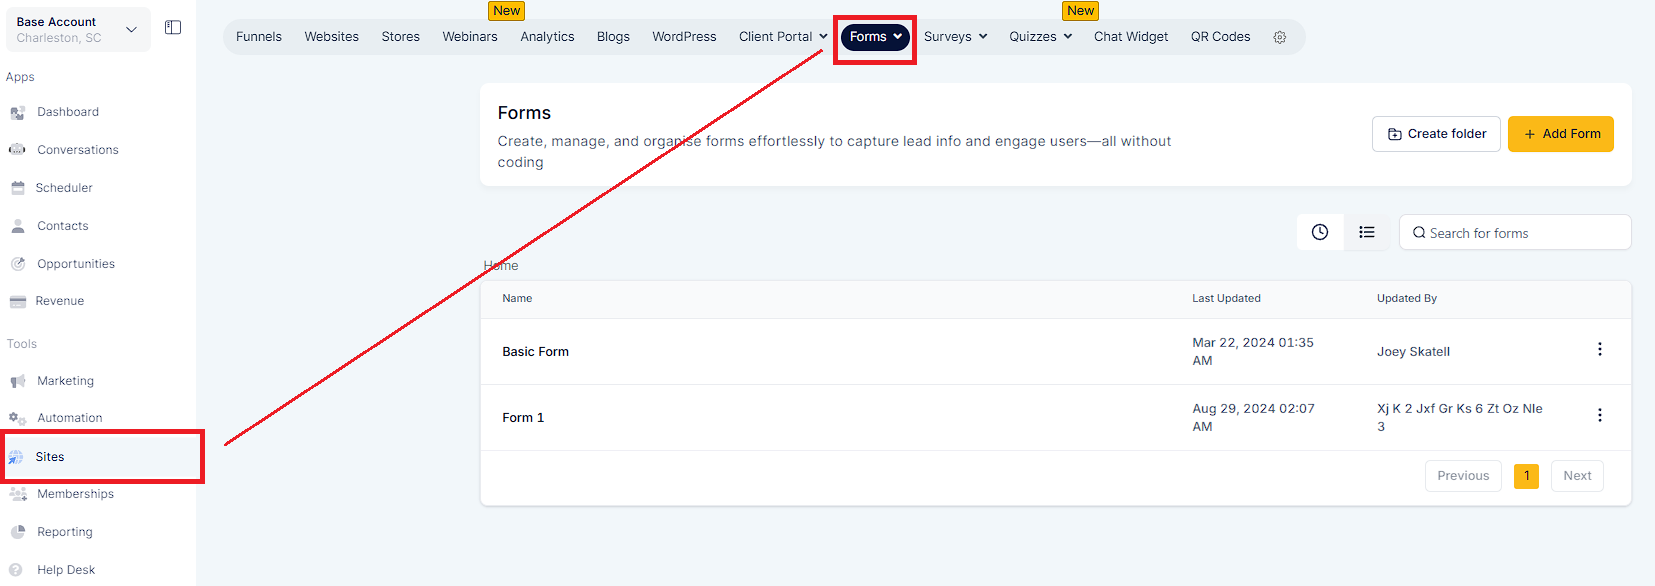
To get started, navigate to Sites > Forms.
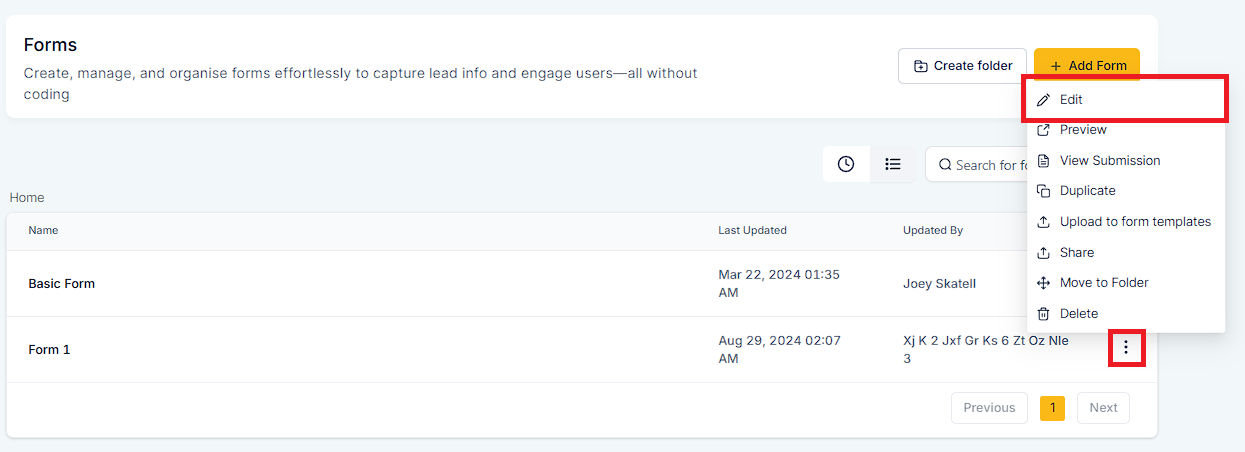
To modify an existing form, click the 3 dot icon and click "Edit" .
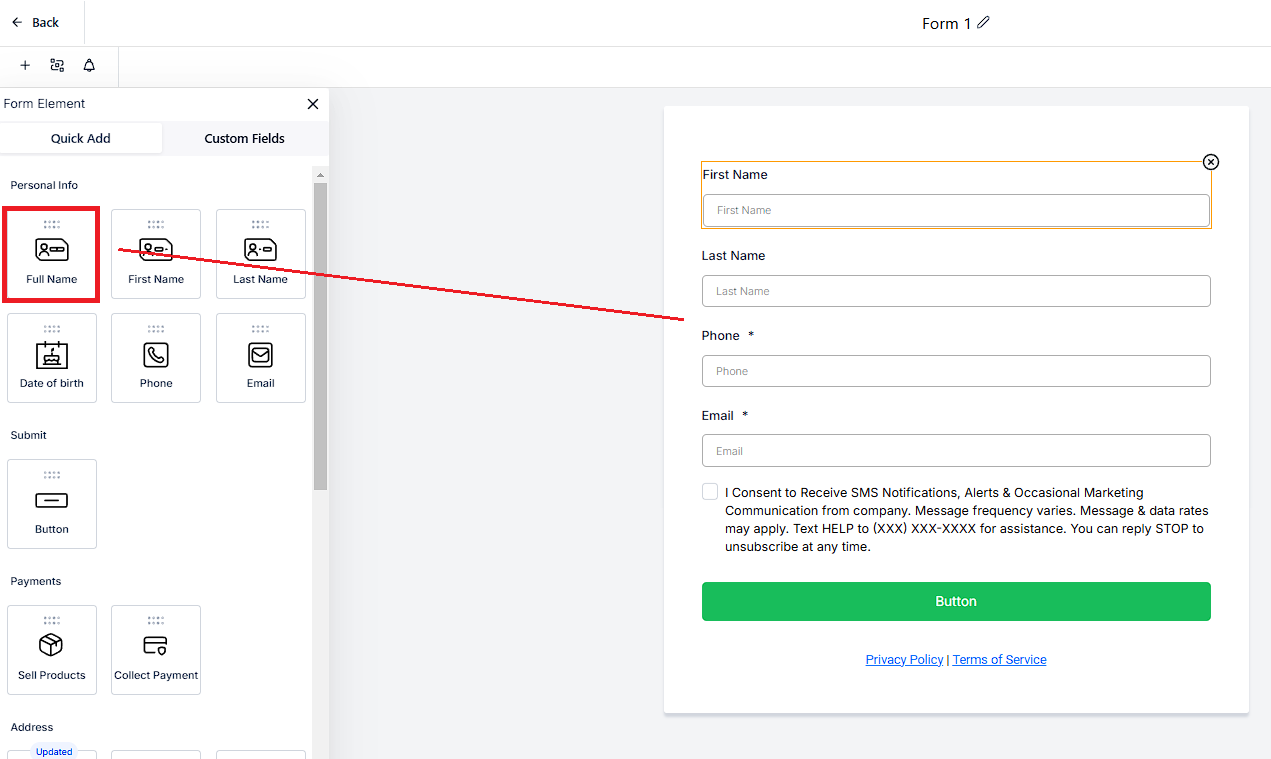
Simply drag and drop the element you wanted to added or click "x" to delete an existing element.

How To Build, Edit, And Utilize Forms
Gain Consent With Custom Checkboxes In Forms (GDPR Compliance)
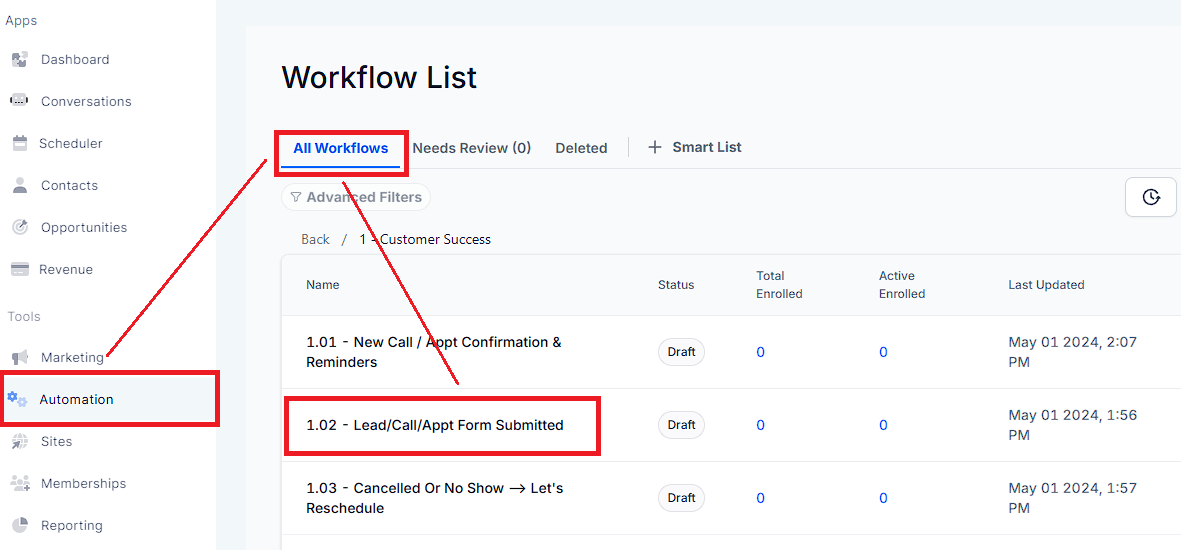
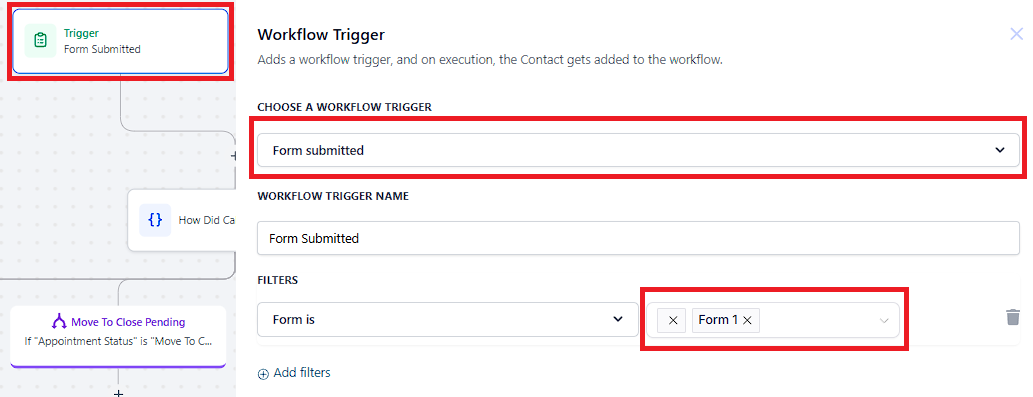
Click the "+" icon and select the action or type Form Submitted. In this case, the trigger is set to activate when a specific form is submitted.
Click the "+" icon and select the action or type If/Else to add the this action. The "If/Else Condition" in your automation workflow allows you to fork the contact's journey based on specific conditions.
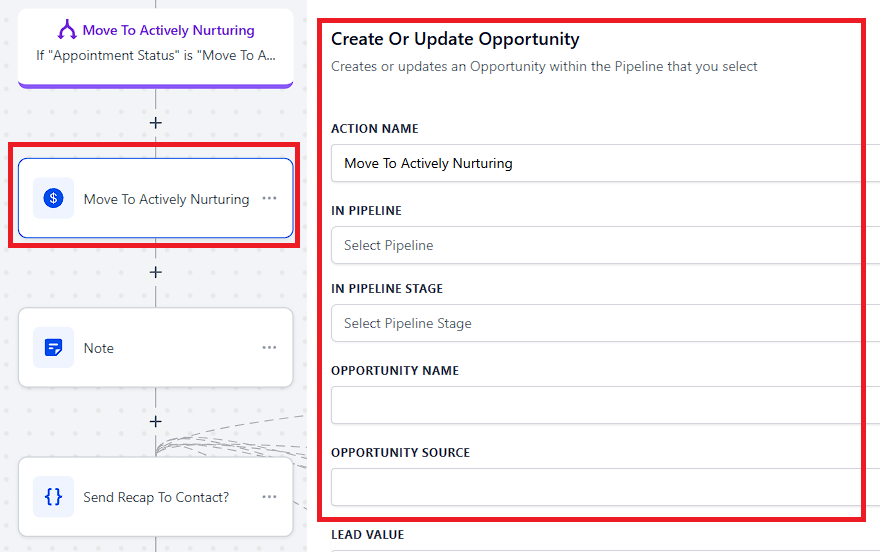
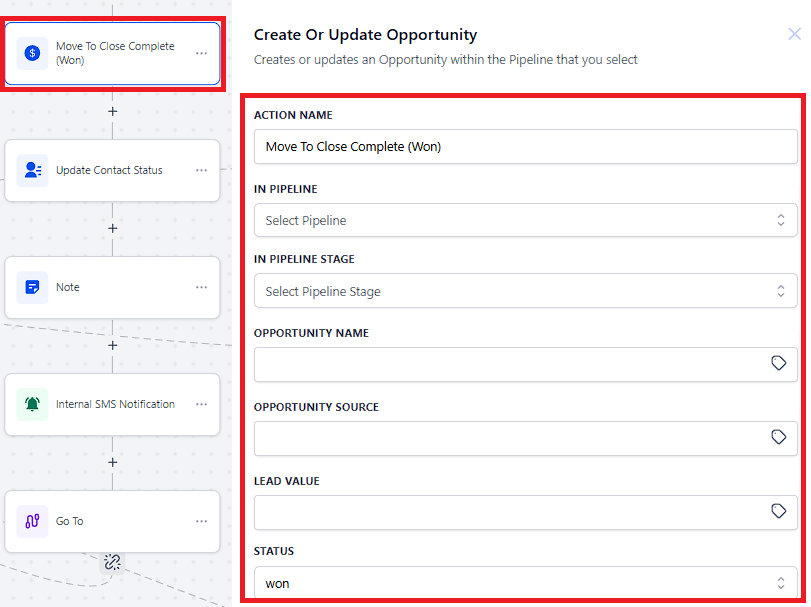
Create or Update Opportunity
Select the In Pipeline and Pipeline Stage by clicking the box. This Action creates or updates an Opportunity within the Pipeline that you select. Make sure to update the Opportunity Name to {{contact.name}}.
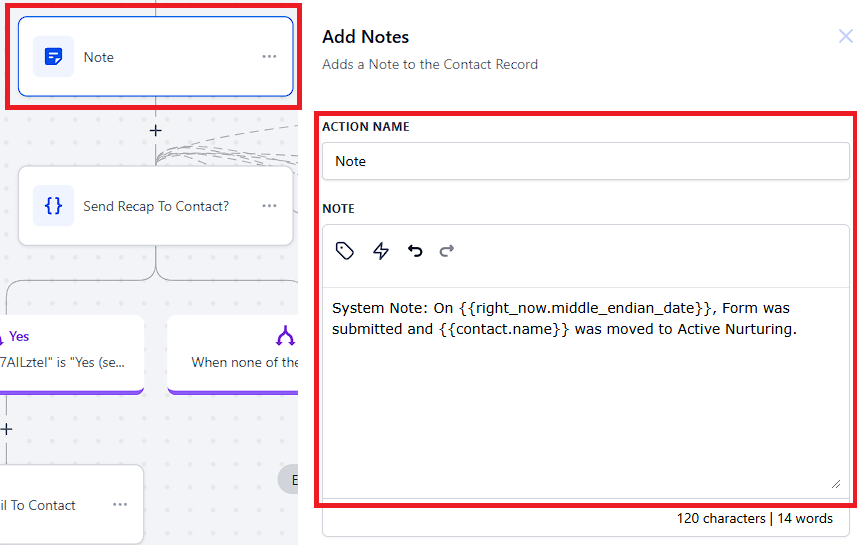
Add Notes
Click the "+" icon and select the action or type Add Notes. This action will allow you to add notes to the contact record.
Condition - Send Recap To Contact
Click the "+" icon and select the action or type If/Else to add the this action. If the "If/Else Condition" is set to "Yes". When none of condition are met, no action is needed.
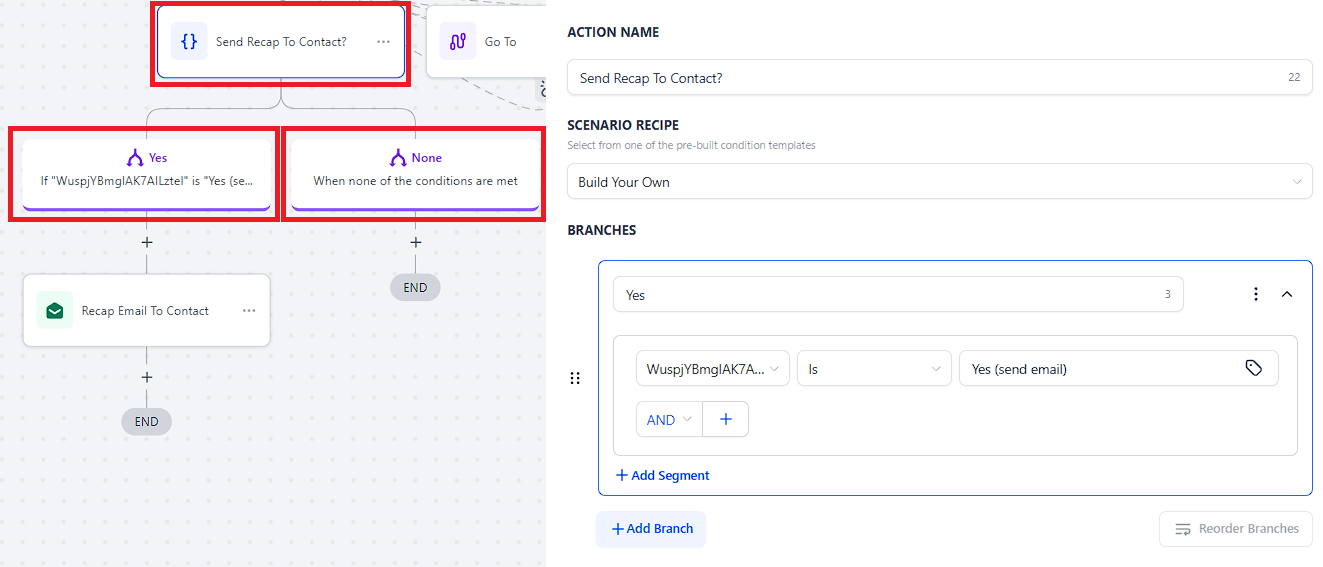
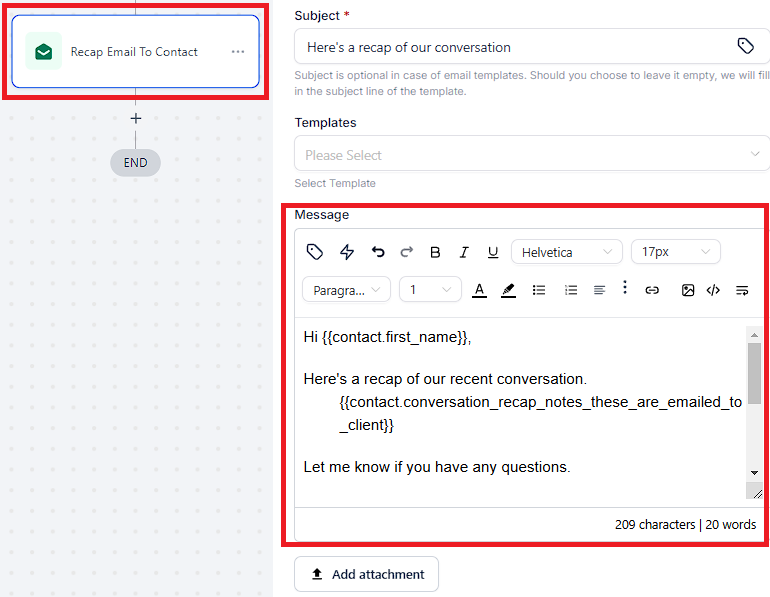
Send a Recap Email To Contact
Click the "+" icon and select the action or type Email. The "Email" action will be activated. Make sure to update the "From Name" and "From Email" and save the action.
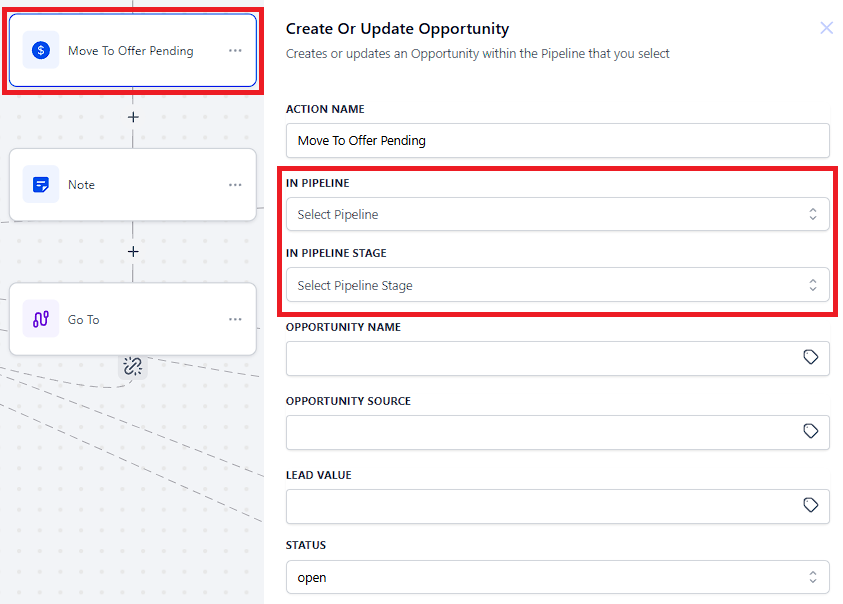
Create or Update Opportunity
Select the In Pipeline and Pipeline Stage by clicking the box. This Action creates or updates an Opportunity within the Pipeline that you select. Make sure to update the Opportunity Name to {{contact.name}}.

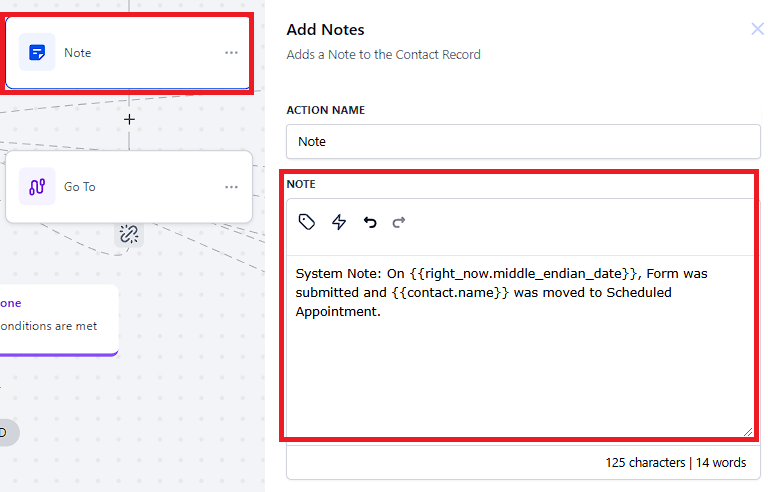
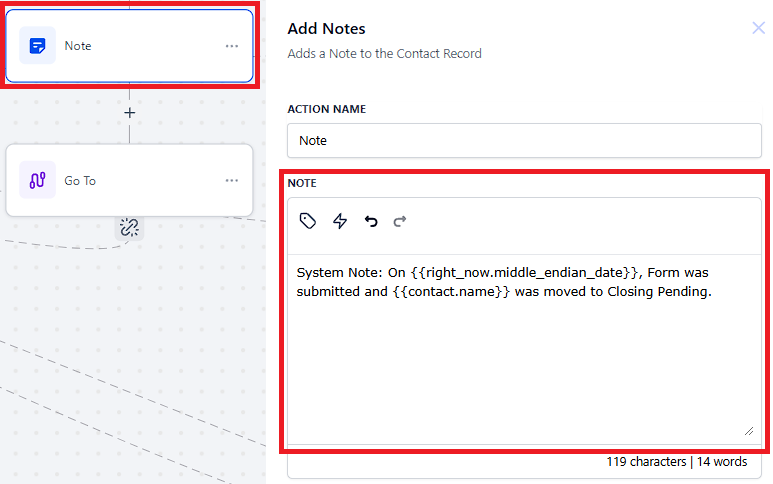
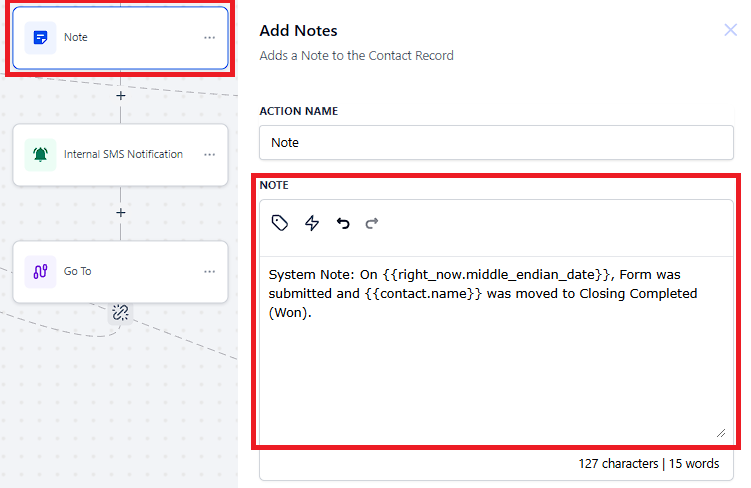
Add Notes
Click the "+" icon and select the action or type "Add Notes". This action will add system notes to the contact record.
Go To
To use a Go-To step, simply add a Go-To event and then draw a line to where you want the contacts to jump. This Go-To event allows you to jump contacts to Send Recap to Contact.

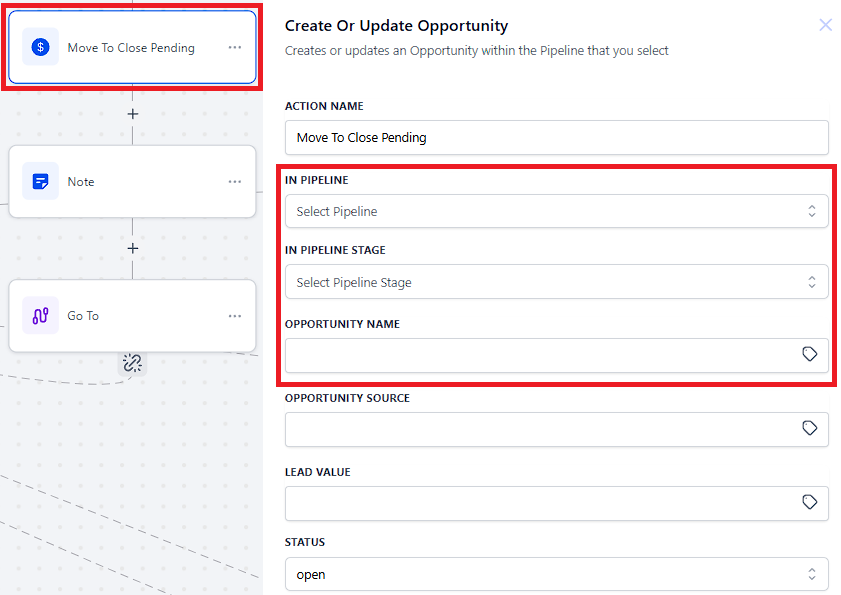
Create or Update Opportunity
Select the In Pipeline and Pipeline Stage by clicking the box. This Action creates or updates an Opportunity within the Pipeline that you select. Make sure to update the Opportunity Name to {{contact.name}}.
Add Notes
Click the "+" icon and select the action or type "Add Notes". This action will add system notes to the contact record.

Go To
To use a Go-To step, simply add a Go-To event and then draw a line to where you want the contacts to jump. This Go-To event allows you to jump contacts to Send Recap to Contact.
Create or Update Opportunity
Select the In Pipeline and Pipeline Stage by clicking the box. This Action creates or updates an Opportunity within the Pipeline that you select. Make sure to update the Opportunity Name to {{contact.name}}.
Add Notes
Click the "+" icon and select the action or type "Add Notes". This action will add system notes to the contact record.
Go To
To use a Go-To step, simply add a Go-To event and then draw a line to where you want the contacts to jump. This Go-To event allows you to jump contacts to Send Recap to Contact.
Create or Update Opportunity
Select the In Pipeline and Pipeline Stage by clicking the box. This Action creates or updates an Opportunity within the Pipeline that you select. Make sure to update the Opportunity Name to {{contact.name}}.
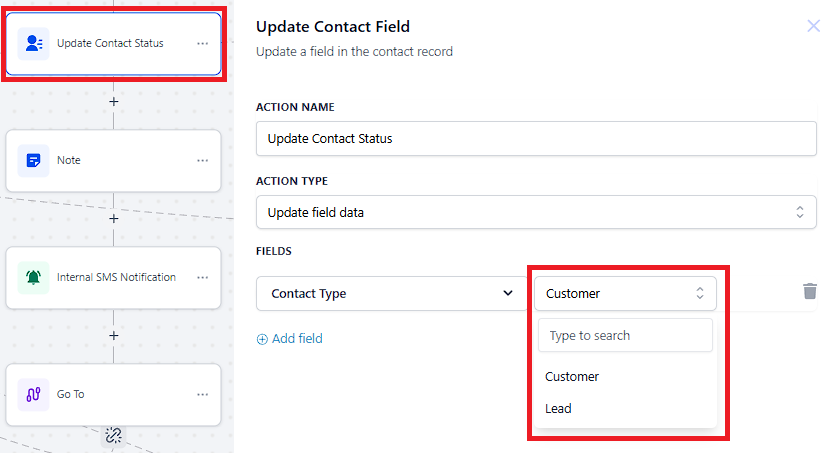
Update Contact Field
Click the "+" icon and select the action or type "Update Contact Field". The update contact field action in workflows allows you to update the value of a specific field for a contact. In this example, the Contact Type is changed from Lead to Customer.
Add Notes
Click the "+" icon and select the action or type "Add Notes". This action will add system notes to the contact record.
Go To
To use a Go-To step, simply add a Go-To event and then draw a line to where you want the contacts to jump. This Go-To event allows you to jump contacts to Send Recap to Contact.

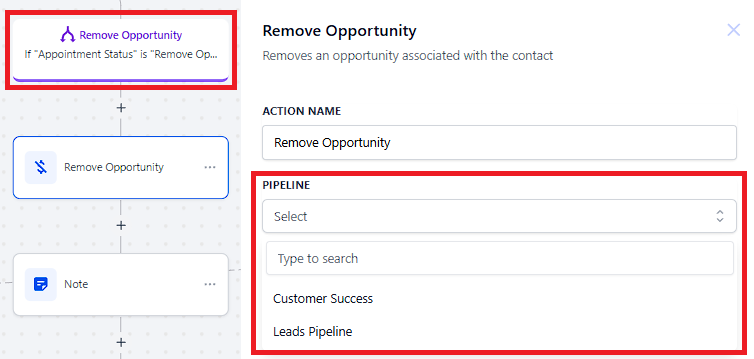
Remove Opportunity
Click the "+" icon and select the action or type "Remove Opportunity". This action deletes an opportunity associated with the contact within a specified pipeline.
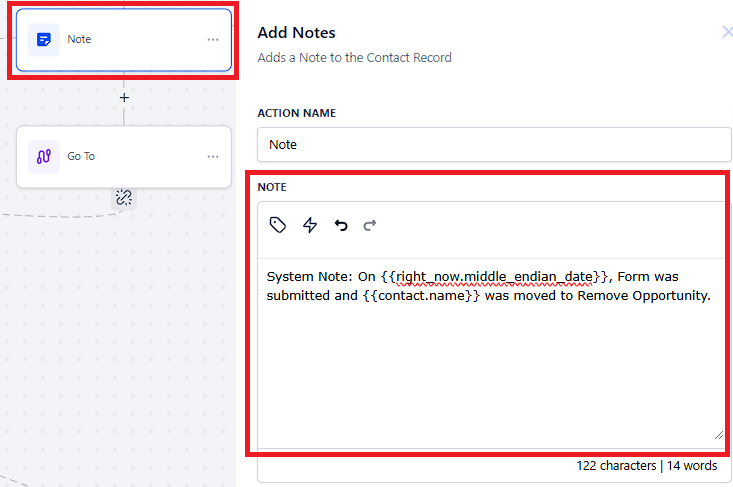
Add Notes
Click the "+" icon and select the action or type "Add Notes". This action will add system notes to the contact record.
Go To
To use a Go-To step, simply add a Go-To event and then draw a line to where you want the contacts to jump. This Go-To event allows you to jump contacts to Send Recap to Contact.
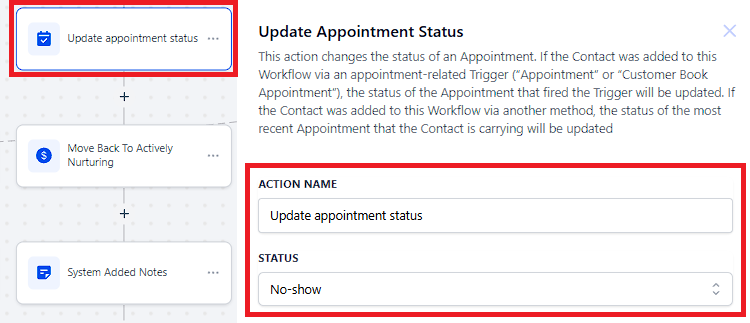
Update Appointment Status
Click the "+" icon and select the action or type "Update Appointment Status". This action changes the status of an existing appointment in the workflow.
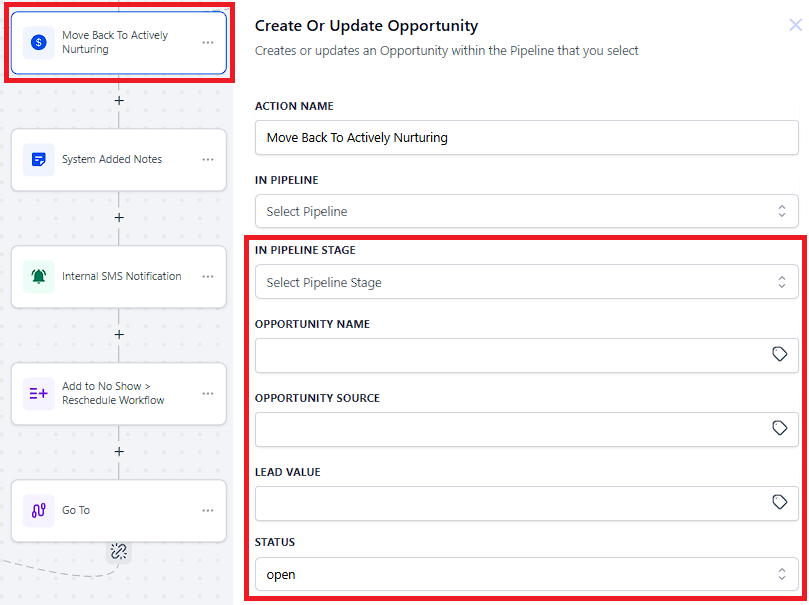
Create or Update Opportunity
Select the In Pipeline and Pipeline Stage by clicking the box. This Action creates or updates an Opportunity within the Pipeline that you select. Make sure to update the Opportunity Name to {{contact.name}}.
Add Notes
Click the "+" icon and select the action or type "Add Notes". This action will add system notes to the contact record.

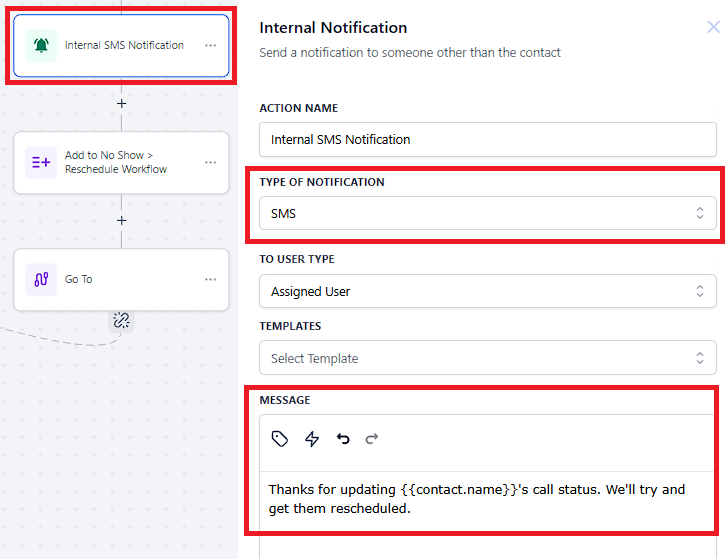
Internal Notification
Click the "+" icon and select the action or type Internal Notification. This action sends SMS to users based on specific triggers within a workflow.
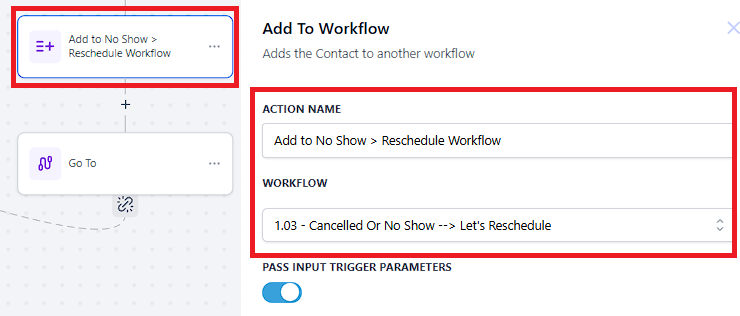
Add to Workflow
Click the "+" icon and select the action or type Add to Workflow. The "Add to Workflow" action is used to automatically add a contact to a specified workflow - 1.03 - Cancelled Or No Show --> Let's Reschedule
Go To
To use a Go-To step, simply add a Go-To event and then draw a line to where you want the contacts to jump. This Go-To event allows you to jump contacts to Send Recap to Contact.
Go To
To use a Go-To step, simply add a Go-To event and then draw a line to where you want the contacts to jump. This Go-To event allows you to jump contacts to Send Recap to Contact.
The "Form Submitted" trigger activates a workflow whenever a specified form is submitted.
Upon activation of the If/Else Condition Action, it will have 8 outputs that depend on certain conditions.
Move To Actively Nurturing
Move To Scheduled Appointment
Move To Offer Pending
Move To Close Pending
Closing Complete
Remove Opportunity
No Show
All end output will send an email recap to a customer or lead.
